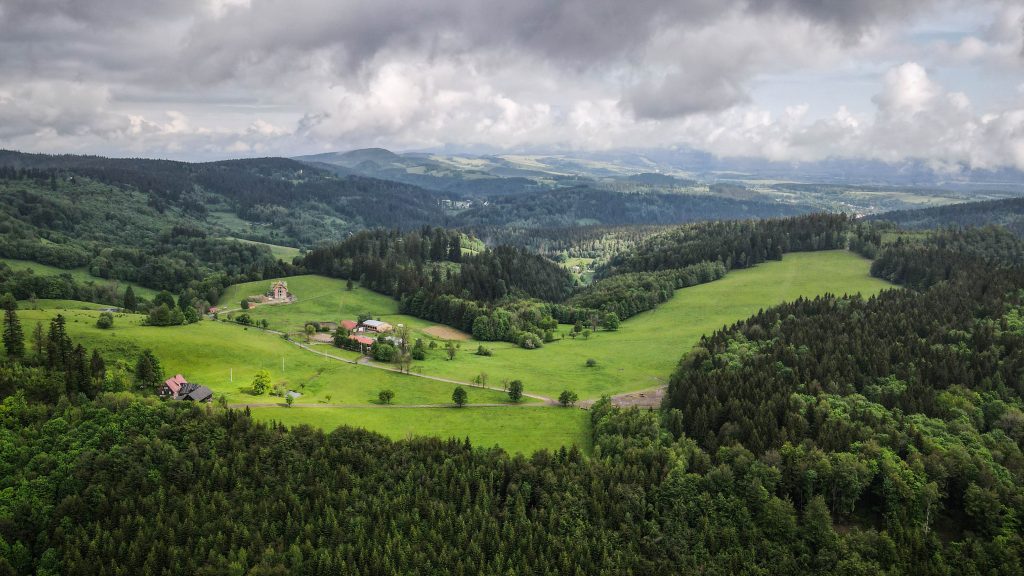
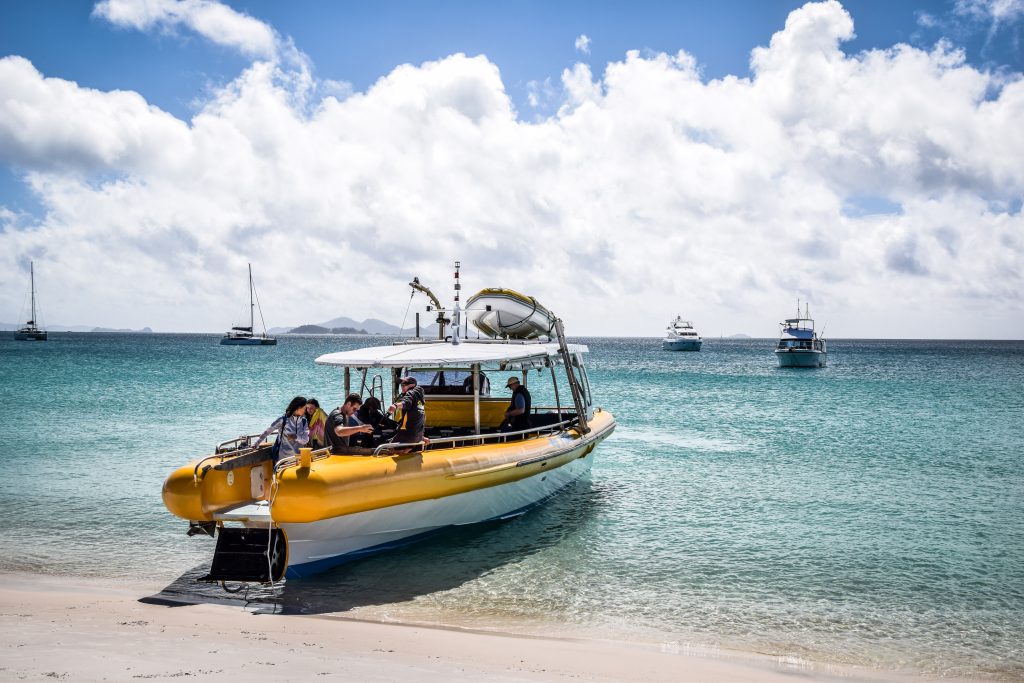
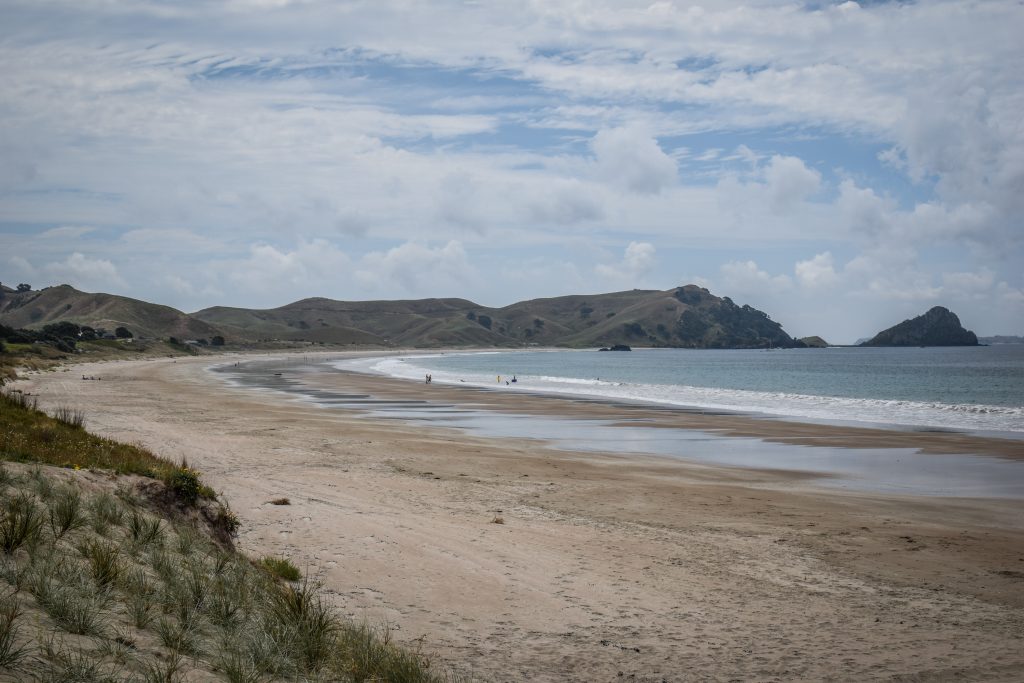
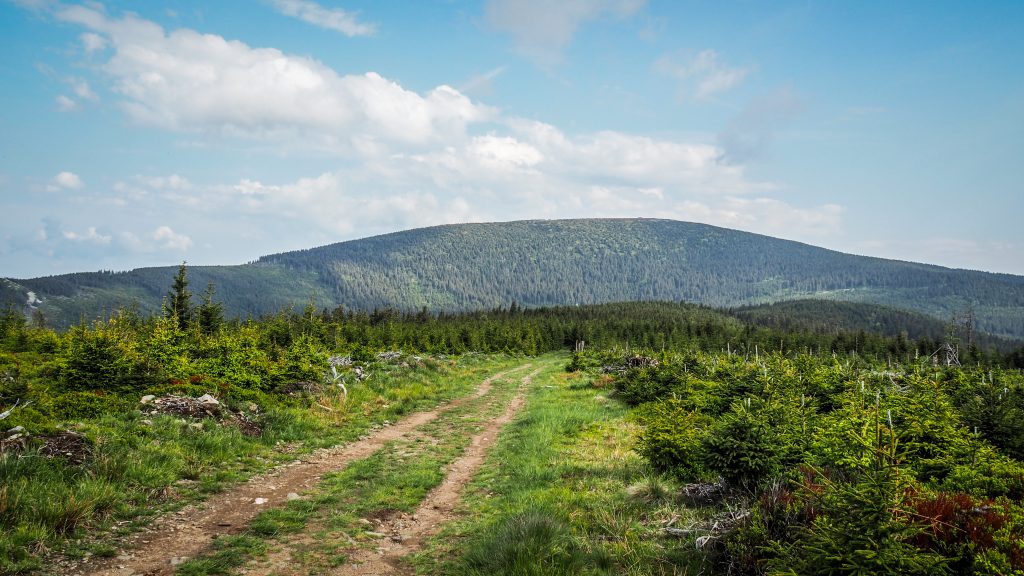
There are 74 islands in the Whitsunday archipelago which lies between the northeast coast of Queensland and the Great Barrier Reef. Most of the islands are uninhabited while the most popular among tourists is definitely Whitsunday Island. Airlie Beach is the major gateway, where you can book lots of tours and activities. For me, it wasn’t any different. I arrived in the early morning and made my way directly to the meeting point of my tour.
I spent a lot of time browsing different boat tours and looking for the best quality to price ratio. Overnight yachts tours sound to be an amazing experience, however, it’s Australia and such attractions aren’t cheap. That’s why I chose 1-day tour on an open-air speedboat operated by Big Fury. The standard price is 170 AUD but you can usually find a slightly better price on BookMe.
What to bring?
You definitely don’t need much. Pack your swimwear, towel, sunscreen, sunglasses and some warmer hoodie or jacket just in case. There isn’t too much walking involved so don’t worry about your shoes either.
1-day itinerary
The departure time of the tour was at 10 AM and a few minutes before we were greeted by the staff. They checked passengers list and gave us kind of swimsuits that we were supposed to wear while snorkelling. Fins and goggles were available on the deck as well.
We quickly gained speed and soon reached the first spot for snorkelling. Not the best though! Corals and fish were nice but nothing extraordinary. The worst was the temperature of the water was really cold and after a few minutes, I wasn’t interested in swimming but simply wanted to warm up on the deck. The swimsuits were rather designed to protect from the stingers (which wasn’t a problem anyway at this time of the year) rather than keep me warm.
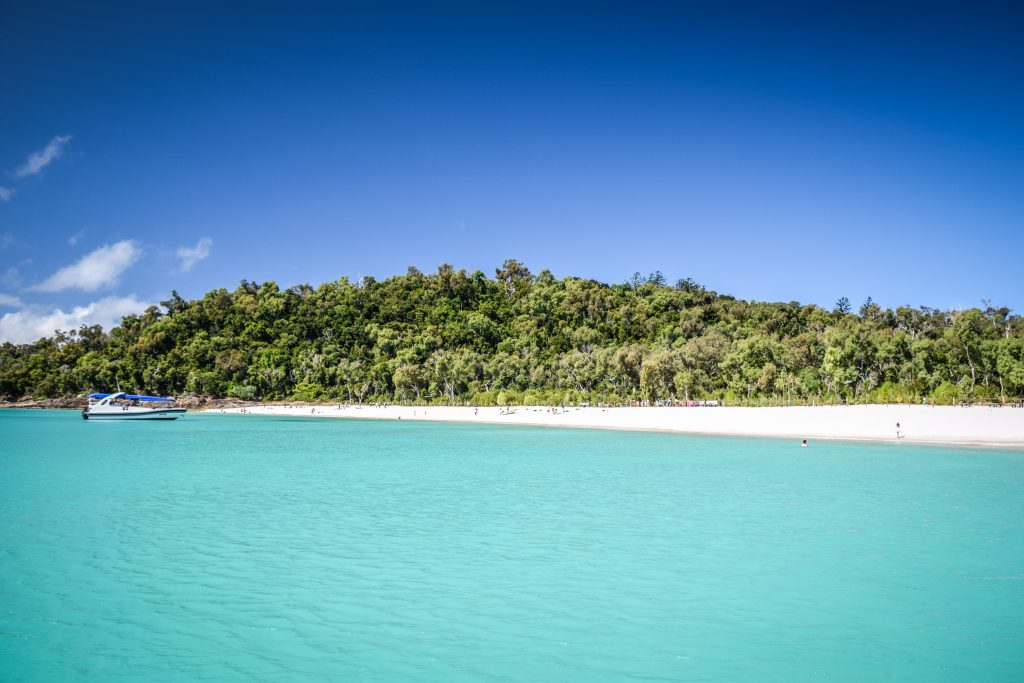
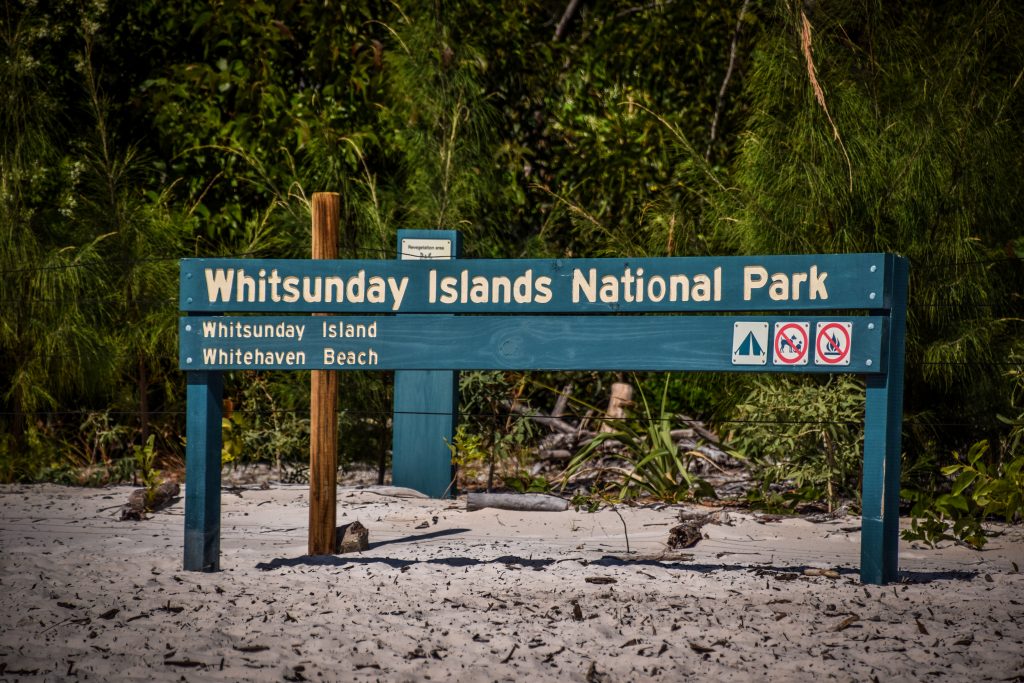
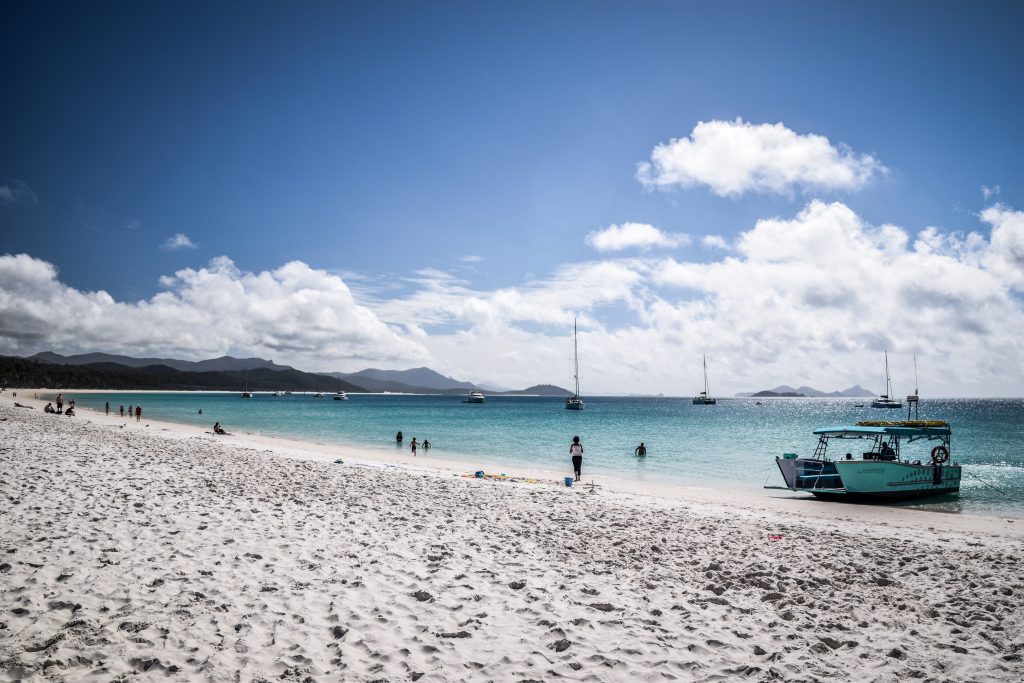
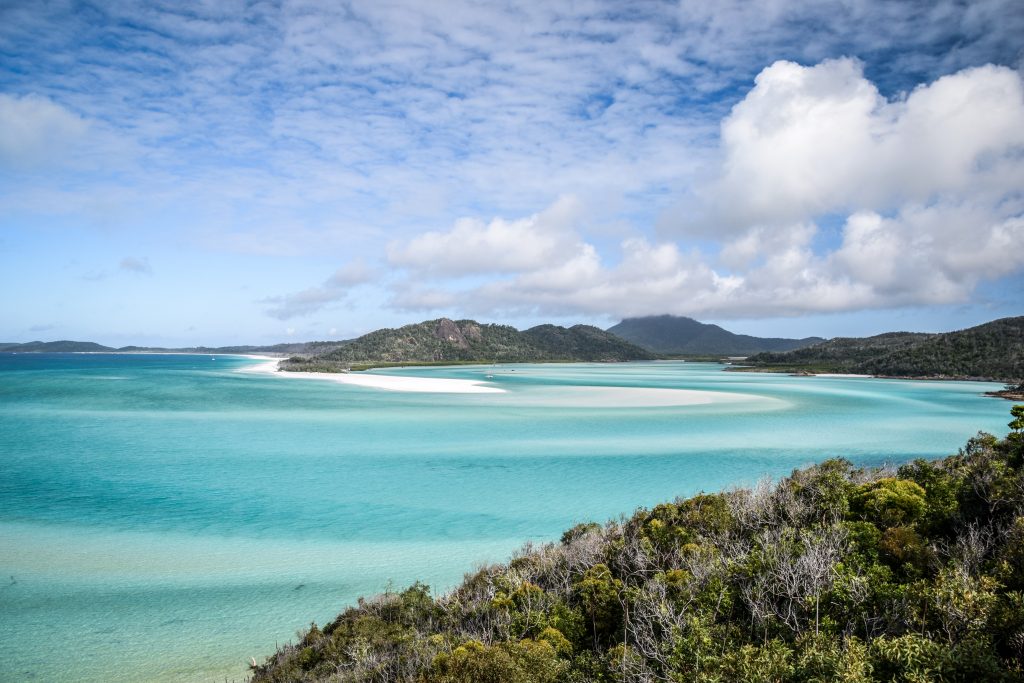
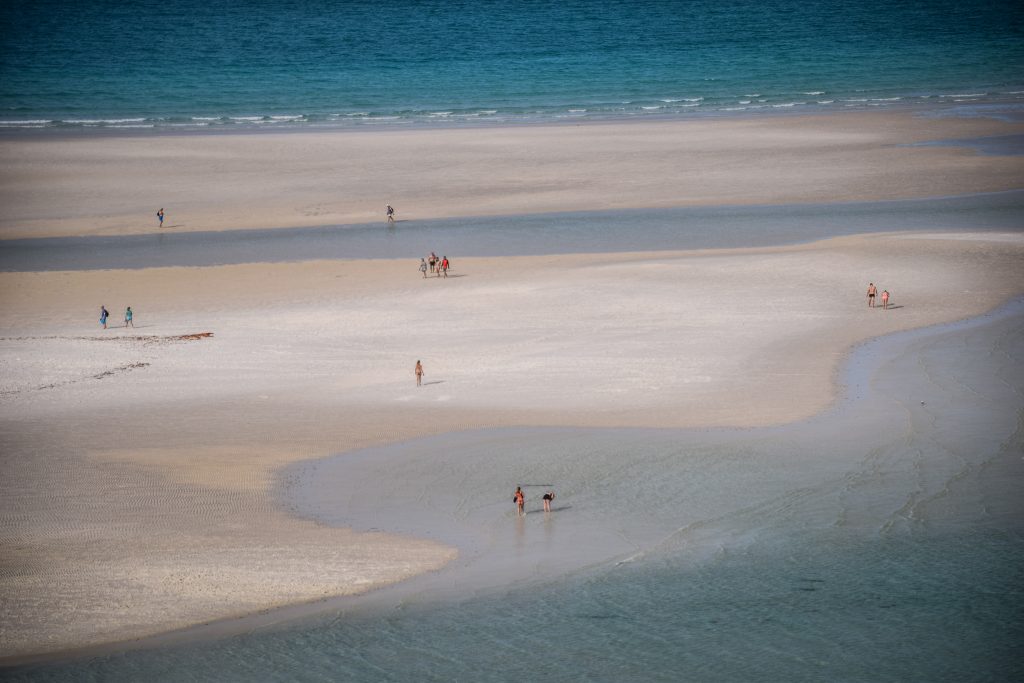
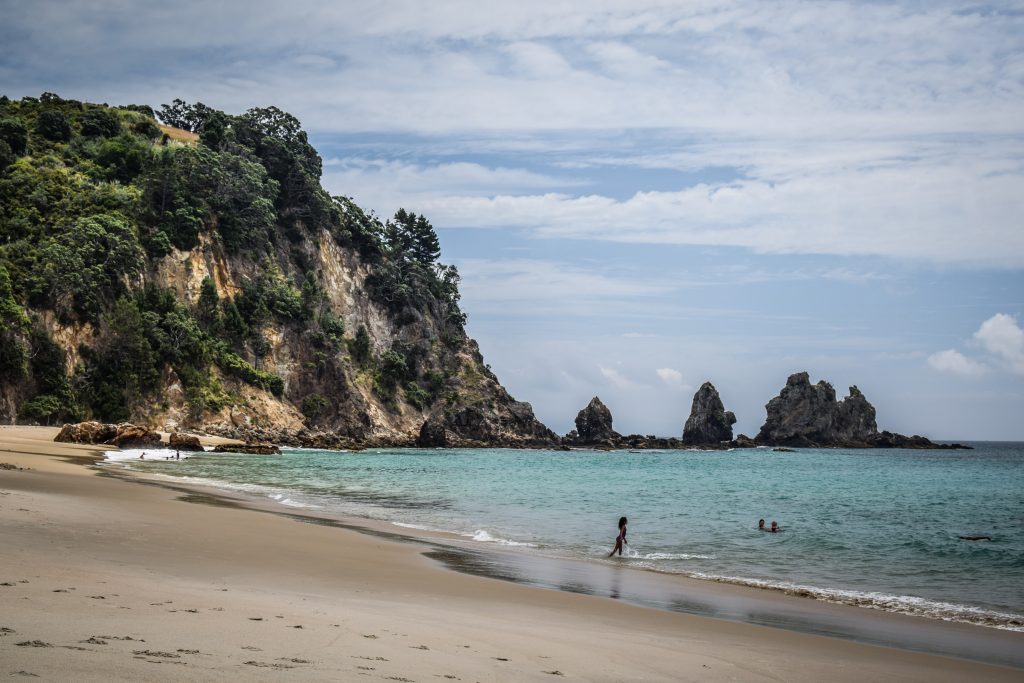
The next stop was on the famous Whitehaven Beach which stretches for 7 kilometres. It is considered to be one of the best in the world, mainly due to its bright white sands, which consist of 98% pure silica. The sand on Whitehaven Beach does not retain heat making it comfortable to walk barefoot on a hot day.
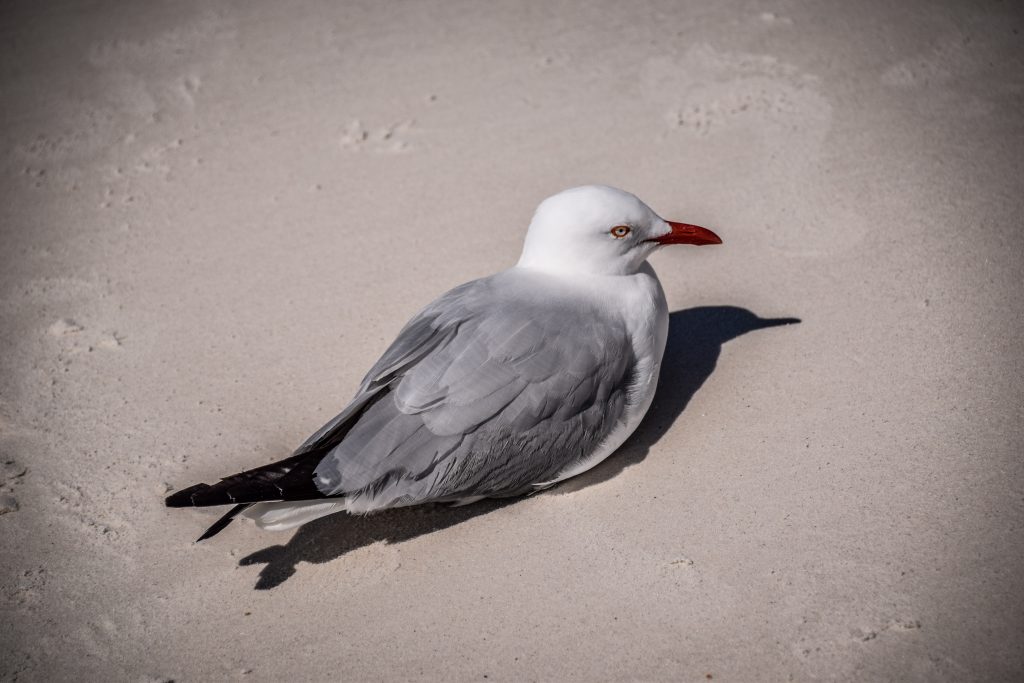
Not too bad colours, right?Let’s get ready to explore the island!Seagulls like the island tooThe whole area is protected as a national parkWhitehaven beach is 7 km long
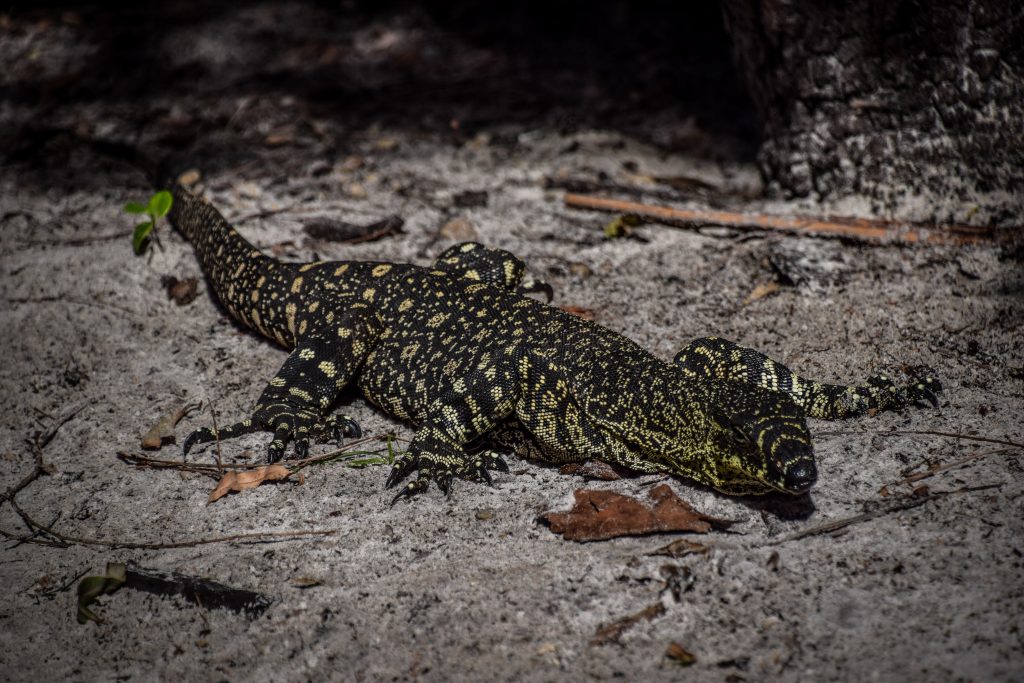
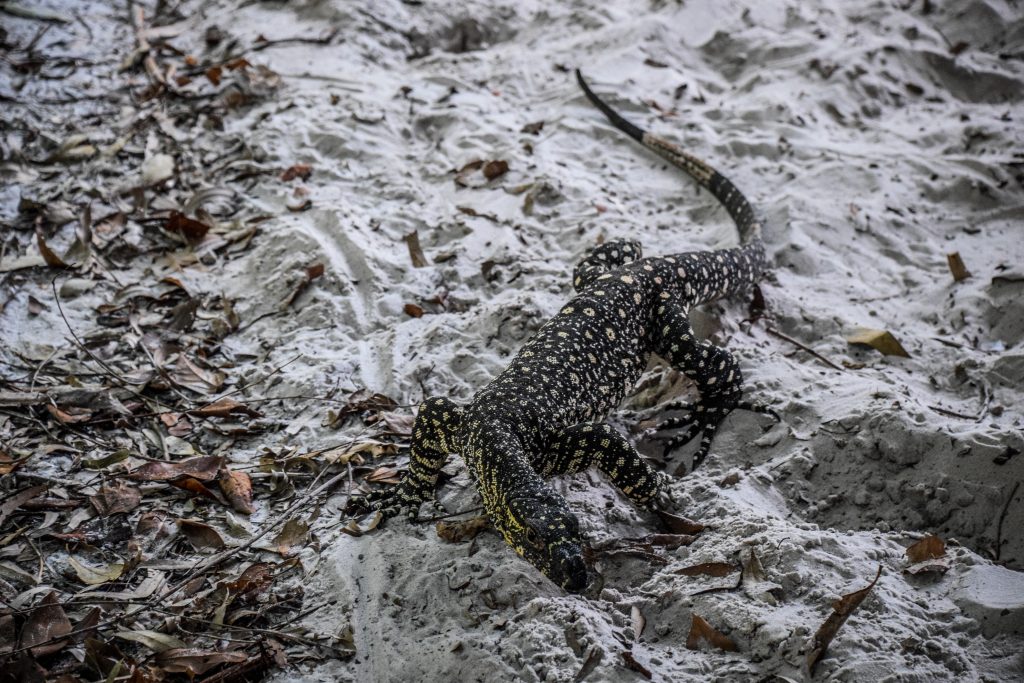
After some chillout time here, it was time for lunch. It came in the form of a buffet in a shaded spot and was really delicious! The smell and noise attracted goannas that came out of the bush to look for an easy meal. Goannas are some species of lizards of the genus Varanus found in Australia and Southeast Asia.
There are plenty of goannas around the shaded lunch spotLooking for food leftovers that was dropped by humans
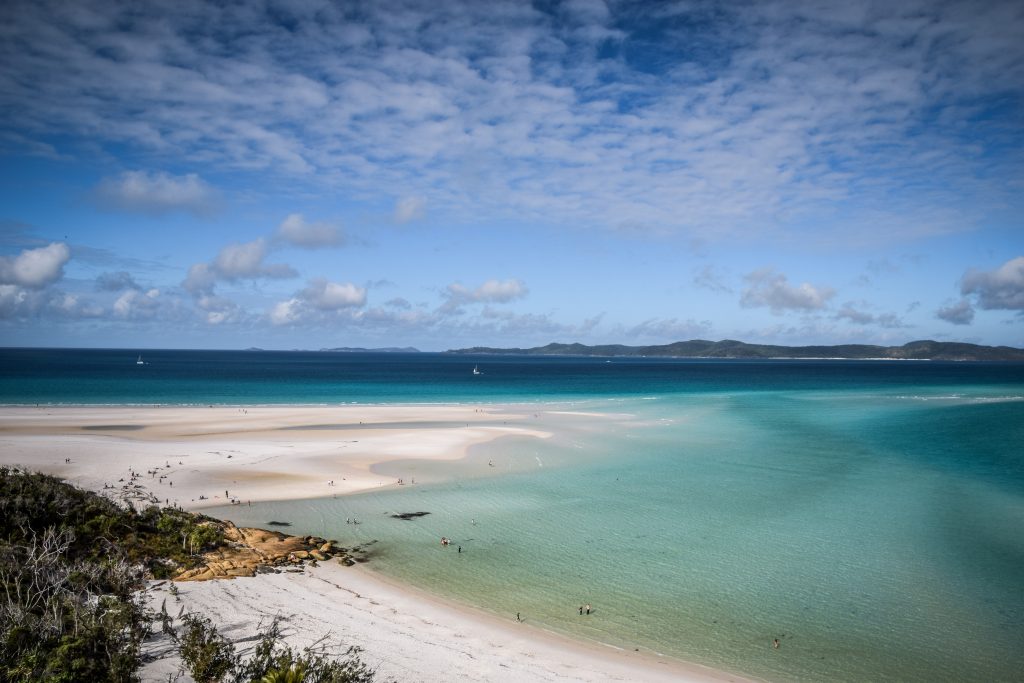
There was still some time left until the departure so I went for a short walk towards South Whitehaven Beach Lookout. The view is really good and there were almost no other people! The last stop was on the other side of Whitehaven Island to see the panorama from the famous Hill Inlet Lookout. It’s one of the best known, postcard style views from Australia with breathtaking swirling sands and unique colour of the water. The distance to walk is 1.3 km (return). Definitely worth seeing, even though the place is usually very crowded as every tour stops here.
Classic view from the Hill Inlet Lookout……and the other side with amazing white sands
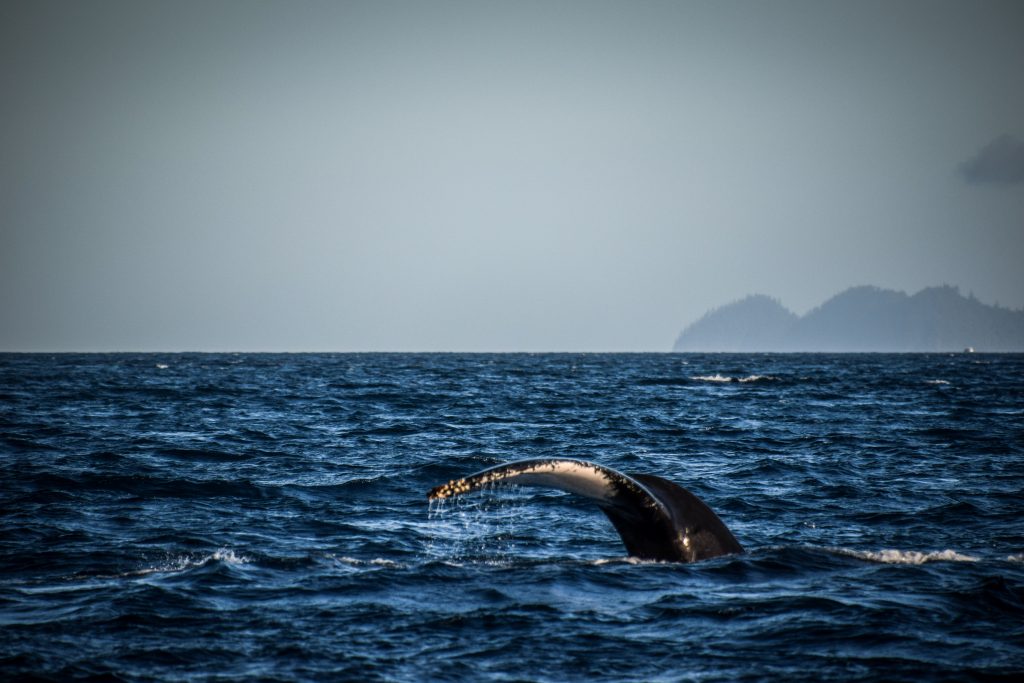
On the way back to the port, the captain reduced the speed couple of times, looking around for humpback whales. There wasn’t any sign of one at first but then one of the passengers spotted one in the distance. Unfortunately, it was quite far away from the boat and I was able to take a picture with maximum zoom, but the quality is far from perfect. Still, better than nothing!
Humpback whale making a splash
We were back in the marina about 5 PM and I was really full of positive emotions after a lovely day. Sure, I could easily imagine cruising around the islands for additional days, exploring them more in detail and sleeping on a campsite or on the deck. However, considering the costs, a 1-day trip with Big Fury is a great deal for backpackers and budget travellers.
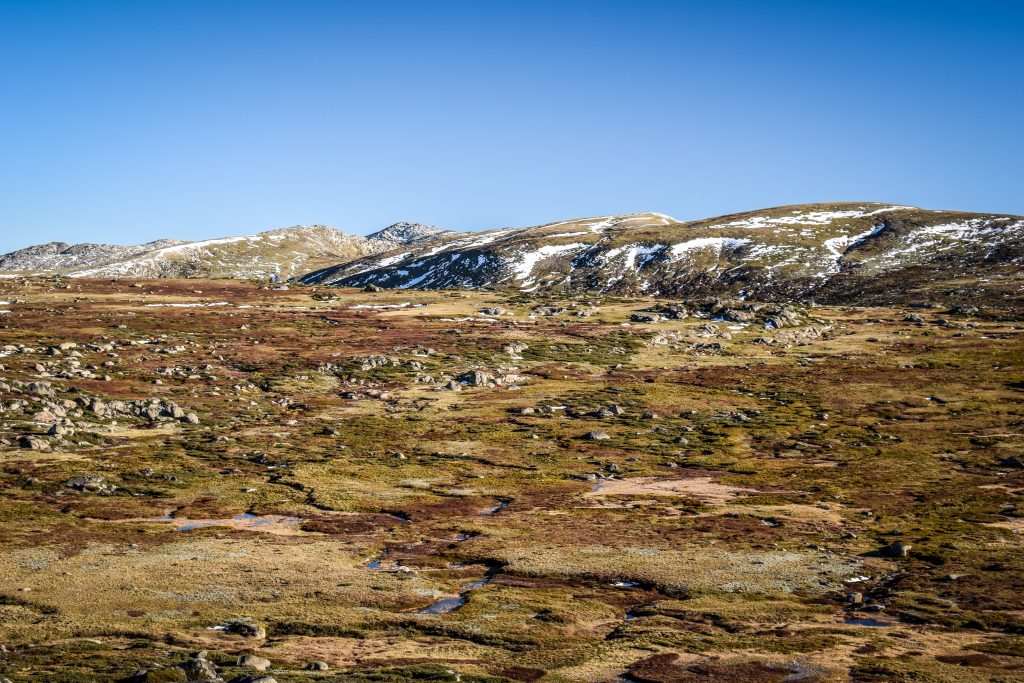
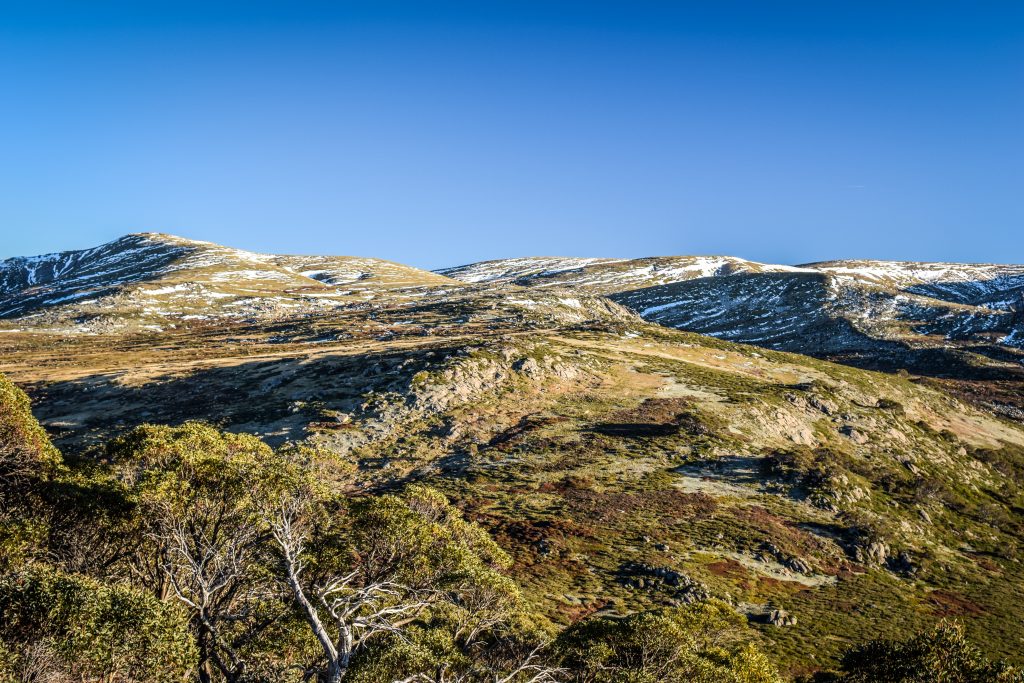
The park is named after Mount Kosciuszko, which at 2,228 metres is Australia’s highest mountain. The best way to discover the area is to go for a walk. Nature enthusiasts will be rewarded with alpine views, crystal clear streams, glacial lakes and historic huts.
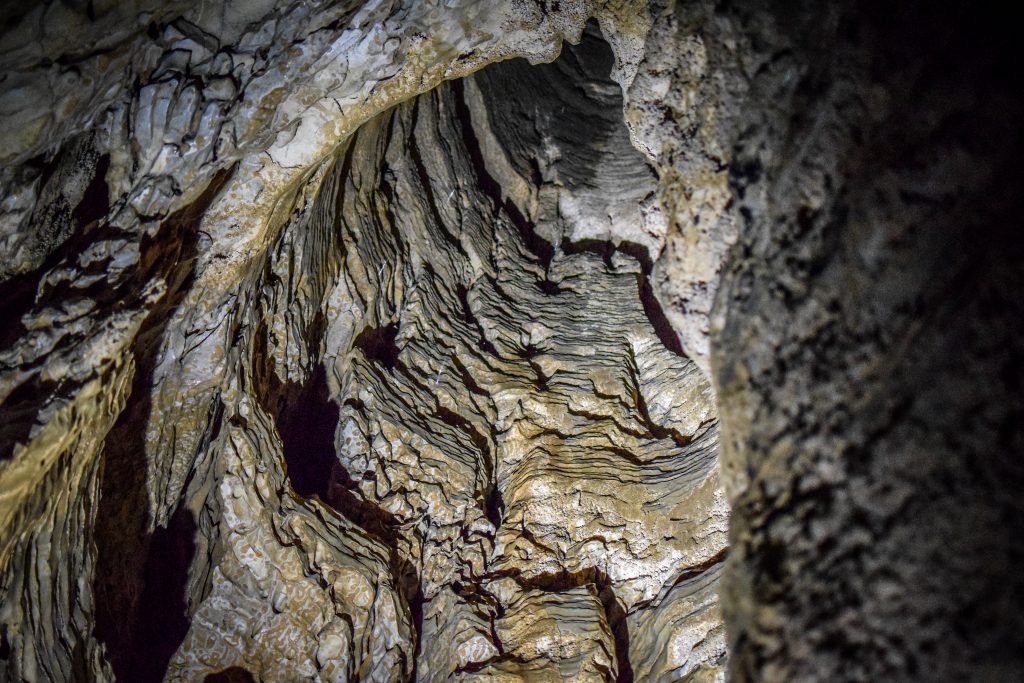
At the northern end of the national park are the Yarrangobilly Caves. The limestone dates back 440 million years. An impressive place to discover with an extra opportunity to relax in a naturally heated thermal pool. Don’t forget your swimmers!
During winter, it’s one of the best places in the country for skiing. All New South Wales alpine resorts are within Kosciuszko National Park: Perisher Blue, Charlotte Pass, Thredbo and Mt Selwyn.
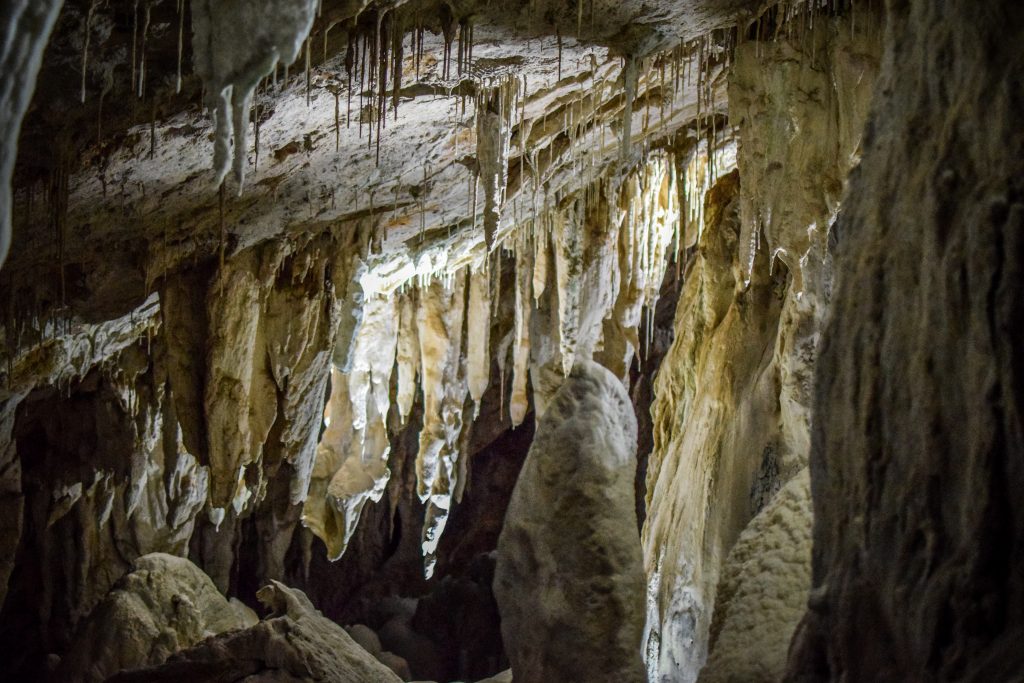
I made my first stop at Yarrangobilly Caves Visitor Centre to purchase 24 hours pass to the National Park. It costs $17 per vehicle per day (24hrs) and includes free entrance to some of the self-guided caves in the area. I was advised to visit South Glory Cave first and that was exactly what I did.
Yarrangobilly’s karst landscapes were created from a belt of limestone laid down about 440 million years ago. Karst environments preserve evidence of climate change, floods, droughts, fires, animal and human activity. All of that makes it an incredible place to discover.
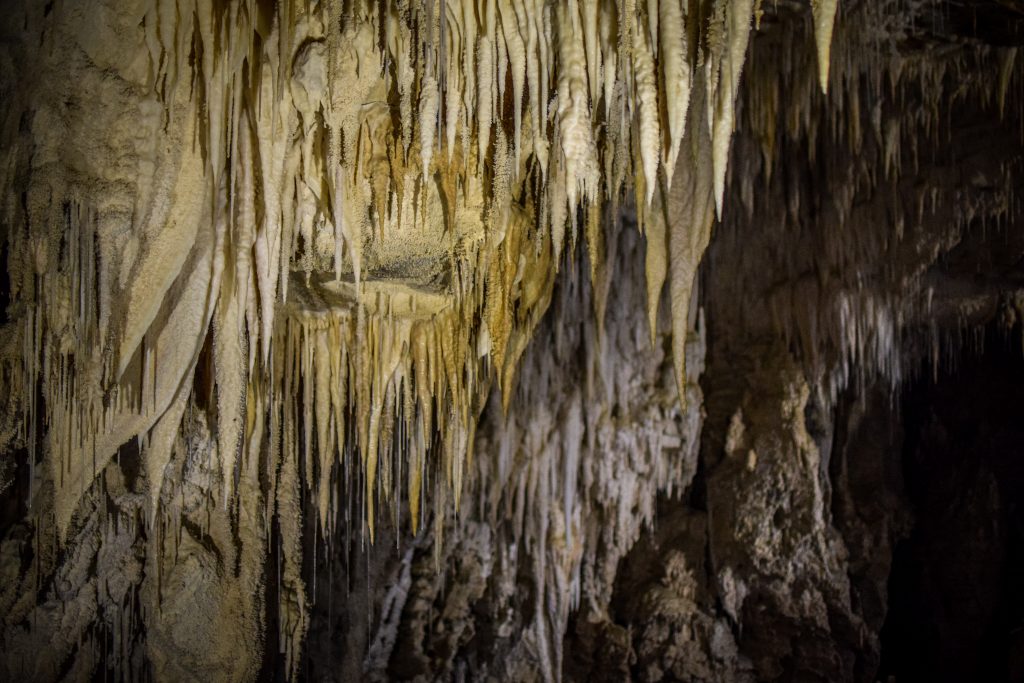
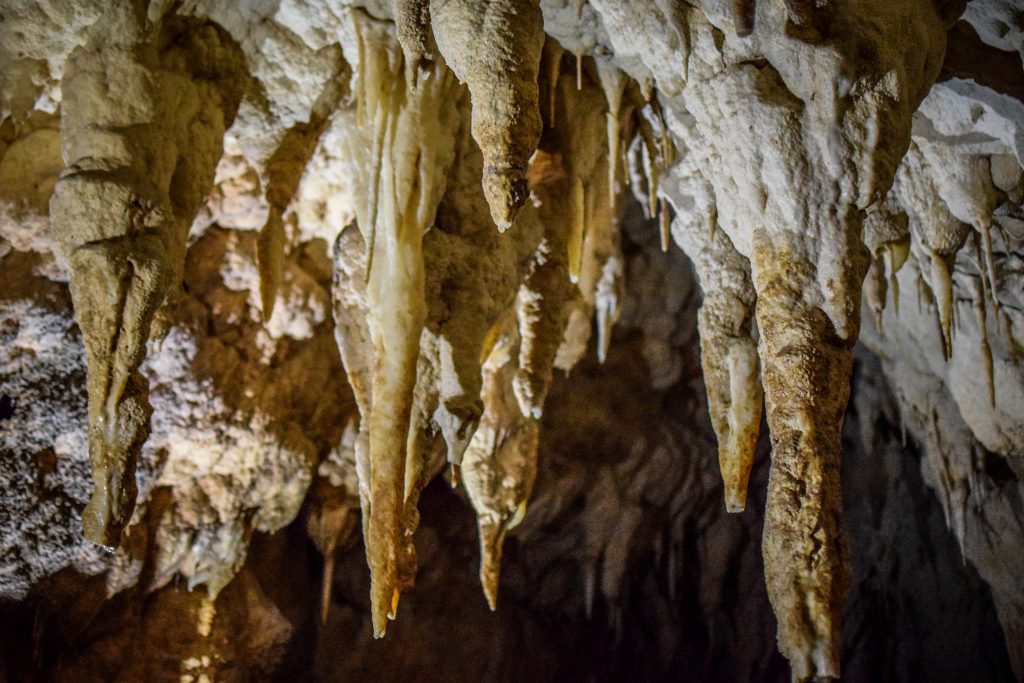
South Glory Cave is the largest one in the Yarrangobilly area of Kosciuszko National Park. I drove past the visitor centre following the signs to the parking. All that area can be easily accessed with a 2WD vehicle. From there, the cave is accessed along a 500m gravel track, leading to Glory Arch. Yarrangobilly river flows just down the escarpment.
The fact that the tour is self-guided makes it much more interesting than just following a group. I was inside completely alone and it took me around half an hour to go through and read information signs. Even though there are sensor lights that switch on as you approach, having your own flashlight is essential. Moreover, the average temperature in this cave is around 10 C so bring a hoodie or a jacket.
After visiting South Glory Cave, it’s a good idea to hike the Castle Cave Walk with the views to limestone cliffs and Mill Creek Gorge. and on to Castle Cave. The track is 3.2 km return and shouldn’t take you more than an hour. Detailed map of the track can be found on the website of NSW National Parks.
If one short track is not enough, head back towards the parking and join Yarrangobilly River Walk. It’s an easy 3 km loop beside the river with an interesting stop on the way – Thermal Pool. Water temperature is on a constant level of 27C so bring your swimsuit and towel! It was nice to jump in and refresh my body, especially after a visit in a cold and damp cave. Detailed map of the track can be found on the website of NSW National Parks.
Glory Farm Walk is a short extension to the thermal pool walk. It’s 2.8 km long (return hike) and follows Yarrangobilly River to the site of Henry Harris’s Glory Hole Farm which provided meat and vegetables for the Kiandra miners in the late 1800s.
There are more caves in the area: Jillabenan Cave, Jersey Cave and North Glory Cave. The first one can be visited on a guided tour. It’s the smallest of the Yarrangobilly Caves with the path through it being 73m long. I didn’t join the tour as visiting South Glory Cave fulfilled all my expectations towards stalagmites and stalactites 🙂 Jersey Cave and North Glory Cave are closed until further notice.
After longer than expected visit in Yarrangobilly Caves, it was time to move on toward Thredbo, which was over 2 hours away.
Mount Kosciuszko Summit (Main Range Walk)
There is not much to do in Thredbo outside of ski season. I had a short walk but then simply made my way to Ngarigo campground which is located along Alpine Way. The place isn’t big but there was only one more campervan parked. I have no idea what the temperature in the night was, but it was damn cold! Definitely the coldest night in Australia during my trip. I used everything I could: blankets, sleeping bag and hoodie.
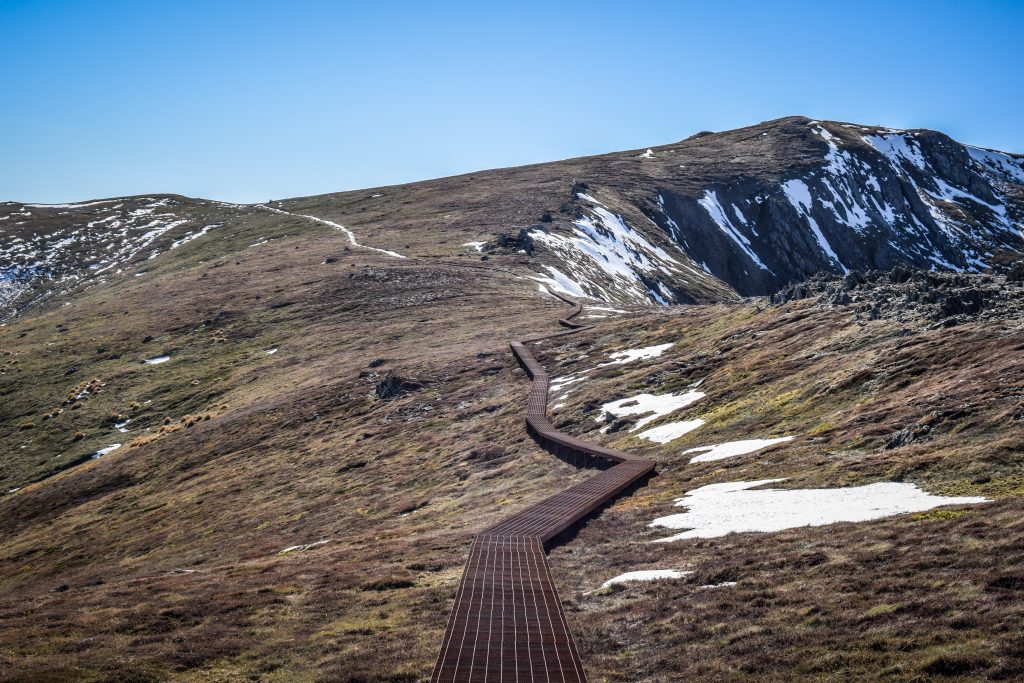
I woke up at dawn I set off without breakfast. It was the first time that I had to turn on the heating as the front windshield got icy! The way to the parking at the end of Kosciuszko Road took me about 1 hour. After breakfast, I packed my backpack and followed the Summit Track. The distance to the summit is 9.3 km (about 2 hours) but I had the plan to take another path on the way back, completing the loop called the Main Range Walk. It’s a 22 km loop that in theory should take between 7-9 hours but in my case, it was rather closer to 5-6 hours.
The morning was very cold but the sun was rising higher and higher warming up the air. Small streams along the track got frozen and there was snow clearly visible in the upper parts of the mountains. I definitely didn’t expect to see it in Australia!
Glacier-carved landscape in Kosciuszko National ParkMornings in late May can be quite cold!Frozen water along the trackAlpine meadows
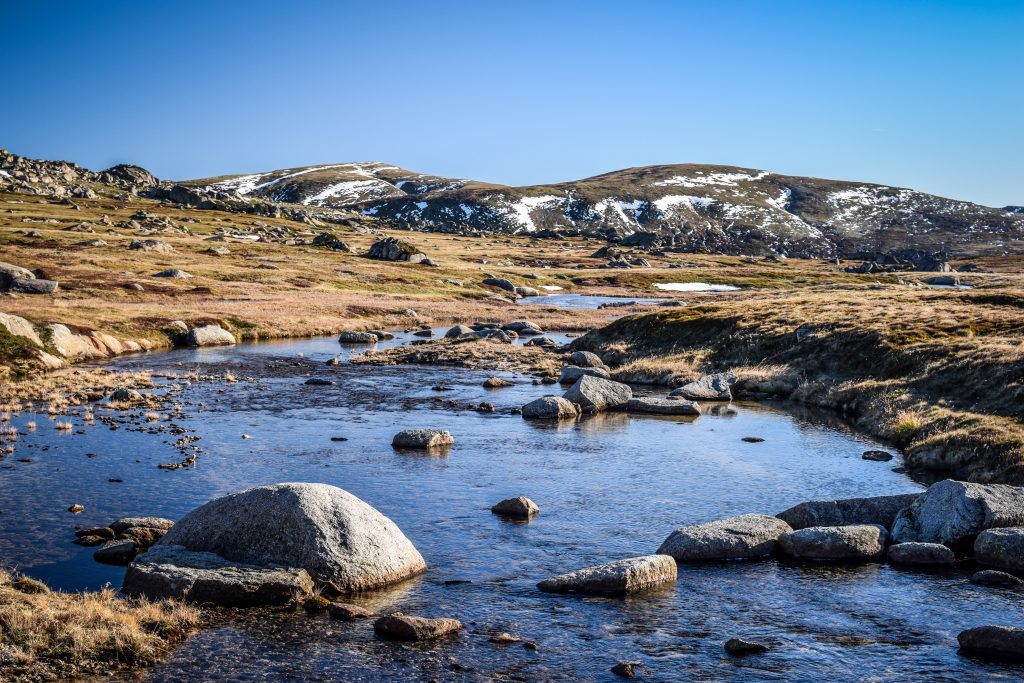
I crossed Snowy River and then, 6 km from the beginning of the track, I passed Seaman’s Hut which is a small safe haven if the weather turns. Rawson Pass is another 1.7 km away. Here it was the time to turn right and make the final ascent to the summit of Mount Kosciuszko.
You may wonder, where the name comes from?
It was given by Polish explorer Count Pawel Edmund Strzelecki who was the first to summit the peak in 1840. It refers to Polish hero General Tadeusz Kosciuszko, a prominent figure in the American revolution. Apparently, the highest Australian mountain looks similar to the sight in which General Kosciuszko was buried.
Approaching the summitViews from the top of Mount Kosciuszko
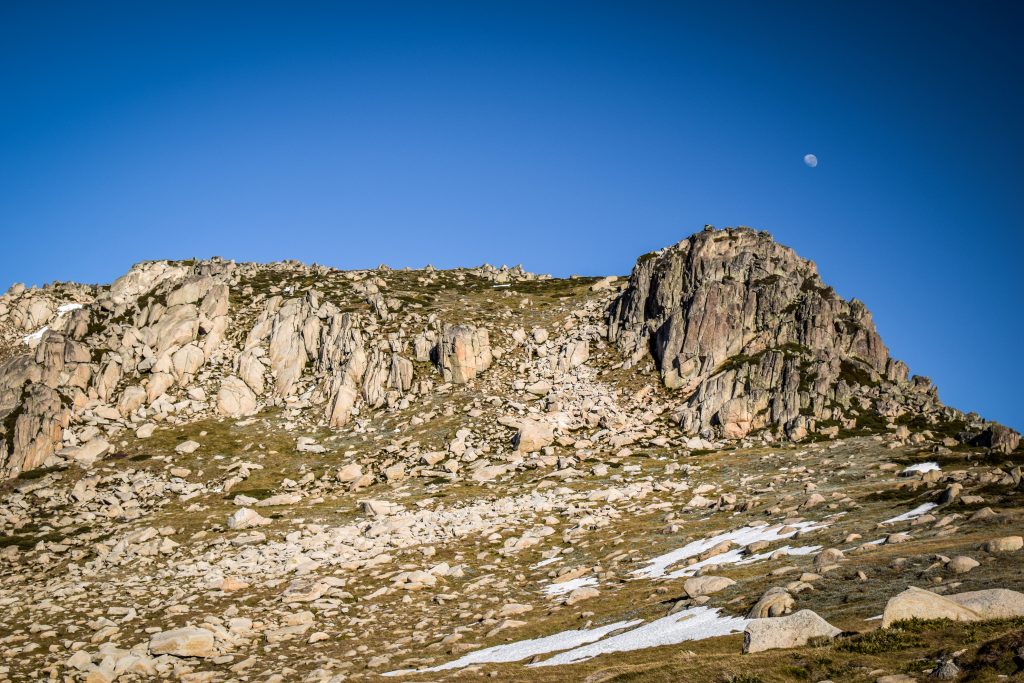
From the distance, the mountain doesn’t look impressive at all. But in sunny weather, the views from 2228 m a.s.l. are decent enough to justify the effort 🙂 Honestly, the landscape here doesn’t feel like Australia at all. Or maybe I just got used to the desert on one side and the ocean on the other?
Continuing the hike along the Main Range TrackWalking on the snow? Why not!Moon just hanging over the mountainPart of the track leads on metal platformsThe Main Range Walk is very scenic!Fantastic alpine viewsTrack covered by snowViews along the Main Range TrackUnique Australian landscape in Kosciuszko National Park
I started the descent following the same way as before but shortly after I turned left on the track leading towards Muellers Pass. Then, it continues to Northcote Pass which is just next to Albina Lake. There is an opportunity of a short detour to Blue Lake which is definitely worth doing.
I’m not sure what are the rules of freedom camping in Kosciuszko National Park but I saw two tents pitched on the meadows. Certainly, the nights are cold, but what a great location! If you are a camping enthusiast, consider doing the same.
After crossing the Carruthers Creek, the track goes to the meeting point of Club Lake Creek and Snowy River. From here, the last uphill section leads back to the parking lot.
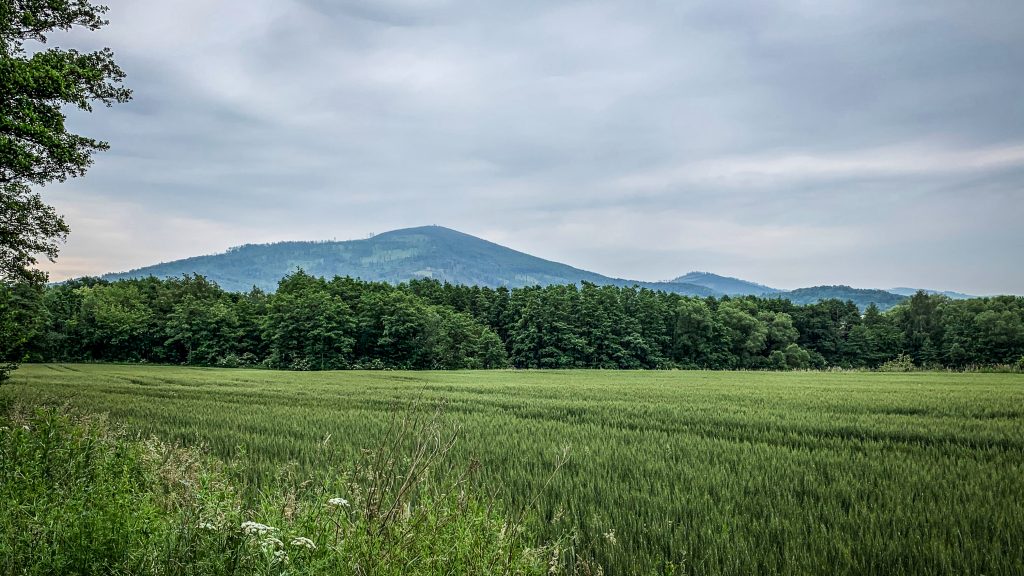
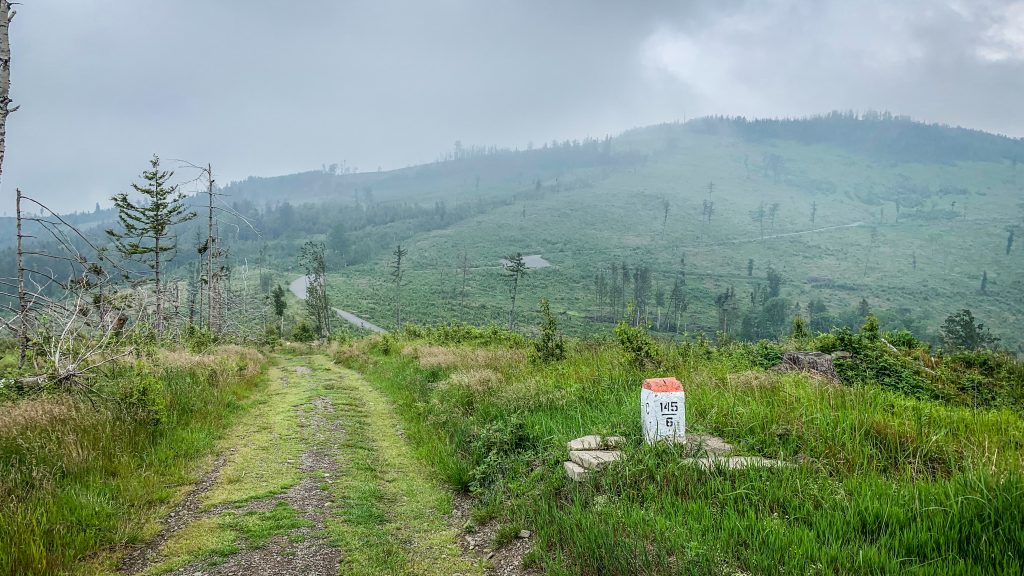
Finally, the moment has come. The last day on the Main Sudetes Trail. I left Głuchołazy in the early morning and started ascent first to Przednia Kopa (495 m a.s.l.) and then to Średnia Kopa (543 m a.s.l.). Even though I already had over 400 km in my legs, I felt surprisingly well.
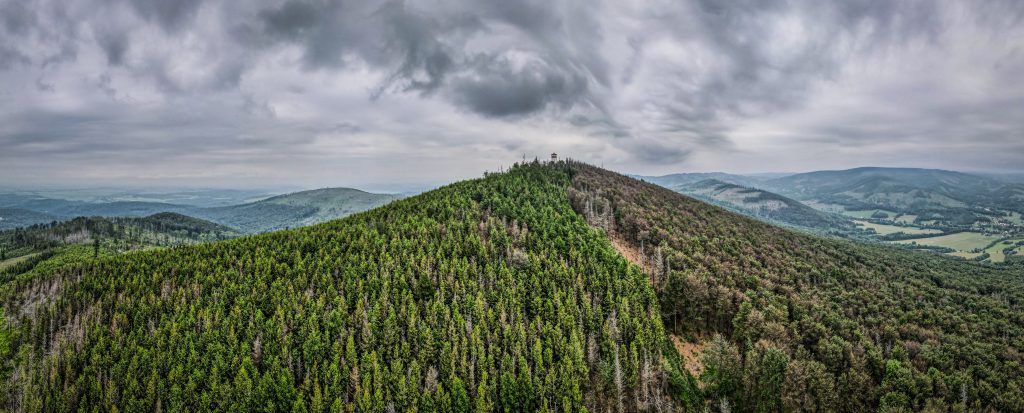
Next 7 kilometres through Podlesie to Jarnołtówek passed quickly due to easy and flat terrain. In the distance, I could already see the highest peak of Opawskie Mountains and the last mountain to tick off on the Main Sudetes Trail – Biskupia Kopa (890 m a.s.l.). It was also the last serious ascent, therefore I took a break for a second breakfast and to play with my drone.
Landscape around JarnołtówekBiskupia Kopa seen from the distance
It’s about 4 kilometres from Jarnołtówek to the top of Biskupia Kopa with over 500m of elevation difference. That’s just enough to warm up for real! Unfortunately, I had to make another stop and put the rain cover on my backpack as the weather was getting worse. There is a mountain hut “Pod Biskupią Kopą” just 15-20 minutes from the summit, in case you are in a need of a hot drink or a meal.
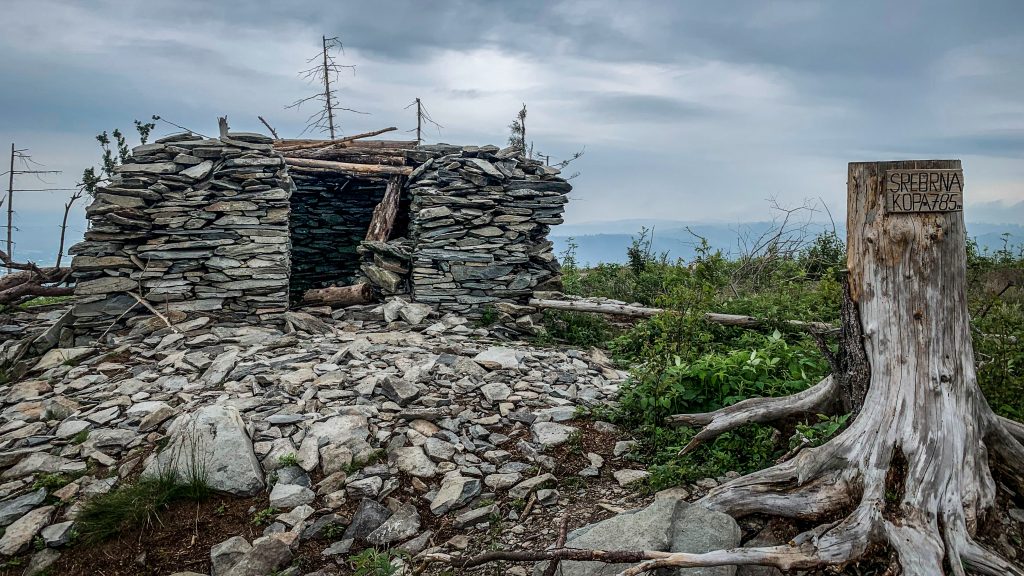
Once on top, I was on the border between two countries – Poland and the Czech Republic. Views are limited by the trees but there is an option to climb an observation tower that stands on the Czech side. I skipped it that time due to clouds rolling in and continued descent towards Srebrna Kopa instead.
Aerial view on Biskupia KopaOn top of Srebrna Kopa
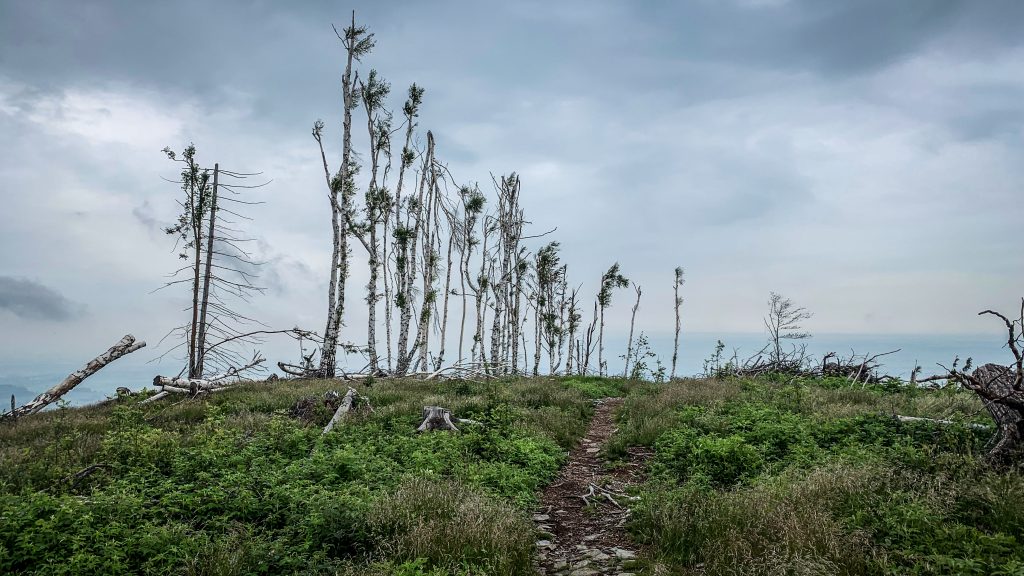
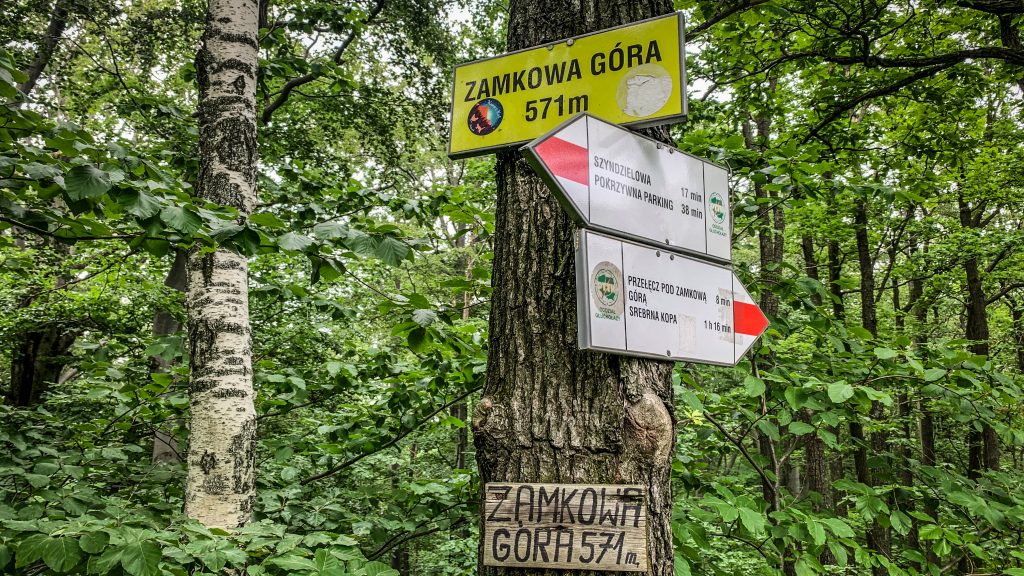
Soon, I reached Pass Under the Castle Mountain (Przełęcz pod Zamkową Górą) and then Castle Mountain (Zamkowa Góra – 571m a.s.l.) itself. Pokrzywna village, which is famous for its fishery, was only half an hour away.
From there to Prudnik it was less than 15 km left. My plan was to catch the last train of the day heading to Wrocław and spend the night in a hostel there, before continuing back to Świeradów Zdrój to pick up my car. Ambitious plan and no time to waste!
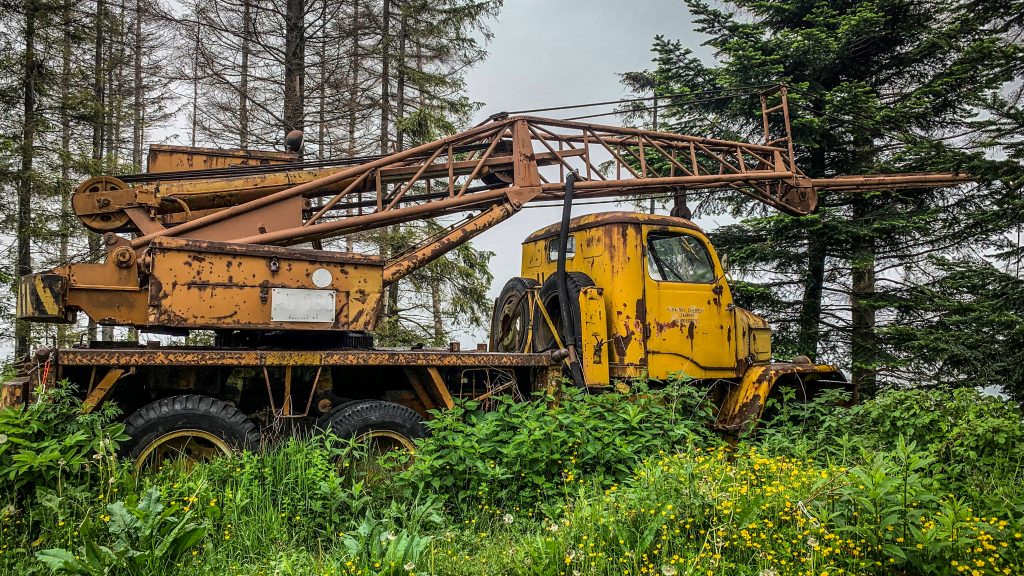
The trail goes along Polish and Czech borderFallen trees around the trailCastle Mountain (Zamkowa Góra)Spooky truck in the middle of nowhere
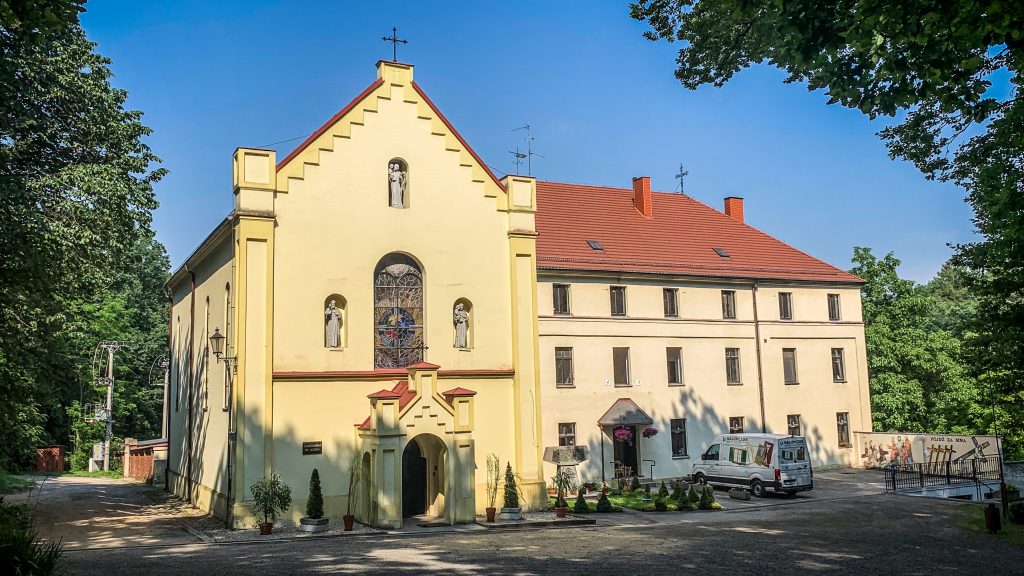
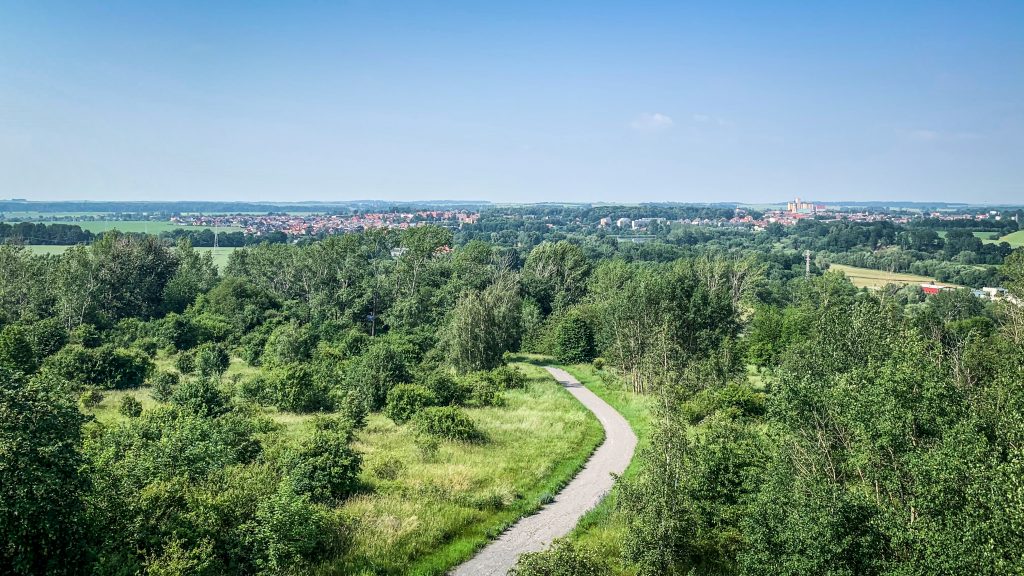
The trail continues through Wieszczyna and Dębowiec to Prudnicki Forest (Las Prudnicki) and a monastery where Cardinal Stefan Wyszyński was imprisoned, an important figure in Polish history. The Prudnik’s buildings are already visible on the horizon and I make the last stop to climb the observation tower on the Goat’s Mountain (Kozia Góra).
Monastery in Prudnicki ForestView to Prudnik from the observation tower
If you have some time in Prudnik, you may want to see the market square with a nice fountain, local museum and the church of St. Michael the Archangel.
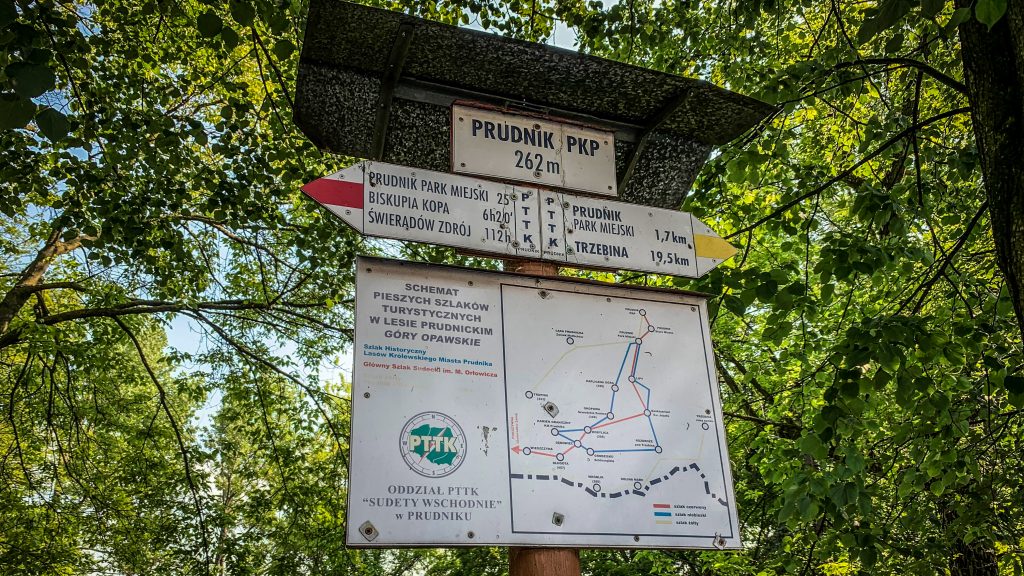
I walked quickly through the streets of the city towards the train station, where there is also a plate marking the end (or beginning) of the Main Sudetes Trail. It shows 112 hours to Świeradów Zdrój from where I started. How long did it take me? No clue. I wasn’t that ambitious to count hours 🙂
I finished walking the trail that most probably I would never walk if there wasn’t lockdown due to COVID-19. Was it worth doing? In such circumstances, for sure yes. I was really happy, satisfied and proud of myself that when most of the people locked themselves at homes, I could go out and spend several days close to nature.
Prudnik PKP – the end of the Main Sudetes Trail
Would I do it again if the borders are open and I can travel elsewhere? Probably not.
When I finished Tour du Mont Blanc a few months later, I couldn’t resist the feeling that I could walk it once again, even tomorrow. Because it was absolutely amazing. The Main Sudetes Trail, on the other hand, is just kind of a one-time experience. But still – a nice experience!
Stage 16 is complicated both logistically and physically. Between Paczków and Głuchołazy there are hardly any options for an overnight stay, not to mention long kilometres of walking on the asphalt roads.
Route planning
Total distance from Złoty Ztok to Głuchołazy is 58,5 km, which is clearly out of range for regular hikers. You may want to split it as follows:
Option 1: Złoty Stok – Paczków (13 km) and then Paczków – Głuchołazy (45,5 km)
Option 2: Złoty Stok – Piotrowice Nyskie (30.5 km) and then Piotrowice Nyskie – Głuchołazy (28 km)
Option 2 sounds more reasonable, though it involves overnight stay at Piotrowice Nyskie Palace, which isn’t particularly cheap. As it’s nearly the end of the hike, you can simply tell yourself that you deserve a little bit of a luxury 🙂
First kilometres towards Paczków
I hit the road in Złoty Stok following the main road passing through the town. Soon, on the right side, I noticed old lime kilns. If you want to learn more about their history, plan your first break here and have a look at the information board.
Finally the red track turn left leaving the main road and continues towards Błotnica and further to Kozielno and Paczków. Kozielno reservoir on your left is another nice place for a short break.
Kozielno Reservoir
What to do in Paczków?
Paczków was founded in 1254 and shortly after defensive walls were erected. Remains of them can still be noticed today. Besides that, several other places are worth seeing: City Hall, Church of St. John the Evangelist, Gas Museum and city towers: Ząbkowicka, Wrocławska and Kłodzka.
City Hall
A beautiful building with the tower that retained its original renaissance character until today. It can be climbed and the panorama of the entire city fully rewards the effort.
City Hall in Paczków
Church of St. John the Evangelist
The temple is really huge and towers over the city so you can’t miss it. The construction began in 1350 and lasted about 30 years. The current shape of the building is the result of reconstructions in the Renaissance, Baroque and Neo-Gothic styles. An interesting fact is that in the 16th century, fearing the invasions of the Turks, the temple was rebuilt and fortified. A round stone well was set up in the southern aisle, the only one in Europe that was located inside the church.
Church of St. John the Evangelist in Paczków
Gas Museum
The gasworks in Paczków was built in the years 1898 – 1901 and shortly after started providing permanent gas supply. Over 90 years later, the place was turned into a museum, being the only facility in Poland where all the municipal gas production facilities have been preserved. You can see a huge collection of gas lamps, meters, cookers, heating stoves, irons but also more weird objects such as refrigerator or curling iron. Unfortunately, it was closed on the day of my visit in town due to COVID-19 pandemic, but it must be an interesting and unique place to visit.
City Gates: Ząbkowicka, Wrocławska, Nyska and Kłodzka
System of medieval town fortifications in Paczków is one of the best-preserved examples of its kind in Poland. Initially, three city gates led to the ring of defensive walls and in the 15th century, a fourth was built. Currently, Wrocławka Gate can be climbed for panoramic views and at the Nysa Gate, there is a wooden, roofed walking gallery with viewing platforms open to the public free of charge.
Kłodzka Gate in Paczków
The Main Sudetes Trail used to end in Paczków but a couple of years ago, it was extended to Prudnik. Therefore, I had to postpone celebration and continue my hiking adventure for a little bit longer. I turned left just after Nyska Gate and followed the main road all the way to the turn leading to Unikowice. Asphalt road passes through the village, goes further to Lisie Kąty and then to Ujeździec. It was only 8 kilometres from Paczków but the road seemed to be incredibly long and just boring with no mountains views at all.
Small chapel with the indication of red track
There was still 10 kilometres between me and my bed for tonight. The boring path continued for 4 kilometres to Trzeboszowice. After passing it, the track turned right and took me to Ratnowice. Both are just another small villages en route without anything particularly interesting. For remaining distance, the landscape was quite monotonous. The only highlight was a young deer roaming the fields. Finally, I arrived at Piotrowice Nyskie and had the whole afternoon for relaxation after that difficult day. The distance was just fine, but walking on asphalt roads is usually much more tiring for the feet. Together with the monotonous landscape, it can be tiring for the mind too.
The Main Sudetes Trail enters small village of Ratnowice
The following day started with 3 km to Kałków, unfortunately again on an asphalt road. I wondered if the trail would look like this until the end and if so, why was it extended. Luckily, after passing Łąka, it was finally the time to take a bit wilder path and cross the farmlands to reach Jarnołtów.
Crossing the farmlandsStorks are very common on a trail
Next targets were Sławniowice and Gierałcice, from where Polish-Czech border is a stone’s throw away. The track continues along on an asphalt road (yeah, again) until it finally separates and continues through the fields to Głuchołazy, passing Biała Głuchołaska river.
In Głuchołazy, I stayed in Guesthouse Iwona. Clean and spacious room with a nice yard in front of the house. There is not much to do in town but a short walk around the old market square and the Catholic Church of St. Lawrence is a good idea. And if you still have too much energy, wonderful Beech Forest Nature Reserve can be explored on foot.
City centre of GłuchołazyIn some places it seems like the time stopped
I was really happy to finally reach the town. Last two days were probably the worst ones during the entire hike. But I also had high hopes for the next day as I knew that mountains will be back for the last time. Biskupia Kopa (890m a.s.l.) is the highest peak in the Opawskie Mountains. So, the plan was easy. Climb it and then finish my adventure on the Main Sudetes Trail in Prudnik.
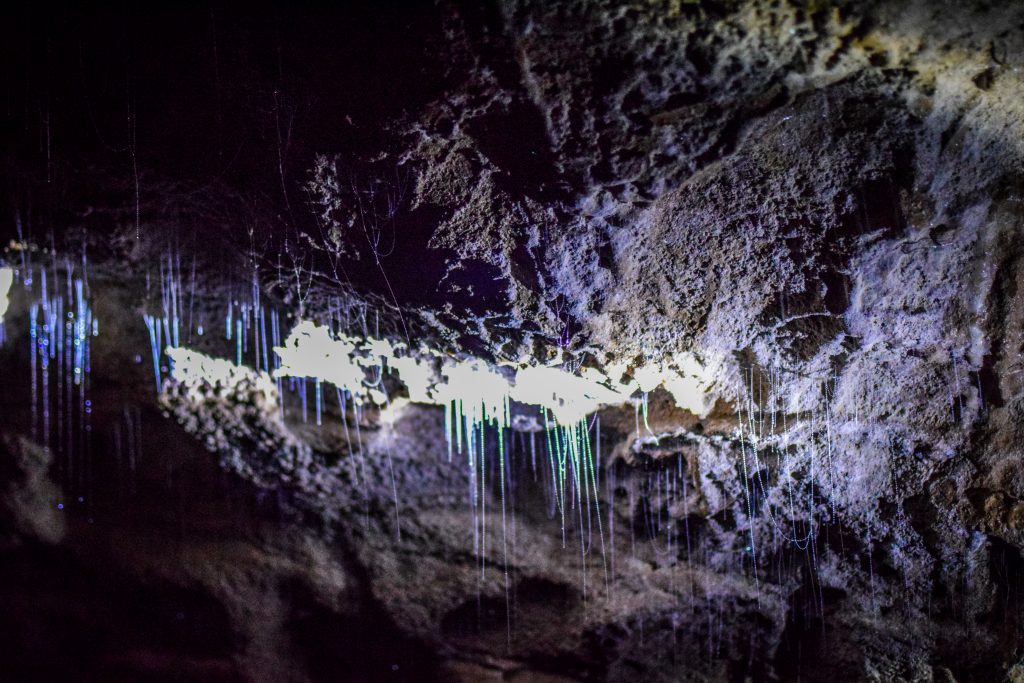
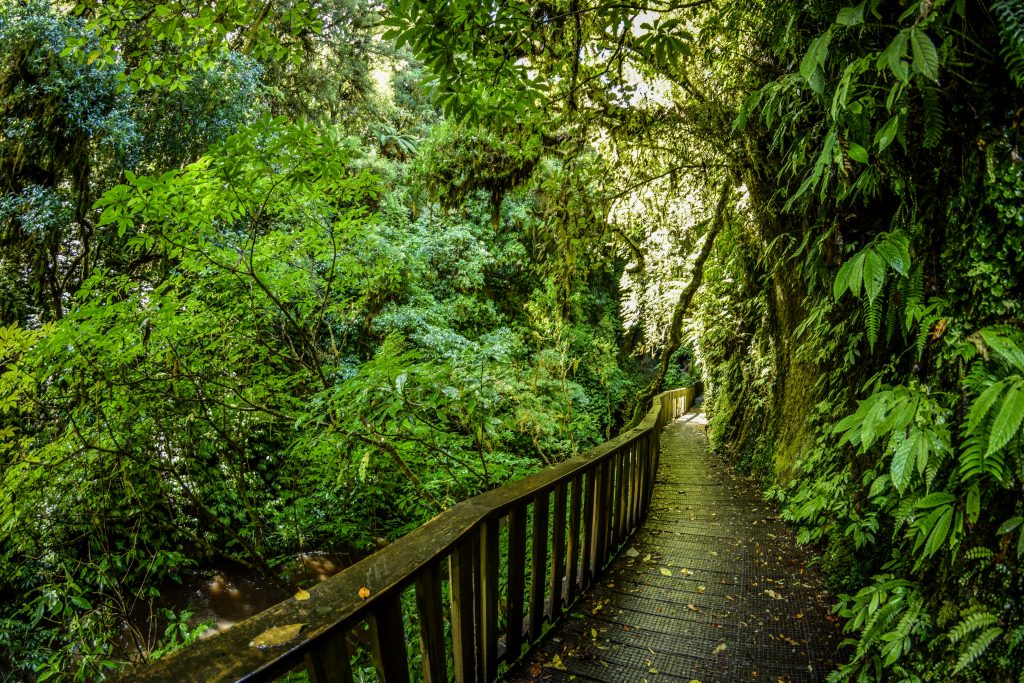
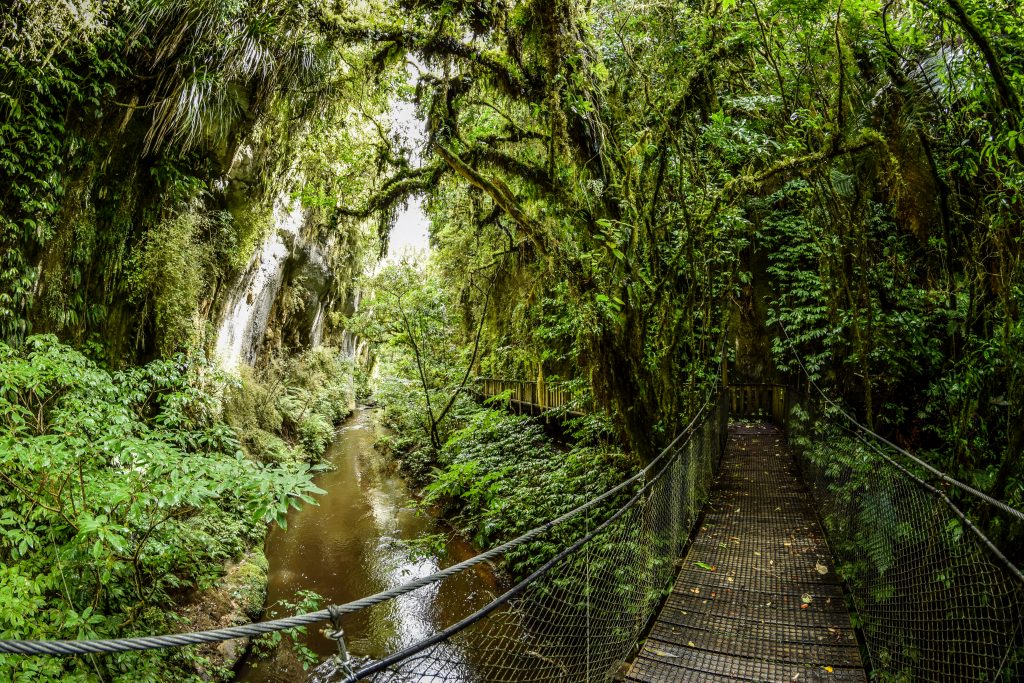
The name Waitomo comes from the Maori words wai (water) and tomo (hole). The whole region has impressive cave systems, out of which the most popular are the ones accessible by tourists: Glowworm, Raukuri and Aranui.
To be honest, I am not a big fan of caves and after visiting a couple of them before, every next tour feels pretty the same. However, Waitomo Caves were on my must-see list from the very beginning as there was something that I had never seen before – glowing worms.
Glowworms are the larvae of the fungus gnat. Their luminescent organs attract small insects which come in the direction of the light only to be caught into sticky threads. In fact, the more hungry the larvae are, the brighter the light. The larval stage lasts between 6-9 months. After that, it turns into a pupa stage, similar to cocoon which develops into adult fungus gnat about 2 weeks later. Seems like the only reason for their short life is reproduction. They don’t have a mouth, therefore after mating and laying eggs, they die. And then the whole process repeats.
The guides will certainly tell you much more interesting details. Stay quiet and avoid shining your flashlight directly on them as it can scare them off and as a result, they will dim the lights.
How much does it cost?
I arrived at Waitomo Caves Discovery Centre in the afternoon and instantly set my wallet of fire. All the options seemed to be so tempting! I had done some online research before and I knew that for sure I want to do Glowworm Cave Tour and Black River Rafting. In the end, I added Raukiri Cave Tour to the deal as well.
Combined ticket for both cave tours costs 100 NZD and Black River Rafting Tour (Black Labyrinth) costs 150 NZD. Yeah, it is pricey. Don’t forget to have a look at www.bookme.co.nz for possible deals and promotions.
What to take?
As it usually is in the caves, the atmosphere is rather wet and cold. Wear good shoes and be prepared for temperature about 12˚ – 14˚C all year round.
If you go for Black River Rafting, you would need to take a swimsuit (to wear under a wetsuit that you get from your guides). It’s also good to have a bag where you can put your clothes for the duration of the adventure as well as a towel and flipflops. And definitely don’t forget your spirit for adventure!
Glowworm Cave Tour
The tour is the most popular one in the area and it really is an absolutely unique experience. There were two parts of it. First, I got to admire cave formations in the dry section. Then it was the time to hop into the boat and the real fun began. Shortly after, we were already in the large cavern known as the Cathedral. The guide navigated through the darkness by pulling the rope in such a graceful and smooth way that it seemed to be an art in itself. The first time to see glowworms could be a bit overwhelming. It so many of them! Hundreds of blue points glowed above my head and once again, I could not believe how lucky I was to spend 3 months on the other side of the world – in New Zealand.
Black River Rafting
It was raining the whole night and the temperature wasn’t too high either. I felt cold even under the blanket inside the van. That’s why I was far from being optimistic about jumping to cold water and spending 3 hours in a cave.
After checking-in at Waitomo Homestead, I met the other guys from my group. It was 5 of us in total plus 2 guides – Mitch, who used the word ‘awesome’ in literally every sentence, and a girl whose name I don’t remember but she was a talented singer which we had the opportunity to experience inside the caves.
We got wetsuits, which were still wet after the last tour the day before. Wearing a wet and cold wetsuit isn’t particularly nice but after a short time, it adjusted to body temperature.
Next, we got helmets with flashlights and of course black tubes. We made a stop next to the stream, just to practice jumping to the water as there are small waterfalls to jump from inside the caves. Don’t worry, just 2-3 metres high so it really isn’t a big deal, even for the person who doesn’t like heights. It was quite fun and the water didn’t seem to be as cold as expected. The wetsuit was doing a good job!
After entering Raukiri cave, we simply walked the first stage until we reached the first waterfall. The jump was awesome! Then, we stopped for marshmallow in chocolate (typical kiwi thing), observed glowworms, saw an eel, jumped from the second waterfall and in the end drifted slowly towards the exit, one after another, holding our feet and creating something like a small train. We were asked to turn off our flashlights to experience total darkness and our second guide started singing a beautiful Maori song. Total darkness, glowworms above your head and live singing inside the cave. Just imagine that. Unforgettable.
The whole experience ended with hot shower, tomato soup and bagel. It was an amazing tour and if I get the chance to repeat one of the cave attractions in Waitomo, I would definitely choose Black River Rafting.
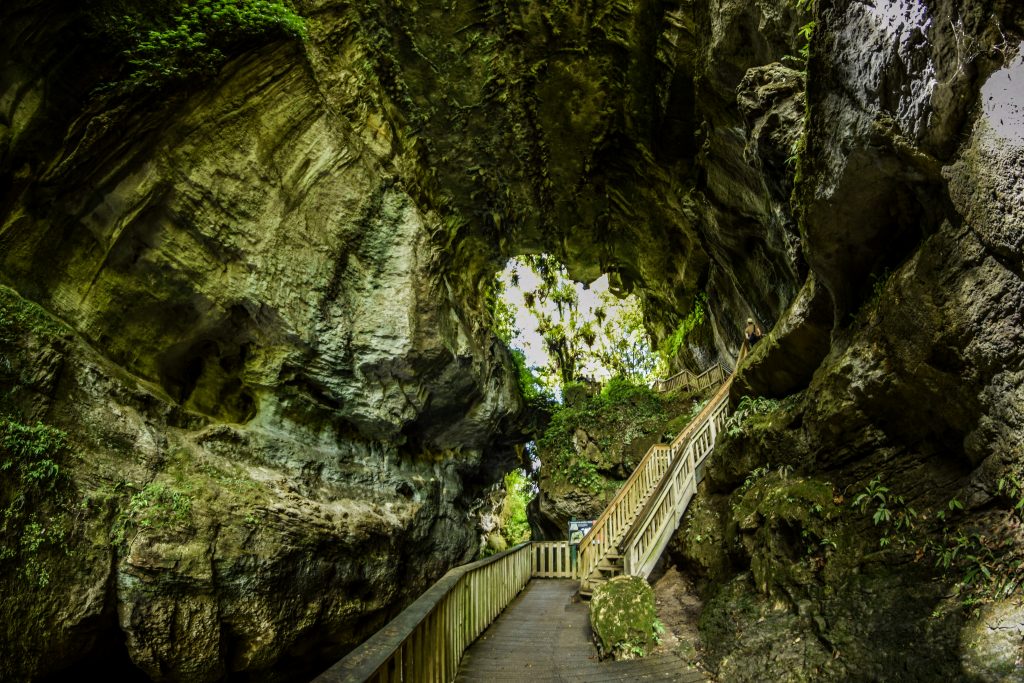
Raukiri Cave Tour
The emotions had not subsided yet but it was already the time for another attraction. I set off to Raukiri cave, that time to take part in walking guided tour. The cave is huge and even though I was already inside during Black River Rafting, the area opened for walkers is a completely different one.
The guide Nathan had a good sense of humour and he introduced the history of the cave, shown stalactites and stalagmites as well as interesting fossils and cave creatures. We covered 1.6 km out of 7.5 km cave system. It was still a nice tour, however definitely the least exciting. I would say, just a regular cave tour which I would not do again if I ever come back to Waitomo.
Glowworms spotted in Raukiri CaveRock chimneys inside the cavePlenty of stalagmites and stalactitesThey are only puppets 🙂Trip through Raukiri Cave is about 1.6 km long
Other sights in the area
As always in New Zealand, there are so many nice places close to each other that it can take days or even weeks to see one region. King Country is not different. If you are done with Waitomo Caves, take your time to visit Mangapohue Natural Bridge, Piripiri Cave and Marokopa Falls.
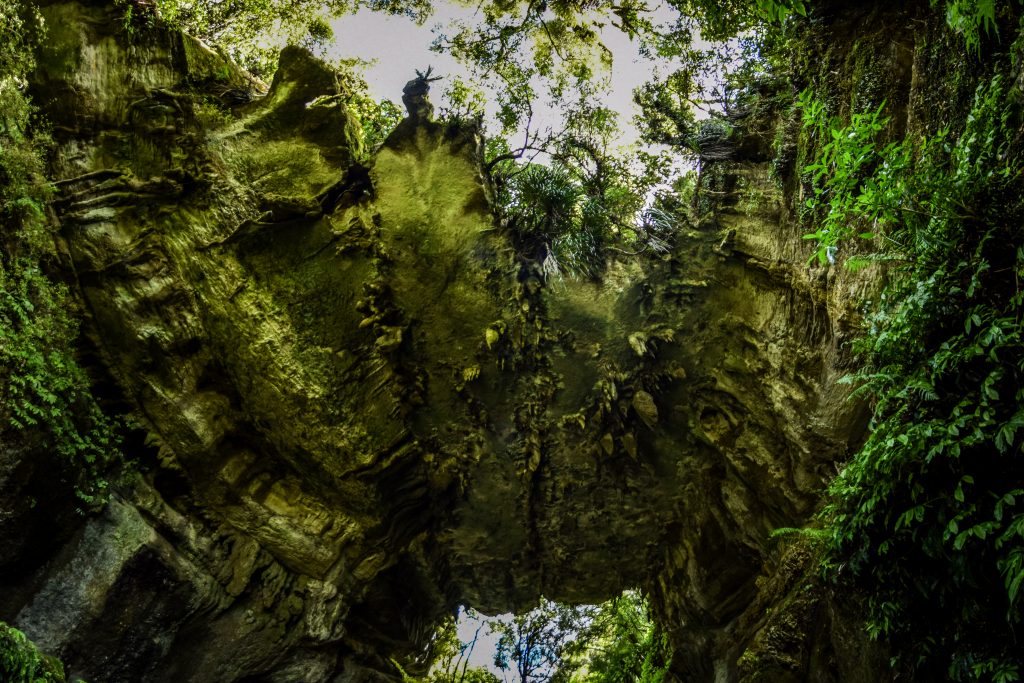
Mangapohue Natural Bridge
It’s a 700m loop track through a limestone gorge that passes underneath a 17 m high natural arch – remains of an ancient cave system. Go up the stairs and have a look at an impressive ceiling with rock formations.
The track continues over farmland and back to the parking. Pay attention to limestone outcrops as on some of them you can notice ancient fossils. It’s a really cool place, don’t miss it!
Boardwalk leading towards Mangapohue Natural BridgeScenic bridge in the middle of the bushStairs leading through 17m high natural archRock formations on the bottom of the archView from the inside of the archThe track continues through the farmlands and back to the parking
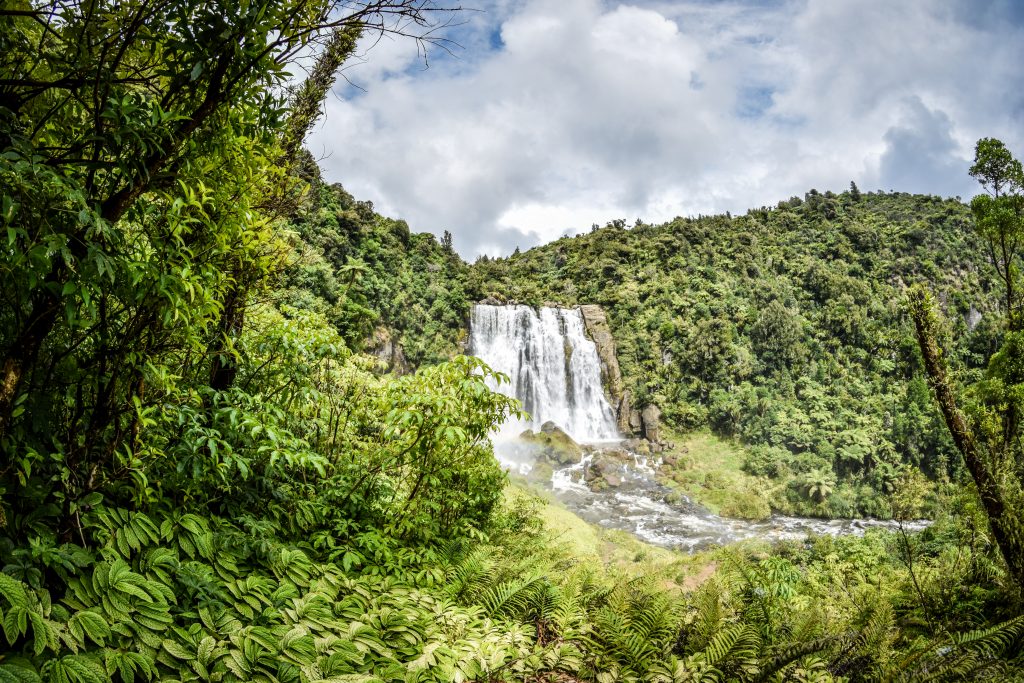
Marokopa Falls
The short track (600m return) takes you through the forest down to the viewing platform. The 35 m high falls are without doubt one of the most beautiful ones in New Zealand. If you are lucky, you will experience a wonderful rainbow and their bottom. Great for photographs!
Marokopa Falls
Piripiri Cave
Hiking path through native bush and past limestone outcrops leads to a short staircase that goes down to the cave entrance. There is an observation platform at the bottom.
After the night near Stronie Village, I had to retreat my steps towards Biała Woda and join Main Sudetes Trail there. Luckily, the same as the day before, I managed to catch a ride quite quickly and save my legs from walking on a boring asphalt road.
The good news was that the distance to Lądek Zdrój (12 km) is rather easy and without significant elevation gains. A mostly downhill path through the forest is especially nice in hot weather and with sore muscles after getting to the top of Śnieżnik on the previous day.
I made a short break at Kąty Bystrzyckie. Next, the track goes gently uphill to the pass where you can see a small chapel. The legend says that it was built on the site of the death of 3 Swedish generals during the Thirty Years War.
The track follows the wide and comfortable road through the farmlands and forest until the first buildings of Lądek Zdrój pop up on the horizon. I could hear thunders becoming louder and louder, therefore I quickened my pace and shortly after arrived at the market square in the city centre.
The town is considered to be the oldest health resort in Poland, because according to historical sources, as early as 1241 there were bathing facilities here destroyed by Mongols returning from the battlefield near Legnica.
The area of old market square with the town hall, old tenement houses and restaurants is nice for a longer break and hot meal. Other than that, I recommend checking out the building of Wojciech Spa, Protestant church ruins as well as two picturesque bridges: the one of St. John of Nepomuk which is close to the old market square and the covered bridge which is more in the spa part of the city (still within walkable distance).
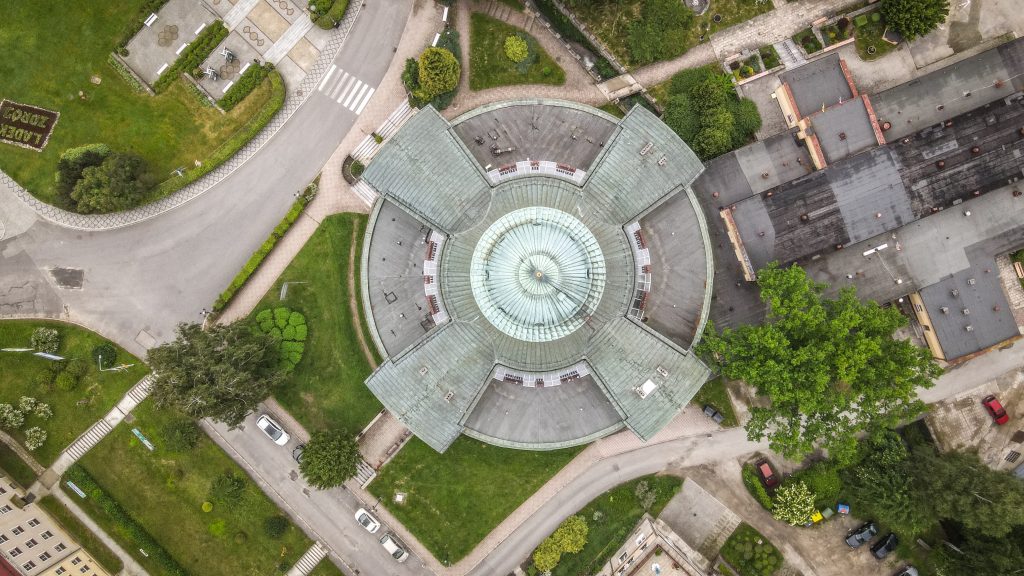
Wojciech Spa – a historic building from the 17th century, rebuilt two hundred years later. It houses a marble swimming pool designed in the style of a Turkish bath, stylish stone bathtubs for pearl baths and a pump room for waters from local springs.
Historic building of Wojciech SpaWojciech Spa seen from the sky
Bridge of St. John of Nepomuk – It was erected in 1565. The author of the sculpture took inspiration from the figure of the patron saint of Bohemia on the Charles Bridge in Prague.
Bridge of St. John of Nepomuk
Covered Bridge – one of the most original and beautiful monuments in Lądek. It was built in the 1930s in order to connect two spa facilities.
Covered bridge in Lądek Zdrój
Protestant church ruins – built in 1846, the temple was destroyed in the fire in 1999.
Ruins of Protestant church
The second part of the day from Lądek Zdrój to Złoty Stok is longer (16 km) and much more difficult due to elevation differences, especially ascent to the Great Jawornik (Jawornik Wielki, 872 m n.p.m.).
I left Lądek Zdrój crossing the bridge over Biała Lądecka and followed the red track towards Pass Under the Konik (Przełęcz Pod Konikiem) and further to Orłowiec village. There, it was time to take a turn from the main road and start tiring ascent to Jaworowa Pass (Przełęcz Jaworowa).
It’s over 3 kilometres to the top of the Great Jawornik. The views are limited because of the trees but there is a viewing platform within 150 metres of a detour from red track. Unfortunately, clouds were hanging very low and I could see absolutely nothing anyway.
There are 6 more kilometres to Złoty Stok but all the way downhill so it didn’t take long to reach historic villa Złoty Jar and shortly after I saw first tourists hanging around in rope park and gold mine museum. Sightseeing was on my list too but first I wanted to drop my heavy backpack at Gold Stok Hotel. The room was simple but comfortable. Moreover, a bed and a private bathroom was everything I needed at that time.
It was getting late and there is quite a lot to see in Złoty Stok, therefore I simply went out for the walk and dinner, leaving tourist attractions for the morning of the next day.
This medieval mining settlement was established in connection with the mining of gold (traces from as early as the 10th century were discovered). Złoty Stok is the oldest mining and metallurgical centre in Poland. The last mine (arsenic ores) was closed in 1961. Today, it’s a popular tourist destination with all attractions being related to its past.
Gold Mine Museum – A specially prepared tourist route with a museum exhibition covering two adits. The first one is called “Gertrude” (500 m) and presents a unique collection of geological maps, ancient mining instruments and rich collection of rocks, ores and minerals from around the world.
The second one, called “Czarna” (700 m), is located in the upper part. This adit leads visitors through the 16th-century, hand-forged workings. You can learn about mining techniques used over the centuries and admire the only underground waterfall in Poland. The tour ends with an underground tram ride in the direction of a daylight 🙂
Entrance to Gertrude aditThe only underground waterfall in Poland
Medieval Technology Park – A replica of a medieval settlement with a lot of real size devices. All of them still work and knowledgable guide presents their usage and let tourists try them themselves. 1-hour tour is concluded with the visit in Executioner Hut. He played an important role in punishing criminals and thieves.
Ochre Adit – It was opened in 2017 and the underground part includes 130 meters of the pavement that is opened for visitors. Sightseeing possible only with a guide.
Combined ticket for all three attractions costs 59 PLN per adult and you should count at least 3.5 hours for sightseeing.
Numerous beaches, ocean, forest, mountains, waterfalls and rich history. It’s a perfect combination for every holiday. Add to it relaxed vibes as well as proximity to Auckland and you will get a very popular place for summer escapes from a big city.
The area was occupied by Maori long time before the arrival of Europeans. Unfortunately, the distance from Auckland, availability of kauri timber and discovery of gold resulted in intense colonisation and Maori lost most of their lands by the 1880s.
The Peninsula was named after HMS Coromandel, a ship of the British Royal Navy that stopped at Coromandel Harbour in 1820 to purchase kauri spars. The ship was named for India’s Coromandel Coast.
The following itinerary encircles the peninsula from east to west and assumes that you have your own transportation.
Day 1 – Waihi, Whangamata, Wentworth Falls, Tairua, Hot Water Beach, Cathedral Cove
The day is busy and packed with attractions so it’s essential to start early. Driving along the east coast of Coromandel Peninsula will reward you with scening summer towns, waterfall, gold and silver mine and hot water beach. All of that finished with the grand finale at famous Cathedral Cove. Let’s start!
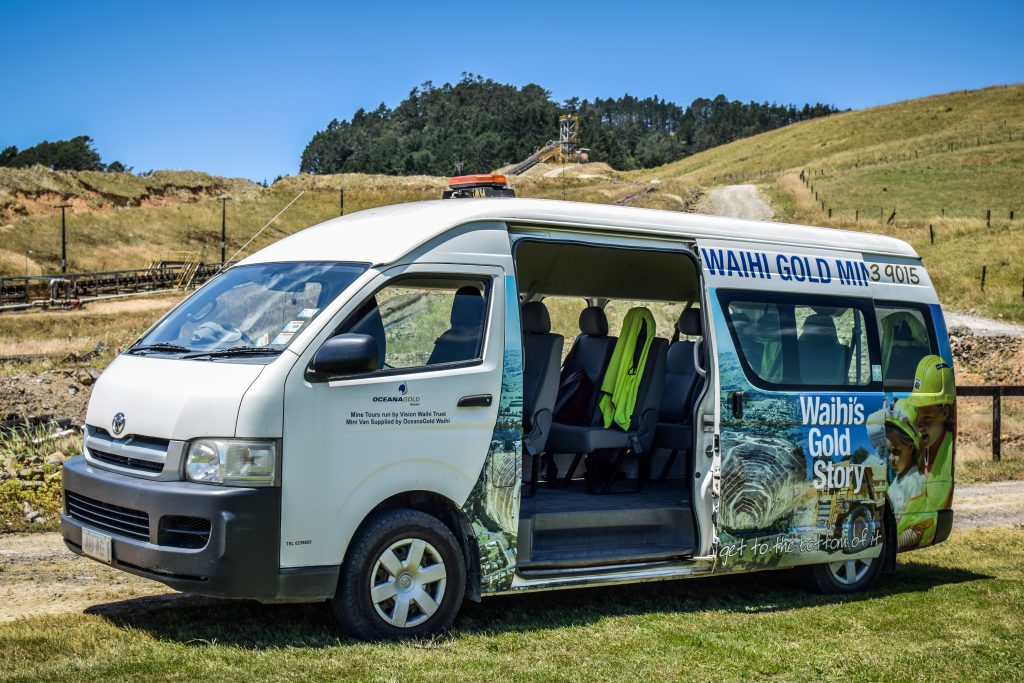
Waihi
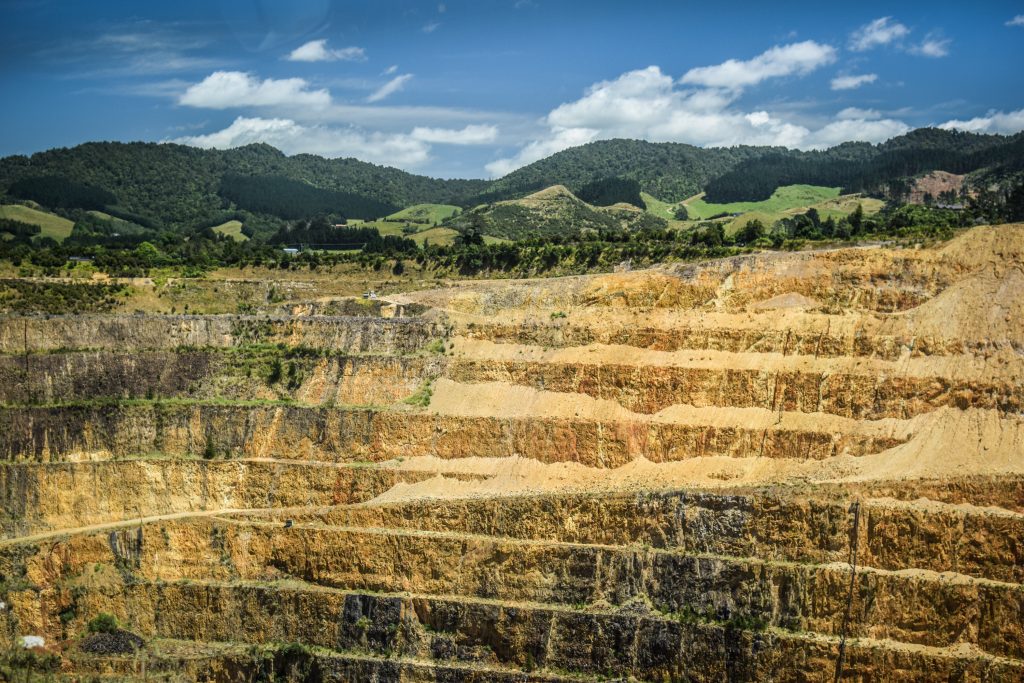
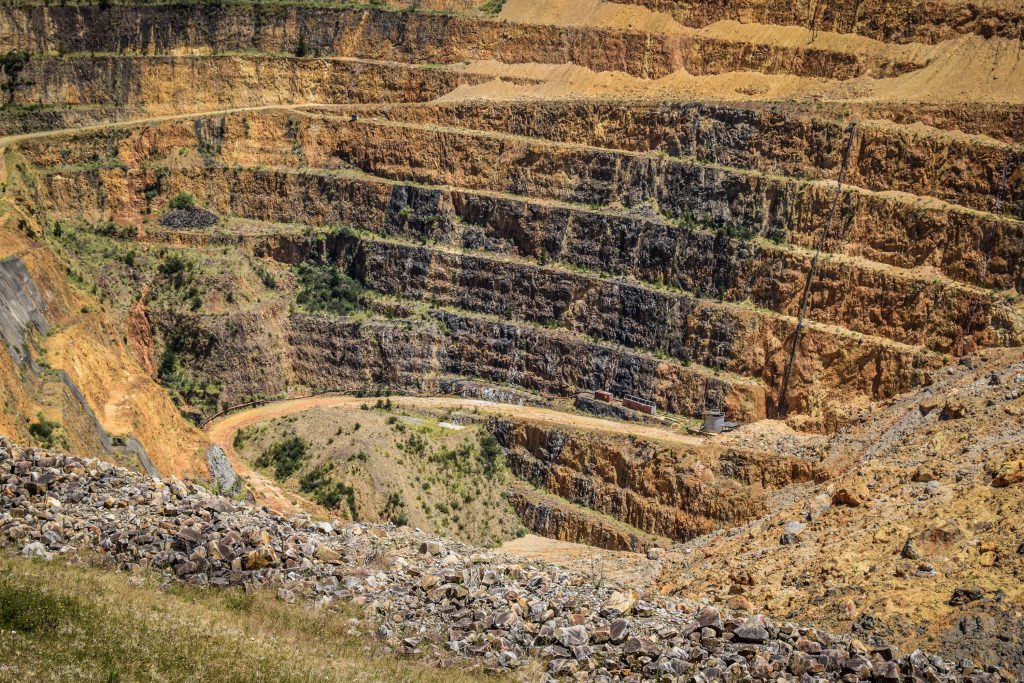
Gold was first discovered here in 1878 and soon after the Martha Mine became one of the most important gold and silver mines in the world and the reachest one in New Zealand. It closed in 1952 due to change in the gold price, outdated machinery and the world depression of the 1930s. In the 1970s, when the gold price went up again, interest in mining at Waihi returned. The site was reopened as an open pit in 1988.
The detailed story is presented in Gold Discovery Centre and additionally, you can join a guided tour to see modern-day gold mining up close. After putting on safety gear, you will board a van driven by a knowledgable guide that stops in many interesting spots along the way. It’s a different kind of experience comparing to historic mines all over North Island, where you walk through old tunnels and see the machinery.
Tickets are quite expensive though – Gold Discovery Centre 25 NZD, guided tour 39 NZD and combo ticket including both 59 NZD (prices for adults).
Remainings of old buildingsOpen pit in Martha MineOpen pit in Martha MineVan used for guided tours around the mine
Whangamata
Popular summer-holiday town with restaurants, parties, fine beaches such as Whangamata Beach or nearby Onemana Beach and a wide selection of water attractions.
Wentworth Falls
From Whangamata follow Wentworth Valley Road for around 8 kilometres inland. Park your car and head towards Wentworth campsite. From here, the return hike to the falls should take about 2 hours. The track is easy, mostly flat and crosses two bridges on its way. The falls are in two drops of about 20 metres each.
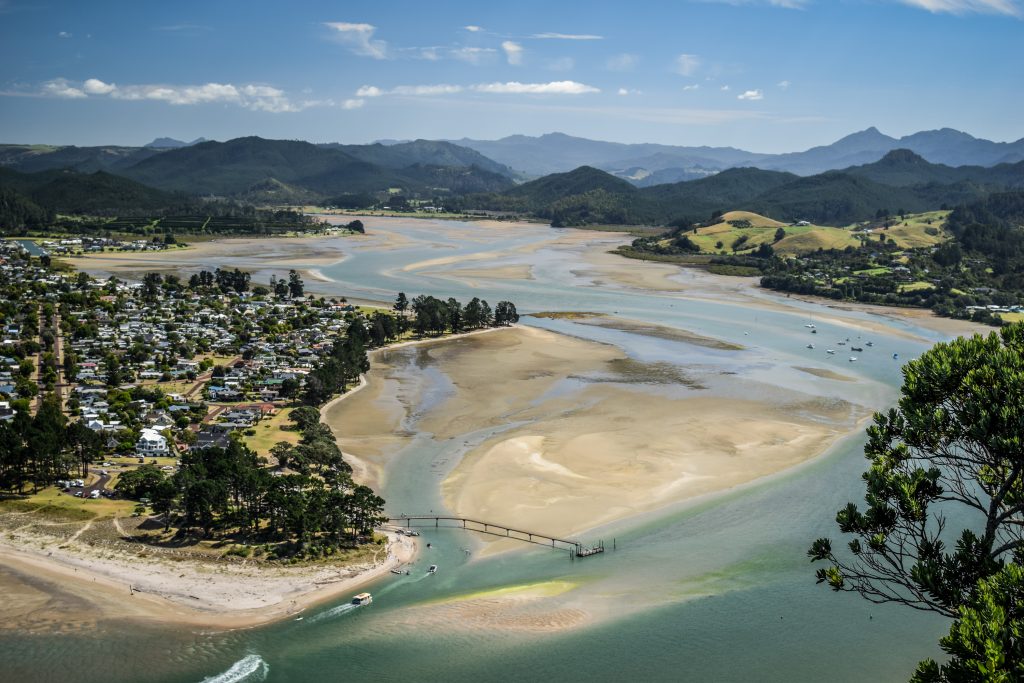
Tairua
Another popular getaway destination with one particularly nice spot to stop by which was once a volcanic island – Mount Paaku. It’s a short but very steep, half an hour return hike with reward panorama of Pauanui and Tairua. The area was also occupated for a long time by Maori tribes.
Panorama from Mount Paaku
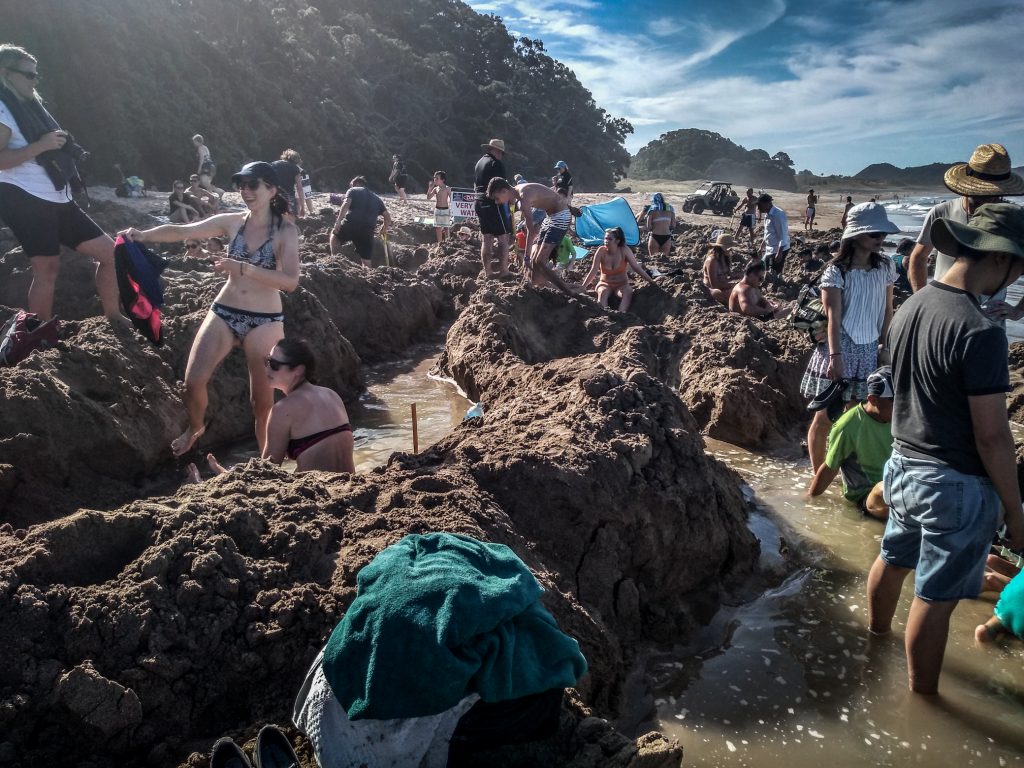
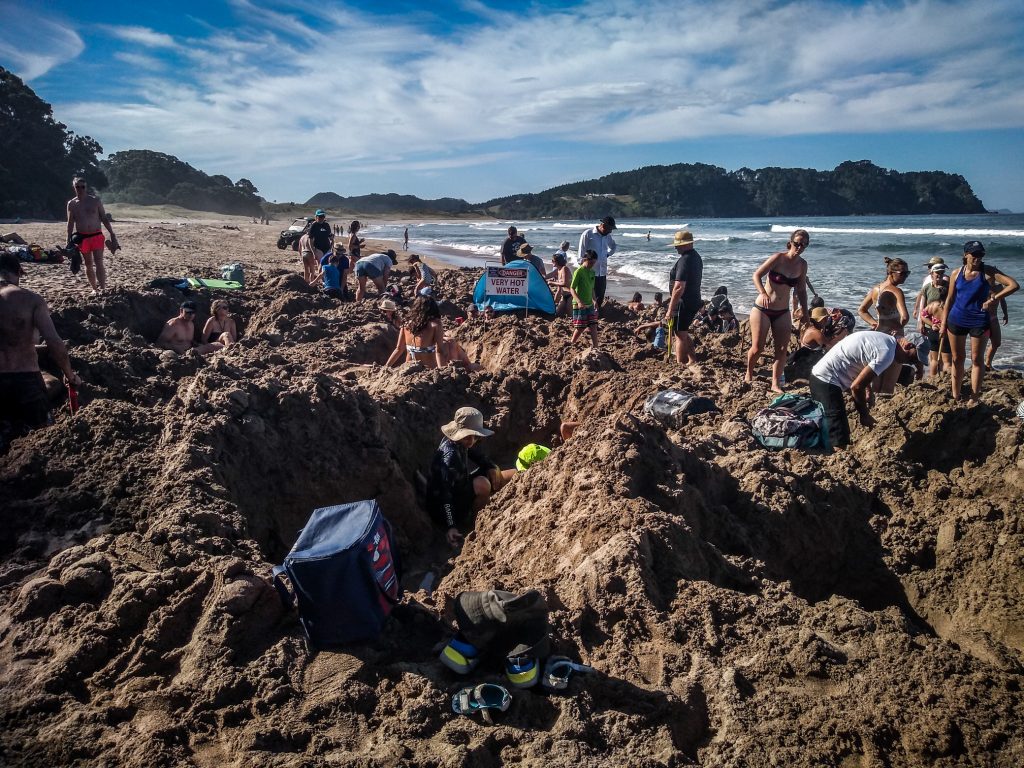
Hot Water Beach
If you see crowds digging holes in the sand and then jumping into them then yes, you are in a good place. It looks quite ridiculous from the distance but in fact, it really is a unique place! Hot water flows from the depths of the earth to surface in the Pacific Ocean exactly here at Hot Water Beach. You can pay a few dollars to rent a spade or simply ask some friendly folks at the beach. Keep in mind that the best time to create your own natural spa is within two hours either side of low tide. Check the times here.
Very popular Hot Water BeachDig your own hole and enjoy natural spa!
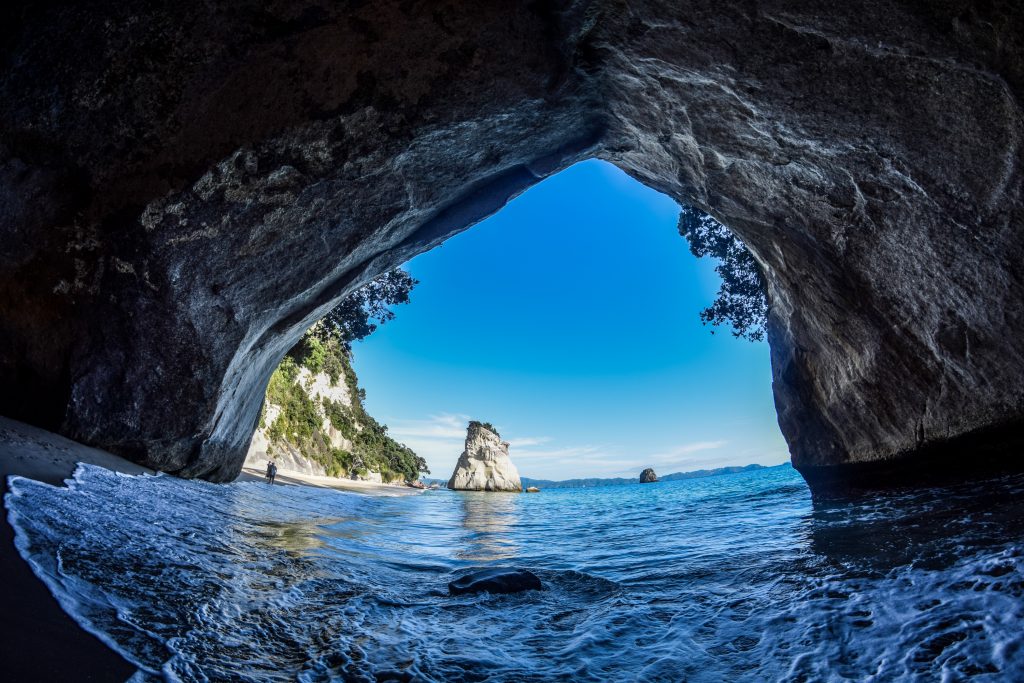
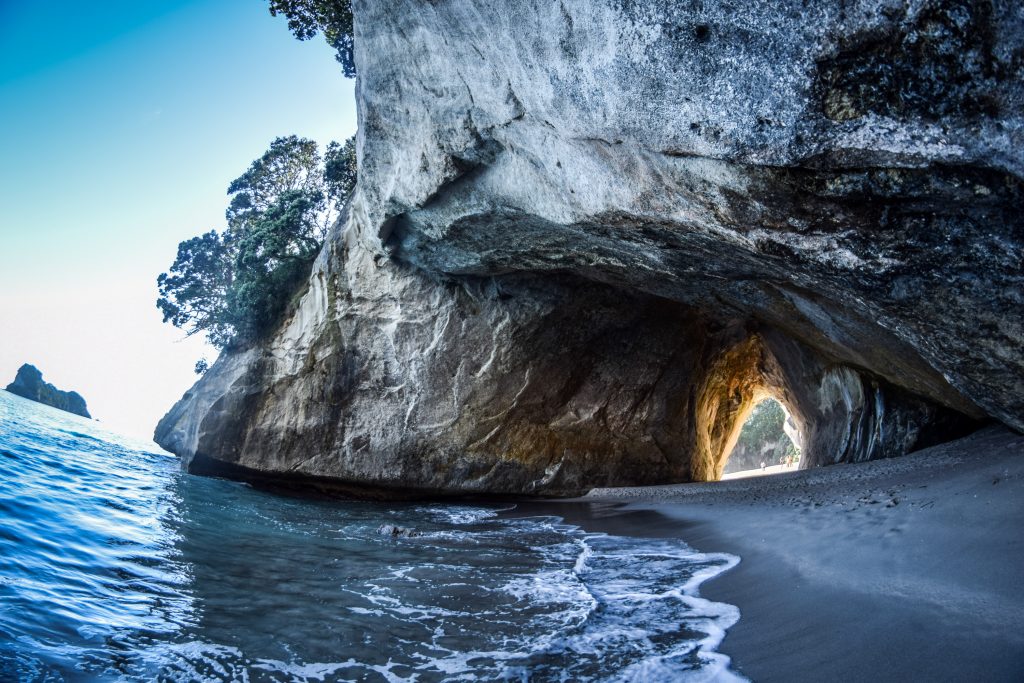
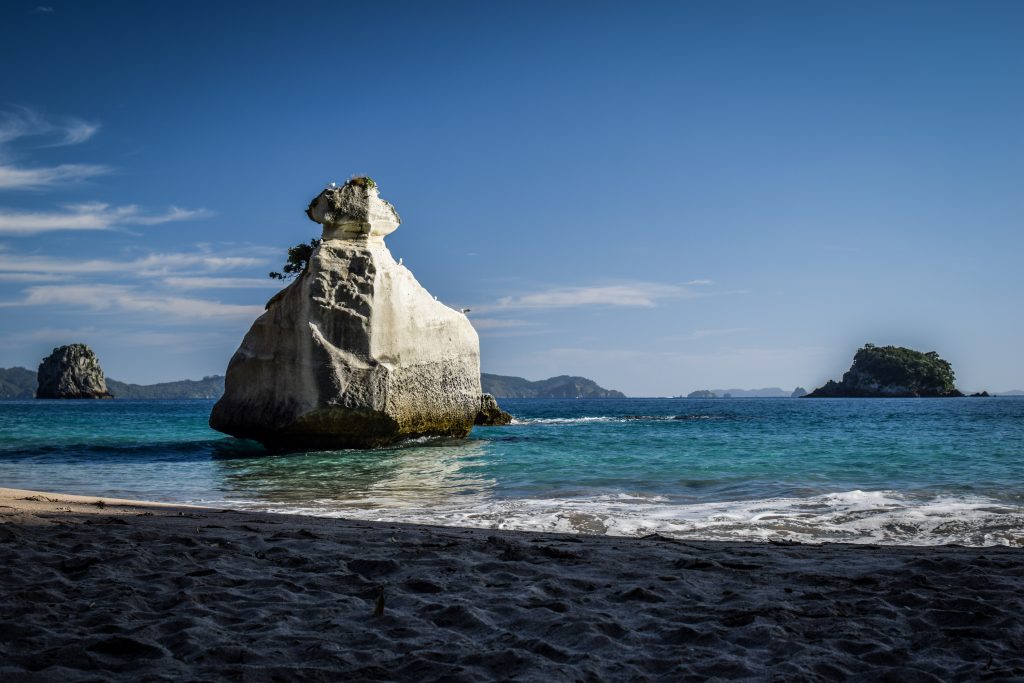
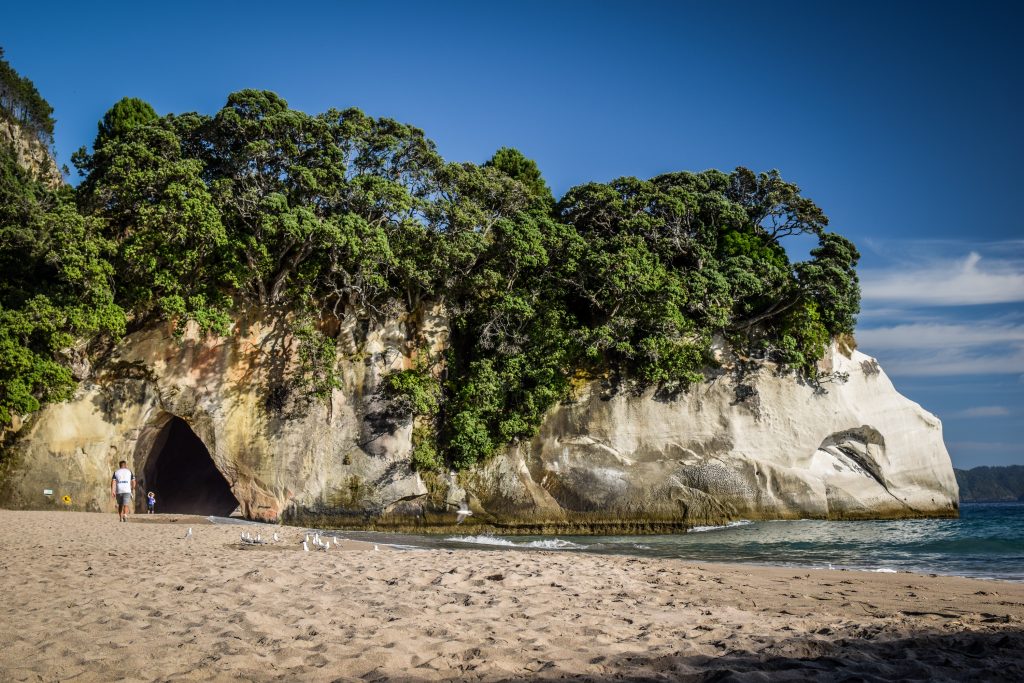
Cathedral Cove
The place with the famous cathedral-like arch is indeed picturesque but somehow I missed that ‘wow effect’. There is too much hype about it and it’s all over Instagram creating false expectations. All those photos with increased colour saturation and extra effects look nice but when you arrive at the actual place… eyes don’t have extra settings 🙂 Best would be to get here in the late afternoon to avoid crowds. From the parking, it’s about 30-45 minutes hike one way. Alternatively, you can park your car in Hahei and walk from there (60-70 minutes one way), take a bus or water taxi.
Famous arch at Cathedral Cove from one side……from the inside……and from another sideRock formations in the coveBeach and rock with the arch at Cathedral Cove
Day 2 – Shakespeare Cliff Lookout, Otama Beach, Opito Bay, Waiau Falls, Kauri Grove, Coromandel Town
The second day is fully focused on nature. You will reach remote beaches but also waterfall as well as majestic kauri trees – a cornerstones of the original forests of the North Island.
Shakespeare Cliff Lookout
Scenic reserve located between Cooks Beach and Flaxmill Bay. A very short walk rewards with memorable views of Mercury Bay. You may also spot a cairn that records the arrival in 1769 of the HMS Endeavour under the command of James Cook.
Otama Beach and Opito Bay
Both spots are accessible via Black Jack Road. It’s mostly unsealed but in a good shape so no problems at all with driving a campervan. The long stretch of Otama Beach comes first. Walk around and enjoy remoteness while listening to the sounds of the ocean.
If you continue driving further along a winding road, you will finally arrive at Opito Bay. Here, I recommend you to do exactly the same as at Otama Beach.
Otama BeachOpito BayOpito Bay
Waiau Falls and Kauri Grove
Both attractions are located on Road 309 so you need to drive back from Opito Bay towards Kaimarama and then take a turn to Waiau. After half an hour, there will be parking next to Waiau Falls. It’s only 10 metres high but still a very nice place for a quick stop.
Waiau Falls
From there, is about 10 minutes hike to kauri grove which was probably the highlight of the day. I had never seen this kind of trees before and damn, I was impressed. Just imagine that back then, the whole Coromandel Peninsula was covered by such a forest! The oldest trees are 600 years old and have about 6m circumference.
Kauri trees are a cornerstone of the original forests of the North Island. They are one of the longest-living tree species in the world as well as the largest.
Tane Mahuta with a diameter of 4.6m and height of 52m is the largest kauri tree still standing. It is estimated to be between 1200 and 2000 years old. You certainly shouldn’t miss seeing it when travelling through Northland.
Kauri timber was used by Maori for a very long time, especially for builduing boats and houses or carving. The gum was used as a fire starter and for chewing.
The arrival of Europeans brought the decimation of these magnificent forests. The mature trees were felled to fulfil the high demand for sawn timber of unsurpassed quality for building. The gum was obtained through digging, fossicking in treetops, or more drastically, by bleeding live trees. Finally, more forest was cleared as demand for farmland.
My first time to admire kauri trees!Fantastic forest walk at Coromandel Peninsula
Coromandel Town
The discovery of gold in the 1860s resulted in an establishment of settlement that quickly grew to over 10.000 inhabitants. Have a walk around the town admiring the Victorian architecture and finish the day with fish & chips and sunset view at Mcgregors Bay.
Mining & Historic Museum located in the historic Coromandel School of Mines building presents the life of mining and its impact on a small town so you may want to visit it in the morning if you are interested.
Architecture in Coromandel Town
Alternative: night in Port Jackson / Fletcher Bay
A very scenic road goes from Coromandel Town to the very top of the peninsula. It’s about 60 km but you have to count at least 2 hours to get there. The road is gravel and very shaky, so I felt a bit insecure while pushing my campervan to its limits already in a first week. I arrived at Macdonald Recreation Reserve, which is more or less halfway and made a decision to turn back.
Nevertheless, if you decide to proceed further, coastal views will certainly take your breath away. It makes sense to drive in the afternoon, stay for the night in one of DOC’s campsites in Fletcher Bay or Port Jackson and come back to Coromandel Town the following day in the morning.
Hiking enthusiasts will be happy as Coromandel Coastal Walkway (3 hours one-way) links Fletcher Bay with Stony Bay and provides fantastic views.
Short rest in Macdonald Recreation ReserveCould easily have a nap here!
Day 3 – Thames, Pinnacles
The highlight of the last day at Coromandel Peninsula is without doubt a hike to the Pinnacles. But before you head towards Coromandel Forest Park, dive into the gold rush times at well maintened Goldmine Experience in Thames.
Thames
Currently, it’s the largest city on Coromandel Peninsula but back in time, it was even the second-largest city in New Zealand. As usual, all because of the gold rush. At that time it was discovered in the lower Kauaerange valley. Two smaller settlements (Shortland and Grahamstown) were founded to support mining in the early 1860s and later on merged into one forming Thames.
Visit in Goldmine Experience was worth the time and money as it was completely different than modern mine in Waihi. The staff is lovely too and they will certainly tell you more about the story of that place. Wear a helmet to walk through the tunnel and have a look at still working stamper battery in action. It’s really noisy but no worries, you will get ear protection.
School of Mines & Mineralogical Museum is another historical spot on the map of the city. I decided to skip it though as minerals aren’t that interesting for me and the main plan for the day was a hike to Pinnacles.
School of Mines & Mineralogical Museum
The Pinnacles Track
After a quick stop in Pak’n’Save to stock with food, I moved on towards Coromandel Forest Park and Kauaeranga Valley. From visitor centre (you may want to ask for maps or weather conditions) it’s another couple of minutes on unsealed road to the parking and start of the hike.
Official timing says it’s 3 hours one way to the hut and another 30-40 minutes to the summit. If you are in a good shape, it’s perfectly doable to reach the hut in about 2 hours. But as always, better assume more and take it easy.
The Pinnacles Track follows the route used by packhorses when carrying supplies for loggers, gum diggers and gold miners who worked in the area during the early 1900s.
First kilometres are rather moderate but the track goes continuously up at some point you may get tired. After reaching the trails junction, you can either continue on the Webb Creek Track or the Billygoat Track. The best and the most popular scenario is to take Webb Creek Track for ascent and then descent following Billygoat Track. That’s exactly what I did as well.
The views are getting better and better the higher you go and the last section will take you to The Pinnacles Hut. It’s a popular overnight place and indeed it must be nice to admire night sky in such a place. I didn’t have a reservation so had a quick lunch instead and then made a final push to the summit.
Very clear message from the staff working in The Pinnacles Hut
The summit seems to be very close but it is a tough ascent, first on the wooden stairs and later on a metal ladder attached to the rocks. Stay focused but don’t forget to look around – that views are the main reason of coming here after all 🙂 Once on the summit, you should feel great satisfaction.
The weather was perfect – warm but with some clouds providing shadowPanorama of the PinnaclesThe hike there and back should take between 6-8 hours
I descended back towards the Pinnacles Hut and then continued all the way to the same trail junction as before, but that time I chose Billygoat Track, finally arriving at the parking where I left my van.
That’s all about the trip to the Coromandel Peninsula. It was a wonderful time packed with beautiful places, history and scenic hikes. I hope you will enjoy it too. And if you have a question, don’t hesitate to leave a comment.
The track leaves Długopole Zdrój climbing above railway tracks into the forest. Going at its edge, I could see a nice panorama with farmlands and mountains on the horizon. Shortly after, I left the forest and entered meadows. It seems that whoever planned Main Sudetes Trail, didn’t bother to mark in anyhow in case there were no trees to pain on. Therefore, it was a good couple of kilometres with barely any signs. Luckily, having access to free maps on mapa-turystyczna.pl on the phone, I was able to track my position very precisely and avoid getting lost. I suggest you to do the same!
Farmlands seen from a droneWide path leading through farmlandsScenic farmlandsit’s worth looking at your feetWhich way to go?From Wilkanów, the track heads towards mountains
After reaching and crossing road 33, I continued towards Wilkanów where I had my first rest break (around 7 km from the starting point). I knew that the next 6 km will be mostly uphill, so it was a good time to refill calories. First half was rather gentle but the second one leading to Sanctuary of Holy Mary slightly more challenging.
I had a quick look at the church and mountain hut nearby. Views all around the place were super nice! Next, I made a detour to the top of Igliczna (845 m a.s.l.) and came back the same way to rejoin the red track.
Wonderful landscape around IglicznaIgliczna seen from a droneSanctuary of Holy Mary
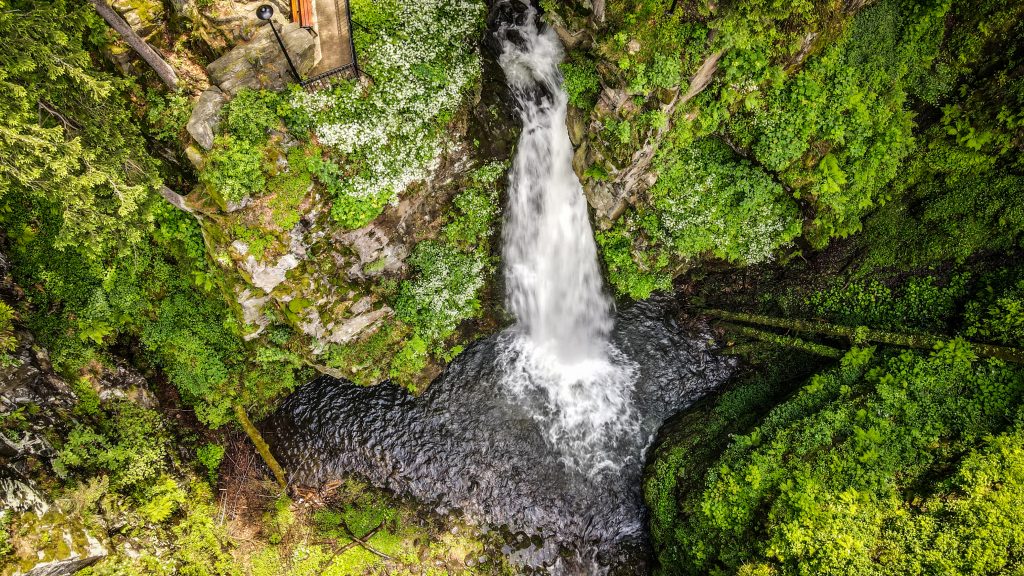
It was nice and quick downhill 3 kilometres bringing me to the second-highest waterfall in the entire Sudetes. Wilczki Falls was created on the line of a tectonic fault, where the Wilczka River falls from a height of 22 meters to the cauldron and continues along a narrow gorge known as the American canyon.
Wilczki Falls in Międzygórze
From there, the red track goes into Międzygórze. In 1840 the town and the vicinity of the Śnieżnik Massif were purchased by Princess Marianna Orańska, wife of the Prussian prince Albrecht Hohenzollern. She initiated the development project, transforming it into a popular summer resort. Walking through the town I could still admire unique 19th century Norwegian and Tyrolean guesthouse buildings.
Architecture of Międzygórze which was once a very popular resort
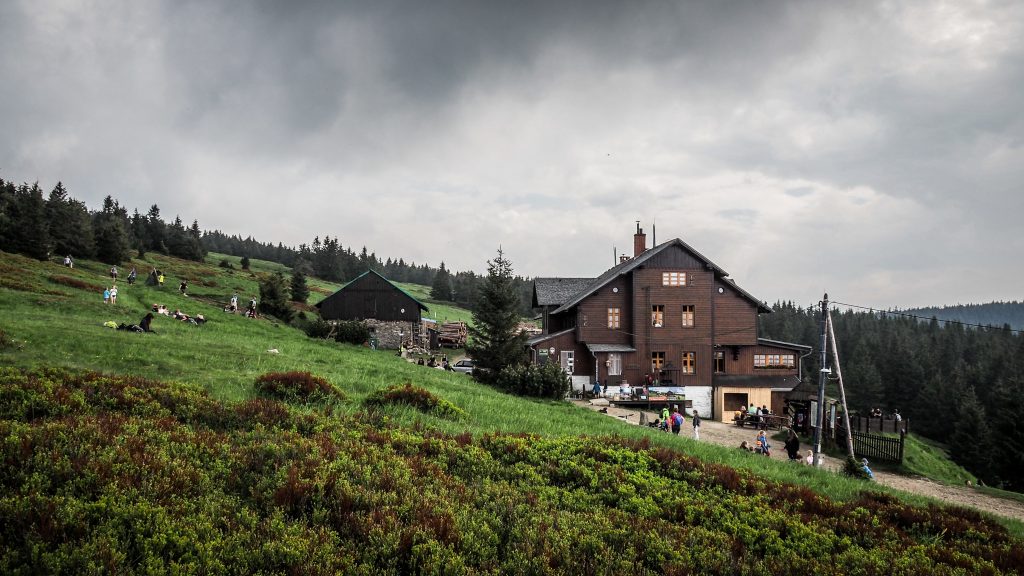
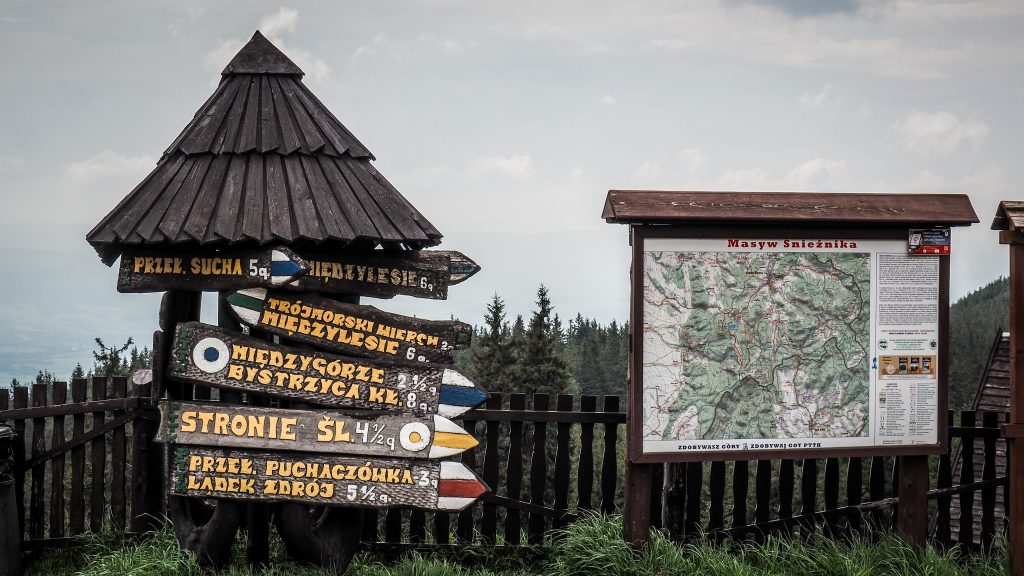
There is another 5-6 km to PTTK Hut on Śnieżnik (1218 m a.s.l.). Its nickname “Swiss” comes from both the style in which the facility was built and the Swiss administrator. Being a very popular destination for day walkers, the path leading to it through the forest is wide and easy to follow. This section is the most challenging part of the day with the highest elevation gain. Pay attention to the nice viewpoint called Goat Rocks (Kozie Skały) on the slope of Średniak.
PTTK Hut on ŚnieżnikSeveral tracks meet around PTTK Hut on Śnieżnik
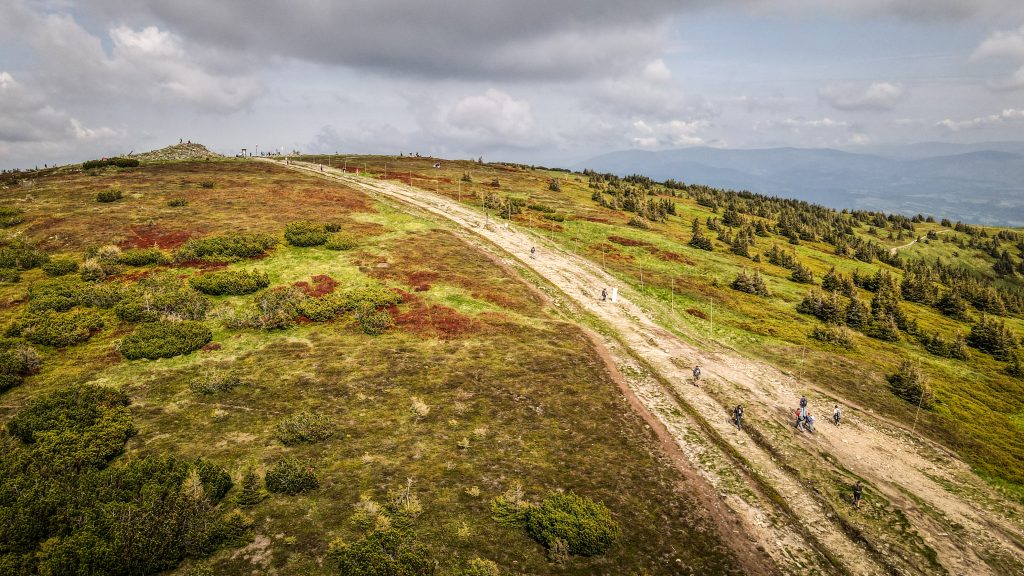
The red track doesn’t go to the summit of Śnieżnik but come on – it’s only half an hour away. The decision couldn’t be different and even though I hesitated for a while due to louder and lauder thunders, shortly after I enjoyed spectacular views from the top.
Śnieżnik (1425 m a.s.l.) is the highest peak in the Eastern part of Polish Sudetes. Due to the significant height difference between Śnieżnik and the surrounding peaks, it can be clearly seen from the distance.
Green track to the top of ŚnieżnikPanorama from the peak
I descended the same way and rejoined the red track leading down Śnieżnicka Pass (Przełęcz Śnieżnicka) and further to Snake Glade (Żmijowa Polana) from where there is the last short ascent of the day to Black Mountain (Czarna Góra). Don’t forget to turn around from time to time to have a glimpse at Śnieżnik.
Don’t forget to look behind your backViews from the ascent to Black Mountain
At the top, there is an observation tower but unfortunately closed for tourists. Remaining distance (2 km) to Puchaczówka Pass is quite a steep downhill walk. Best for you would be to find accommodation somewhere in Sienna village. I wasn’t so lucky and had to spend the night a bit further in Villa Diana near Stronie village. Luckily I managed to hitchhike and save my legs from walking on asphalt road. The villa was very nice, with a beautiful garden and breakfast included. It was also the most expensive accommodation during the entire hike, but well. I felt I deserved it 🙂
Probably I wouldn’t come to Tauranga if it wasn’t the place where I had to pick up my campervan. I was super excited because it was supposed to be my vehicle and home for the next several weeks. The plan was simple. Finish all formalities quickly and spend the rest of the day exploring the town!
How did I find a car in Tauranga? Well, it was before I even departed to New Zealand. At my boring job, I had enough time for browsing websites of rental companies, reading blogs and articles from other travellers. This is how I came across Kiwi Road Trips and checked their offer of self-contained vans.
After another week of thinking about all pros and cons, I made my mind that it’s the most convenient and affordable way to have my own 4 wheels for a longer period of time. It comes with guaranteed buy-back so I didn’t have to worry about looking for buying in April, which is already after peak season. Karen and Pete explained to me all formalities and we set the date for pick up.
Don’t you worry – there will be a separate article describing all the options that travellers have for renting or buying a car in New Zealand. Stay tuned. Meanwhile, let’s focus on Tauranga.
Intercityhas a bus network all over the country and they have good deals too. You can buy hours-based travel passes and that should be fine to visit the most popular travel destinations. Needless to say, places that are off-the-beaten-track will be difficult to reach and very often it’s possible only with your own vehicle.
Nearby airport isn’t too busy but there are daily flights to and from Auckland, Wellington or Christchurch.
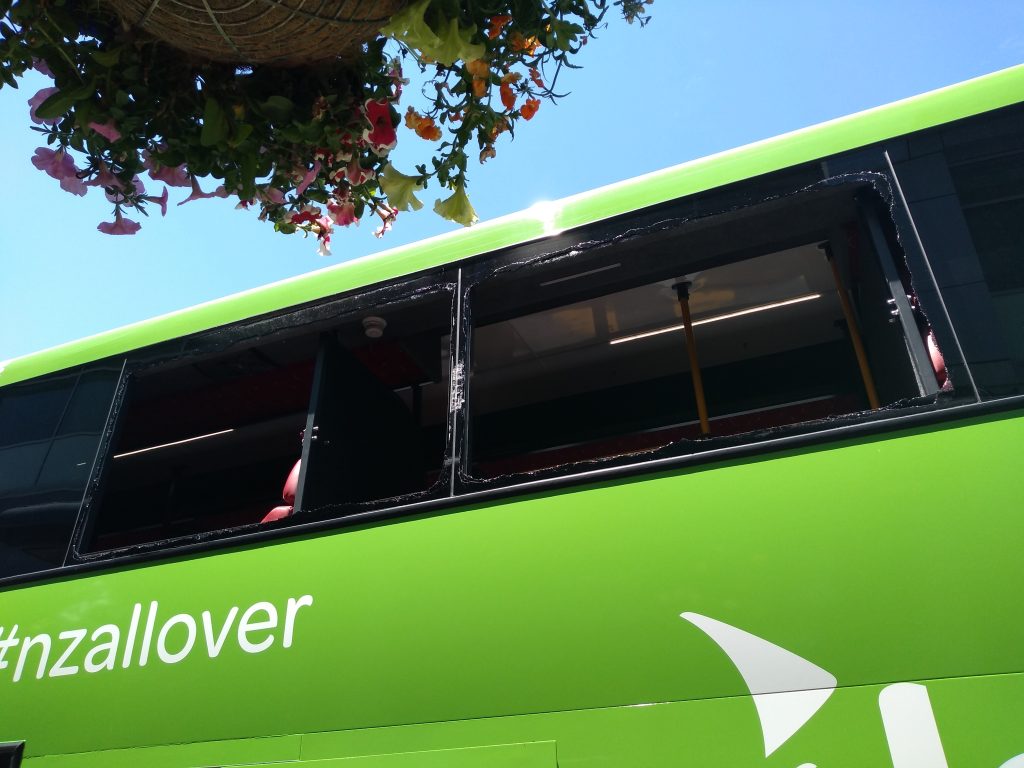
I will describe the bus trip a bit more because I must say, it was quite entertaining. I boarded the bus in Auckland and everything was fine until on one of the turns it hit the wall of rocks with its left side. Not very hard, but everyone could feel a bump and small pieces of glass were all over the floor. A window was broken. The driver stopped, checked the damage and called the company. The window was still there, just a bit broken. Unfortunately, it could fell apart anytime creating the risk for passengers and other drivers. The solution to the problem was very practical and kiwi style. The driver took a broom, smashed remaining parts of the window, told everyone to move to the front of the vehicle and that was it. We continued the journey to Tauranga, just without 2 windows on the side of the bus. At least we couldn’t complain there wasn’t enough fresh air. Such situations certainly don’t happen too often to stay chilled!
Broken windows in unlucky Intercity connection from Auckland to Tauranga
I was picked by Karen from Kiwi Road Trips at the bus station and after signing documents, it was time to drive out on kiwi roads.
1-day itinerary
Tauranga is the largest city in the Bay of Plenty and one the biggest in the country. Location is very convenient for further exploration of North Island, with Rotorua, Taupo and Tongariro National Park being a short drive away. The city centre isn’t as popular as beachside suburbs – Mount Maunganui or Papamoa. But you know me guys, I always want to see everything so here is where I started.
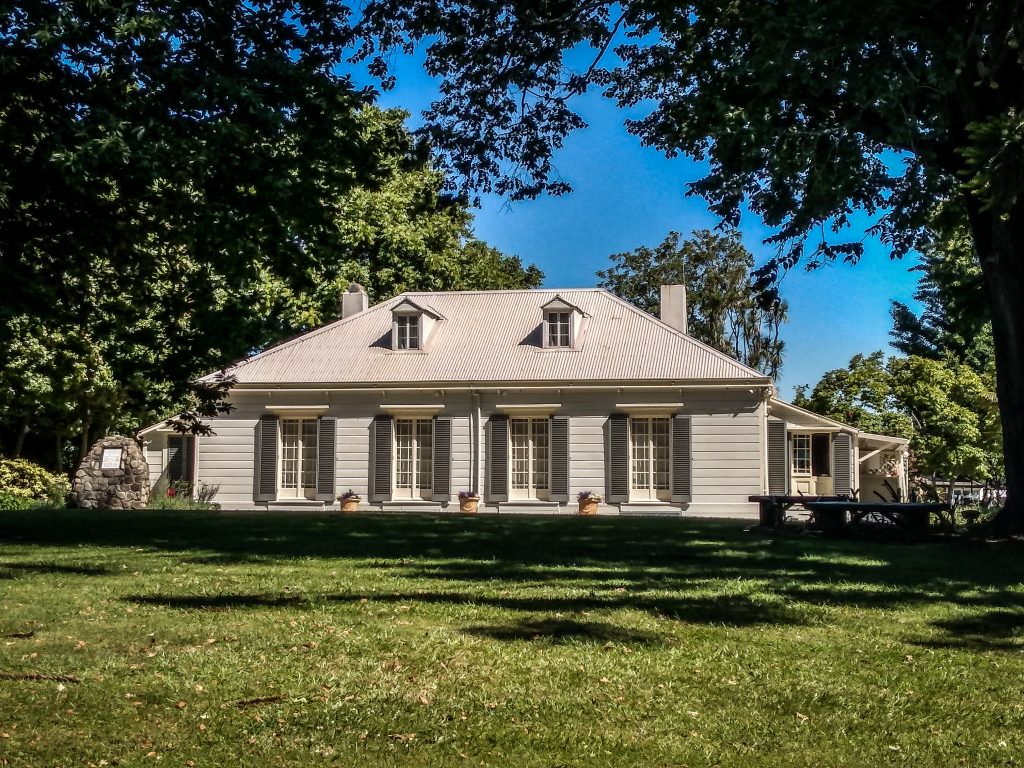
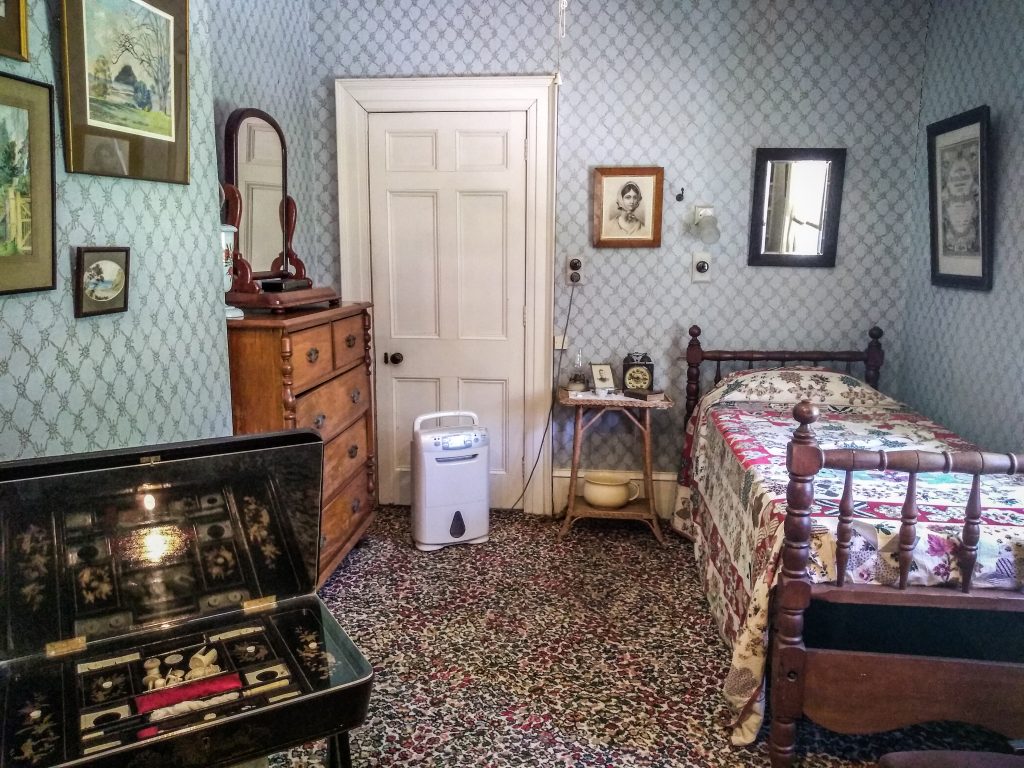
The Elms – Anglican mission was established here in 1838 by priest Alfred Nesbit Brown and the first buildings in the Bay of Plenty were constructed, initiating regular contact between Maori and Pakeha (white people). Brown worked hard, preaching even in the most remote settlements. Unfortunately, after the war, soldiers settled on the land previously occupied by Māori and the mission declined.
The guide was an absolute highlight of the place. So passionate and dedicated! Even though the entrance ticket isn’t cheap (15 NZD for international guests), it’s a solid part of New Zealand history and shouldn’t be missed.
Mission Cemetery – Visiting the memorials commemorating battles between Maori and British government forces is a great continuation to the visit at the Elms mission house.
Mission house in TaurangaInside the mission house – guided tour is great!
Monmouth Redoubt – Another memorial place. Maori fortified village (called pa) Taumatakahawai, used to stand here until it was taken over by British forces during the wars to stop the flow of warriors and support for Maori chiefs.
Tauranga Art Gallery – exhibitions of contemporary works. I’m not a fan of such, so gave it a miss but it does have good reviews so you may want to consider it in your itinerary.
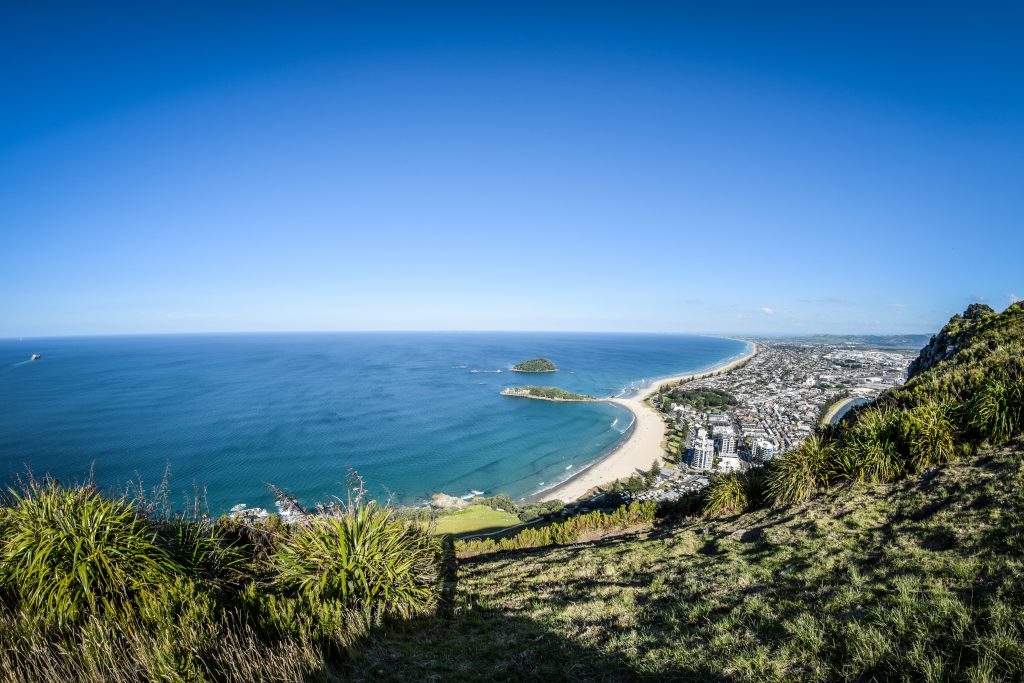
After seeing the most interesting sights in Tauranga, I got into my car and drove to the nearby beachside suburb of Mount Maunganui. It’s hard to miss an extinct volcanic cone at the end of peninsula seen from the distance and that was exactly where I was heading. Maunganui means big mountain but let’s say that with the elevation of 232 m a.s.l. the name is rather overexaggerated.
Mauao Reserve – There has been evidence of three fortified villages (pa) on top of and around Mauao making it an important and sacred site for Maori. Several walking paths run in the area, the most popular being the summit walk. You would need about 35-50 minutes to get to the top and it can be done following Oruahine Track, Waikorire Track or 4WD Track. Check the map here. It’s quite steep and more tiring than it looks like but the views are nice, especially in the direction of the ocean. The base track around the mountain is popular as well and it’s 3.4 km long, taking about 45 minutes to complete.
Views nearby the summit of Mount MaunganuiPath to the summit in Mauao Reserve
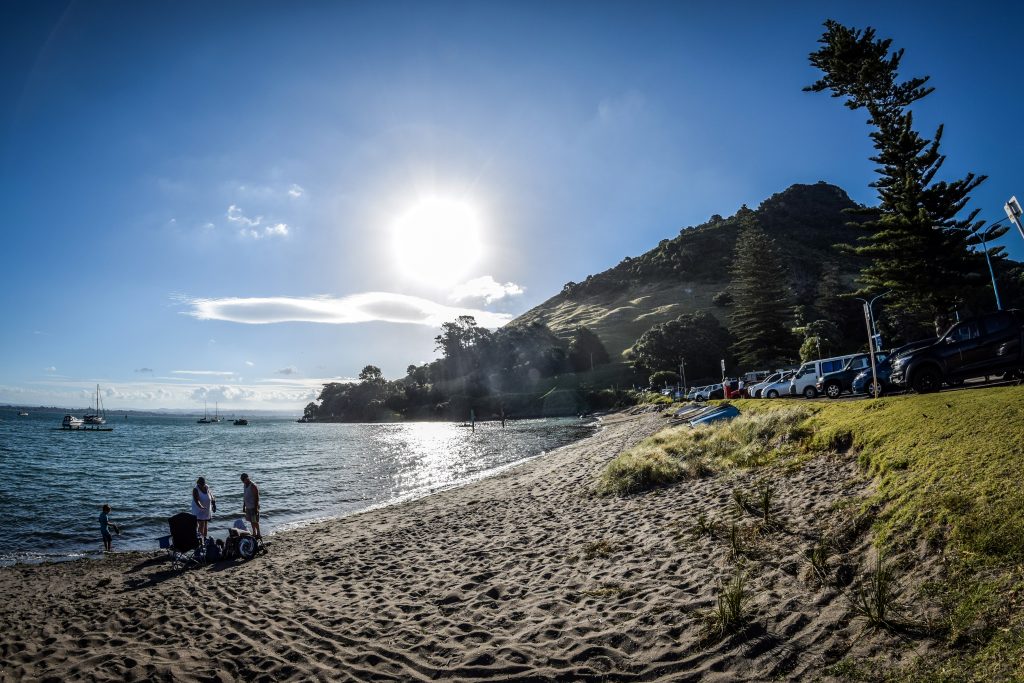
Main Beach and Pilot Bay Beach – The first one is on the side of the ocean, which makes it very popular among those looking for bigger waves. There is also Moturiki Island easily accessible from the beach. The second one is located on the side of the bay and is usually much calmer and better for kids.
Pilot Bay BeachPilot Bay Beach
Mount Hot Pools (optional) – Located just at the feet of Maunganui. The bath in hot saltwater doesn’t sound bad and certainly will help you to recover energy after a full day of sightseeing.
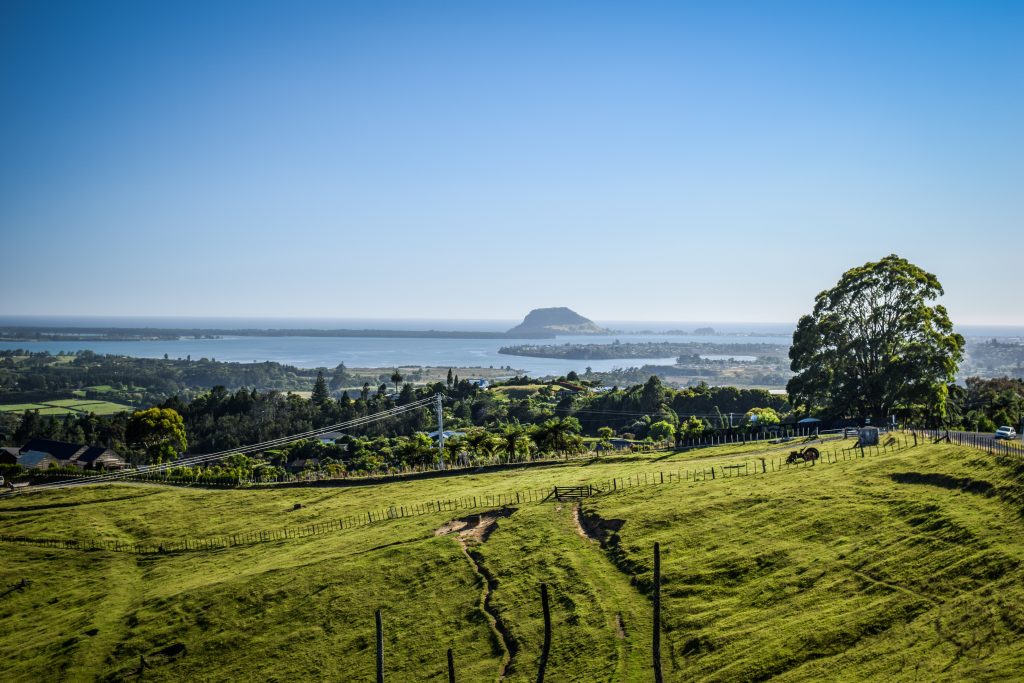
Minden Lookout – Being located about 13 kilometres from the city centre, it was my last stop for that day. The easiest is to follow State Highway 2 and then turn left into Minden Road in Te Puna. Wide panorama of the Bay of Plenty is certainly worth extra kilometres.
View to Mount Maunganui from Minden Lookout
From there, it was time to stock up with groceries so I made my way to Pack’n’Save. It has the opinion of being the cheapest supermarket in New Zealand and they also have discounts for fuel which is another benefit for road trips.
Karen and Pete recommended me to stay the first night in the campervan at McLaren Falls, 190 hectares of parkland set alongside Lake McLaren. Parking for campervans costs 10 NZD and it was indeed a very nice place in nature with clean toilets, sink and electric grills.
If you read the previous post, you know that my plans for stage 12 had to be adjusted due to the rain and I decided to stay overnight in Duszniki Zdrój. It didn’t seem to be a problem at first, but I totally forgot that on the next day the long weekend starts and it could be more difficult to book accommodation on the way, especially mountains huts. And this was exactly where I wanted to stay 🙂 When I called PTTK Jagodna Hut in the morning asking for bed, they only started to laugh as everything was booked out weeks before. Sleeping on the floor was also not an option due to COVID-19 restrictions.
Route: Duszniki Zdrój to Długopole Zdrój Distance: ~ 39 km
At that point, it was clear that I have to hike all the way to Długopole Zdrój. I made a few phone calls trying to book a room and in the end, find one free at Aleksander Resort. Way overpriced, same as all the other places on that weekend. Seems like Polish people were so sick of spending time at home due to COVID-19 that once restrictions were loosened and bank holiday came, everyone set off for short city break.
Starting at Duszniki Zdrój market square, I passed the spa part of town and started the ascent towards Zieleniec, which is located 11 kilometres from the start point. The path goes very gently until Podgórze and from there it’s a bit more challenging but nothing extraordinary.
Panorama of Duszniki ZdrójHills surrounding Duszniki Zdrój
I heard the noise of cars coming from the top of the hill and unfortunately, shortly after I saw an asphalt road. It’s the Sudetes Highway. The only thing that road has in common with real highways is the name. Luckily, it’s an advantage for hikers as the red track follows it all the way to Zieleniec. Traffic is minimal so just keep to the left edge of the road and it should be fine.
Track joining the Sudetes HighwayPTTK Orlica Hut
With all that ski lifts around, Zieleniec must be a busy place in winter. Without snow though, it was a rather dead place and I only made a short stop at PTTK Orlica Hut to have a drink and snack.
The tracks descents 4 kilometres towards Nature Reserve Pod Zieleńcem. It’s the area with peat bogs, not very visible from the main trail but you could easily make a short detour and get closer following one of the local paths.
Nature Reserve pod ZieleńemPeat bogs seen from a drone
From here to Spalona and PTTK Jagodna Hut is around 15 kilometres without any significant elevation differences. I passed the village of Lasówka with a picturesque church. Great place for short picnic lunch. After that was a bit monotonous section through the forest until I popped out close to the ski lift at Spalona. Following it all the way to the top of the hill, I reached extremely busy at that time PTTK Jagodna Hut. Long weekend, lunchtime, mountain hut accessible by cars. All of these means one thing – crowds.
Muddy forest trailSki lift around PTTK Jagodna Hut
If you have time or you stay for the night in the hut, there is an easy trail blue going to the highest peak of Bystrzyckie Mountains – Jagodna (977 m n.p.m.). It’s around 4 kilometres, taking 1 hour one way. The views are particularly nice from the newly build viewing tower.
Main Sudetes Trail (red) continues from PTTK Jagodna Hut on the Sudetes Highway for 4 kilometres when it turns left and descents to Ponikwa. Be careful not to miss the sign. Before Ponikwa, it passes through the grasslands with the walking track being barely visible. The easiest is to just follow the grass crushed by other walkers and head in the direction of the buildings.
Red track continues on The Sudetes Highway until it turns left……and goes through the meadows……all the way to Ponikwa
Shortly after leaving Ponikwa, the trail turns left and continues on the gravel road to my final destination. Luckily, that time I left the forest just in front of my hotel, so no more extra kilometres. It was a long day and sightseeing had to wait for the next day in the morning.
Długopole Zdrój is the smallest and probably least popular spa town along Main Sudetes Trail. The water flowing out of the excavation area of the old mine was taken for tests and proved to be healthy enough. The spa town was established in 1802 as Bad Langenau and therapeutic baths started shortly after. It’s worth to have a look at the pump house and try mineral waters. Other than that, there is nothing else to do.
Panorama of Ponikwa and Długopole ZdrójPump house with mineral waters in Długopole Zdrój


: Głuchołazy – Prudnik")
: Złoty Stok – Głuchołazy")


: Puchaczówka Pass – Złoty Stok")


: Długopole Zdrój – Puchaczówka Pass")


: Duszniki Zdrój – Długopole Zdrój")