Tag

camping

Browsing

Introduction

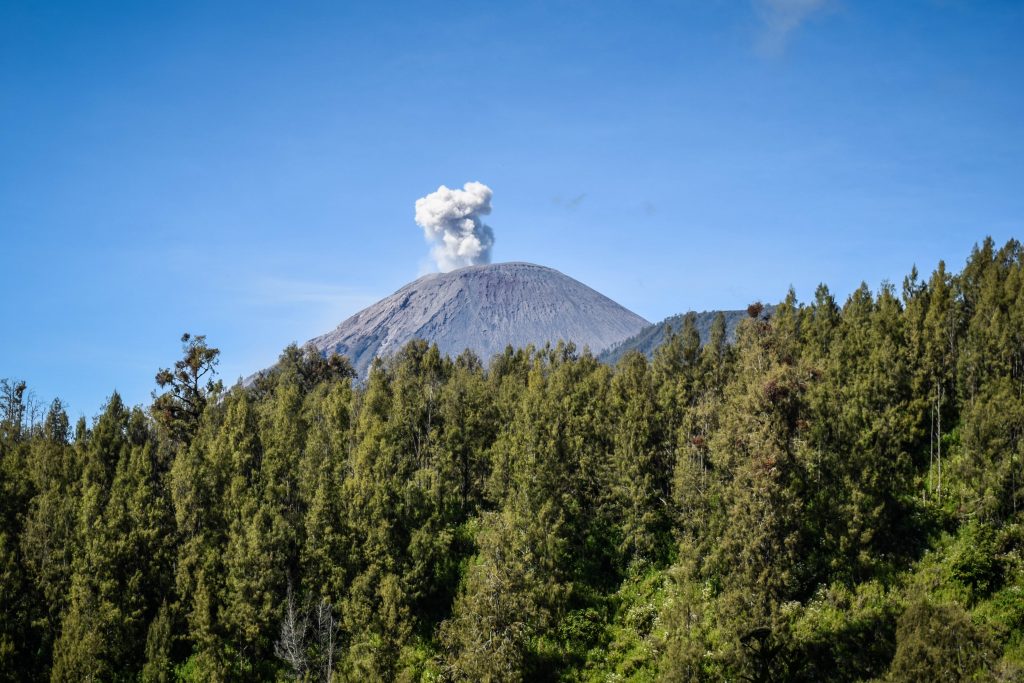
Semeru is a stratovolcano, which with its 3.676 meters above sea level, can be called the roof of Java. The mountain is also known as Mahameru, meaning ‘The Great Mountain’. The name originates from the Hindu cosmology’s mountain of Meru or Sumeru, the place where gods reside.

It’s a popular hiking destination that provides you with a feeling of real adventure. In the end, you are walking on an active volcano! The activity can be noticed many times, especially when you see volcanic ash coming out of the crater at the summit. On the way up the mountain, you start thinking about how it will look up there. Is it even safe?

Semeru has a long history of eruptions and can be periodically closed for hikers. I was there in August 2019 and felt perfectly safe. Needless to say, care has to be taken on the last kilometers when walking on the steep and exposed slope and later when wandering around the summit. Most probably you will witness small eruption when volcanic ash goes into the air just a few meters from you but that’s the part of the game and the factor that attracts so many tourists. Just don’t come too close to avoid breathing it in. Everyone wants to have a selfie with a small eruption in the background and it happens every 20-30min!

Everything you need to know before you go

Technical details

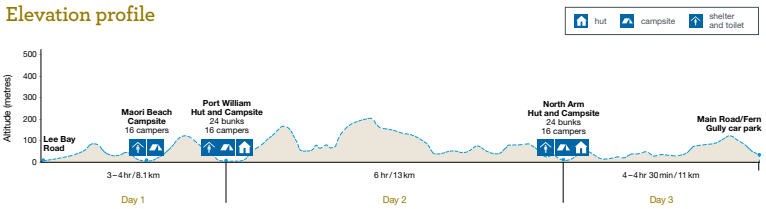
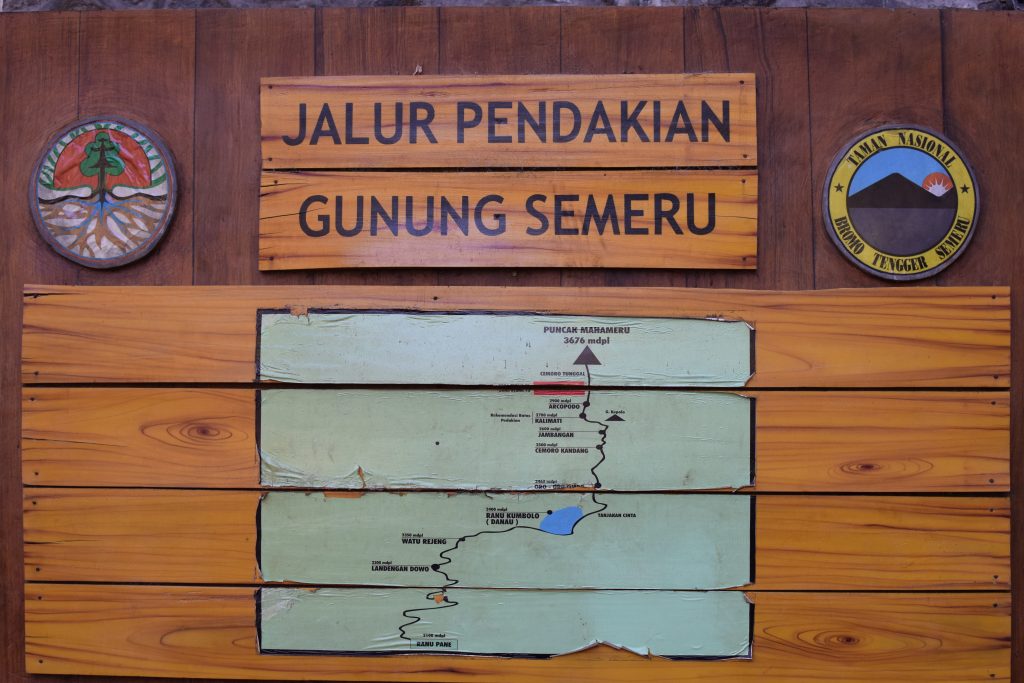
  • Summit: 3,676 meters above sea level
  • Altitude gain: 1,576 meters
  • Distance: 42 km return
  • Ranu Kumbolo Lake campsite: 2,400 meters above sea level (10.5 km from the starting point)
  • Kalimati campsite: 2,700 above sea level (7.5 km from Ranu Kumbolo Lake)
  • Final ascent: 3 km one way from Kalimati campsite
  • My difficulty rating: medium / hard

Best time to go

The dry season, which is the best time for the hike, starts from late April and lasts until November. During the rainy season from January to late April the trail to the summit may be closed but most importantly going there can be dangerous. It’s also the time to restore the ecosystem of the area.

Hiking Mount Semeru
Panoramic views on the way to the summit

How to get there?

We did the route Malang – Tumpang – Ranu Pane. The first leg was really straightforward as we ordered a taxi via the Grab mobile app. Just tell the driver to take you to the jeep’s departure point. Both Grab and Gojek are great ways to get around Indonesia. They work in the same way as Uber but very often have more options available. You can literally order delivery of anything you can imagine!

Being the only hikers there, we waited well over an hour for other people to join in order to lower the costs of jeep ride. Unfortunately, no one came. After bargaining, it cost us 150.000 IDR per person. The rule is simple – the bigger the group, the lower the cost per person is. They charge per vehicle and as it was only two of us, we had to pay a bit more.

Required documents

Medical check – must be obtained from the local hospitals or public health facilities 1 day before the hike. It’s an easy procedure – they just check your weight, high, blood pressure and ask about your general condition. I don’t remember the exact cost, but it was around 20.000-40.000 IDR. We did it in Malang 1 day prior to the hike but you may also do it in Tumpang or even Ranu Pane village.

Passport / ID copy – Photocopy of official identity document that is still valid. For hikers who are less than 17 years old, parents’ approval has to be signed and stamped (6.000 IDR fee) together with a photocopy of parents’ passport / ID.

Registration form – confirmation of online registration or the document filled in the office in Ranu Pane.

Hiking Mount Semeru
Views like that are worth the paperwork

Bookings and prices

Registration for the permit can be done through the website of Bromo Tengger Semeru National Park. Just follow the online booking registration flow, make a payment and wait for the confirmation email. The national park puts a limit of 600 people entering the trail every day, that’s why in high season it’s better to make the booking and secure a spot. Don’t forget to do it at least 3 days before the start of the hike.

There was a problem with processing the payment with my credit card, so if you have the same issue, just take enough cash and pay in the office in Ranu Pane. Apparently, if you don’t make a payment as soon as 5 hours after registration, it will be canceled. Even though, we didn’t have any problems explaining to the ranger that the payment couldn’t be processed and he accepted cash.

Ticket prices for Indonesians:

Working Day 19.000 IDR per person per day

Holidays 24.000 IDR per person per day

Ticket prices for Foreigners:

Working Day 210.000 IDR per person per day

Holidays 310.000 IDR per person per day

Hiking Mount Semeru
Views from the top of Mount Semeru

Briefing

After picking up the permit in the rangers’ office, you will be invited to the briefing. They explain the route, location of the campsites and some safety tips to keep in mind. One rule is especially worth remembering: whatever you bring in, bring it out with you. There are no rubbish bins and unfortunately, trash can be found around campsites. Indonesia has a big problem with rubbish and makes sure not to leave anything behind. Simply throw it away in Ranu Pane village.

Itineraries

2 DAYS 1 NIGHT

You will walk 42 km in two days and the second one will be especially tiring. Do it only if you are an experienced hiker in decent shape. We did it this way and it was fine, though one extra day to enjoy nature wouldn’t hurt. The campsite at Ranu Kumbalo Lake is only 3 hours walk away from Ranu Pane, that’s why it seemed unreasonable to stay there for the night and we pushed to the end instead.

Day 1: Ranu Pane – Ranu Kumbalo Lake – Kalimati campsite
Day 2: Kalimati campsite – Semeru summit – Kalimati campsite – Ranu Kumbalo Lake – Ranu Pane

3 DAYS 2 NIGHTS

The most popular and optimal version of the hike, giving you more time on the side of nature, taking all the sights at a slower pace. Good idea if you have more time to spend in the national park.

Day 1: Ranu Pane – Ranu Kumbalo Lake – Kalimati campsite
Day 2: Kalimati campsite – Semeru summit – Kalimati campsite – Ranu Kumbalo Lake
Day 3: Ranu Kumbalo Lake – Ranu Pane

4 DAYS 3 NIGHTS

The very long and chilling version of the hike, for me it would be a bit too long though. But if you are with a group of friends, why not 🙂

Day 1: Ranu Pane – Ranu Kumbalo Lake – Kalimati campsite
Day 2: Kalimati campsite – Semeru summit – Kalimati campsite
Day 3: Kalimati campsite – Ranu Kumbalo Lake
Day 3: Ranu Kumbalo Lake – Ranu Pane

Hiking Mount Semeru
On the top of Mount Semeru

With or without a guide?

Taking a guide is not necessary at all. The trail to Kalimati campsite is very easy to follow, there is a lot of people, small stalls selling food and drinks so it’s impossible to get lost. For the final summit push just follow the lights of other hikers and you will be fine as well.

Equipment

Here is my basic packing list for the hike:

  • Camping: tent, sleeping bag, sleeping mat, gas cooker, cooking pot, lighter.
    If you don’t have your own equipment, you can easily rent it everywhere in Ranu Pane.
  • Clothes: thermals, t-shirts, shorts, long pants, warm sweater/hoodie, gloves, hat, socks, underwear, hiking shoes, jacket.
    Don’t underestimate the weather. Even if it’s warm and nice in Tumpang or even Ranu Pane, the nights at the campsites will be cold as well as final ascent on exposed terrain.
  • Headlamp and spare batteries, hiking poles, sunglasses.
    Good light is essential as you will be walking hours in the night. Hiking poles are extremely useful on the last kilometers of the steep summit push so it’s good to have at least one.
  • First aid kit, basic medications, suncream.
  • Food
    Don’t take too much. Indonesia won’t leave you with an empty stomach. There are small stalls on the way where you can buy fruits, drinks, snacks. You will support the local community and keep your backpack lighter.
  • Camera
Hiking Mount Semeru
Hiking poles are very useful when walking in volcanic ash

Accommodation in Ranu Pane

There are many accommodation options in the village and the best is to text them through Whatsapp or just come to the village and look around. We chose Thomas Sanjaya Homestay which was simple but perfectly sufficient. There was even a hot water shower which is not always the case in Indonesia. They also run a small shop for those willing to buy some extra noodles, cookies or rent a sleeping bag and gas cooker. The nights can get really cold in the region, giving us a feeling that next night in the tent for sure won’t be too warm!

On the trail – 2 days 1 night

Day 1: Ranu Pane village – Ranu Kumbolo Lake – Kalimati campsite (15km, 5-6h)

Stage 1: Ranu Pane village to Ranu Kumbolo Lake (3-3.5h)

Around 7 am the guesthouse started to be busy with climbers getting breakfast and preparing for departure. The breakfast didn’t surprise – it was a simple nasi goreng (fried rice) with egg. I could say a lot about nasi goreng but let’s just underline that it is absolutely the most popular meal for budget travelers and I had it nearly every day 🙂

Hiking Mount Semeru
Information board at the entrance gate

At around 8 am we were already on the way. First, following asphalt road to the gate of the national park where our permits were checked and then passing through cabbage fields into the forest. Surprisingly, I realized that taking so much food with us was absolutely not necessary. Why? There are warungs (little stalls) on the way! They sell fruits, cakes, drinks and of course fried rice or fried noodles. You can make a stop there and refill your energy, supporting local people running a rather challenging business. They have to descent back to the village every day and then go up again in the early morning, very often simply carrying products on their backs.

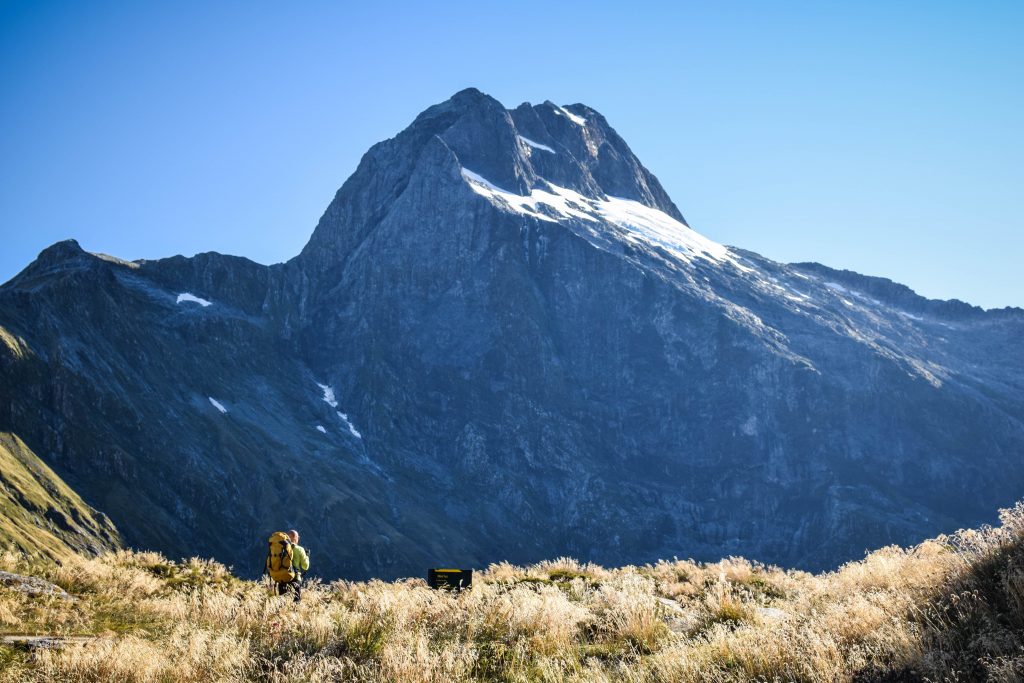
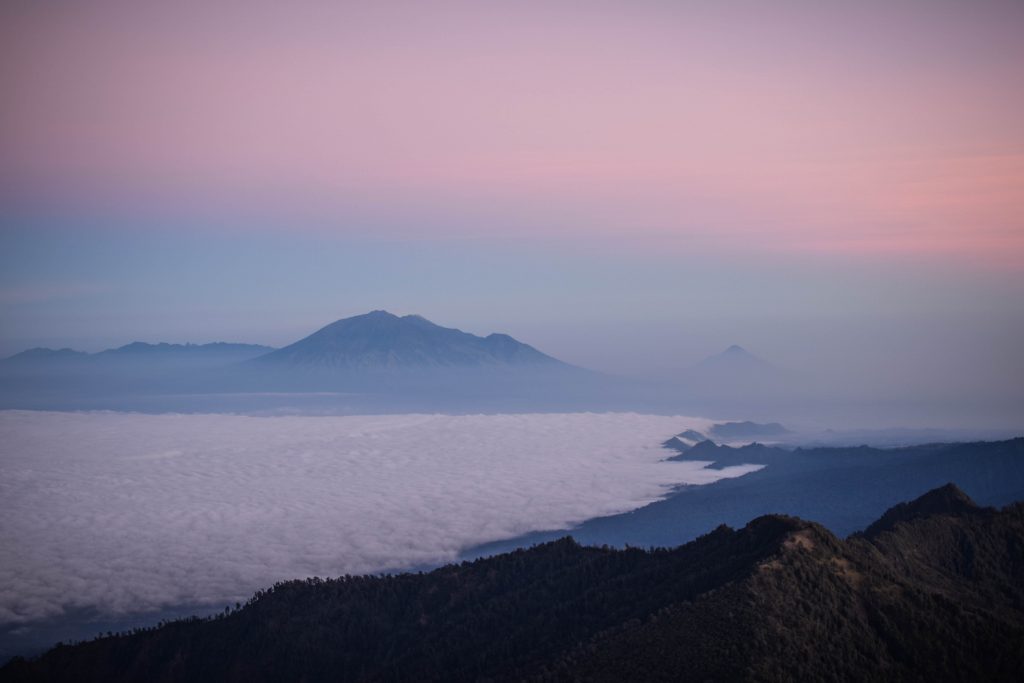
Mt Semeru still looked very far away and we admired its graceful shape from the distance when suddenly the cloud of volcanic ash appeared growing just at the summit! It looked totally amazing and it was the first time for me to actually see a small volcanic eruption. It has a long history of eruptions and since 1967 it is in a state of near-constant activity. Small eruptions can happen even every 20 minutes! While it’s an additional advantage that boosts your adrenaline, for your own safety you should never go off the hiking trail.

Hiking Mount Semeru
Small eruption seen from the distance

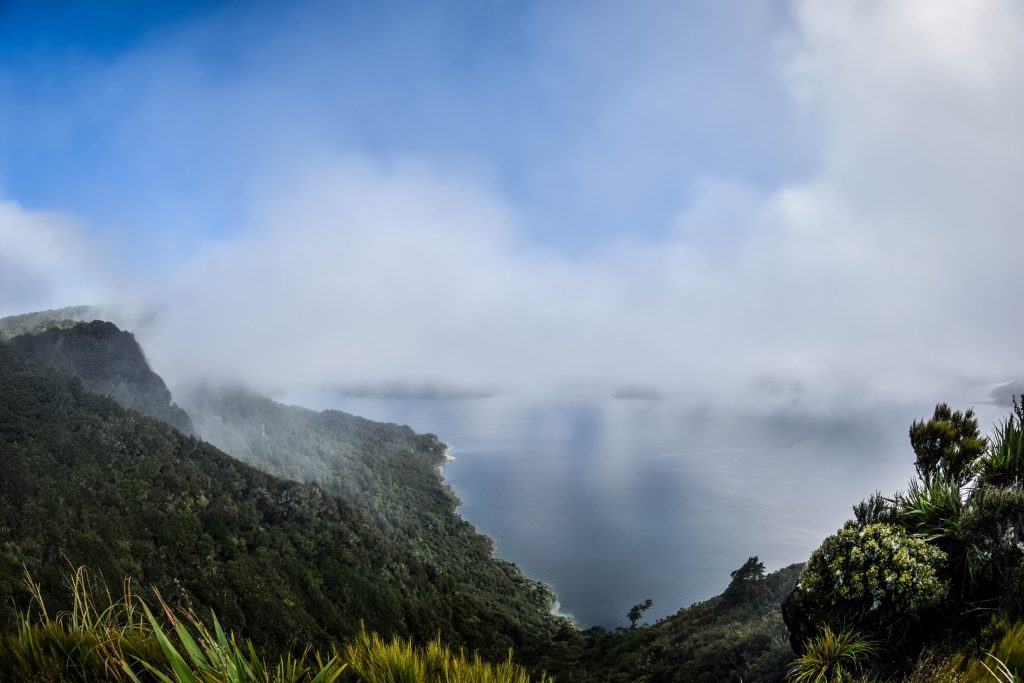
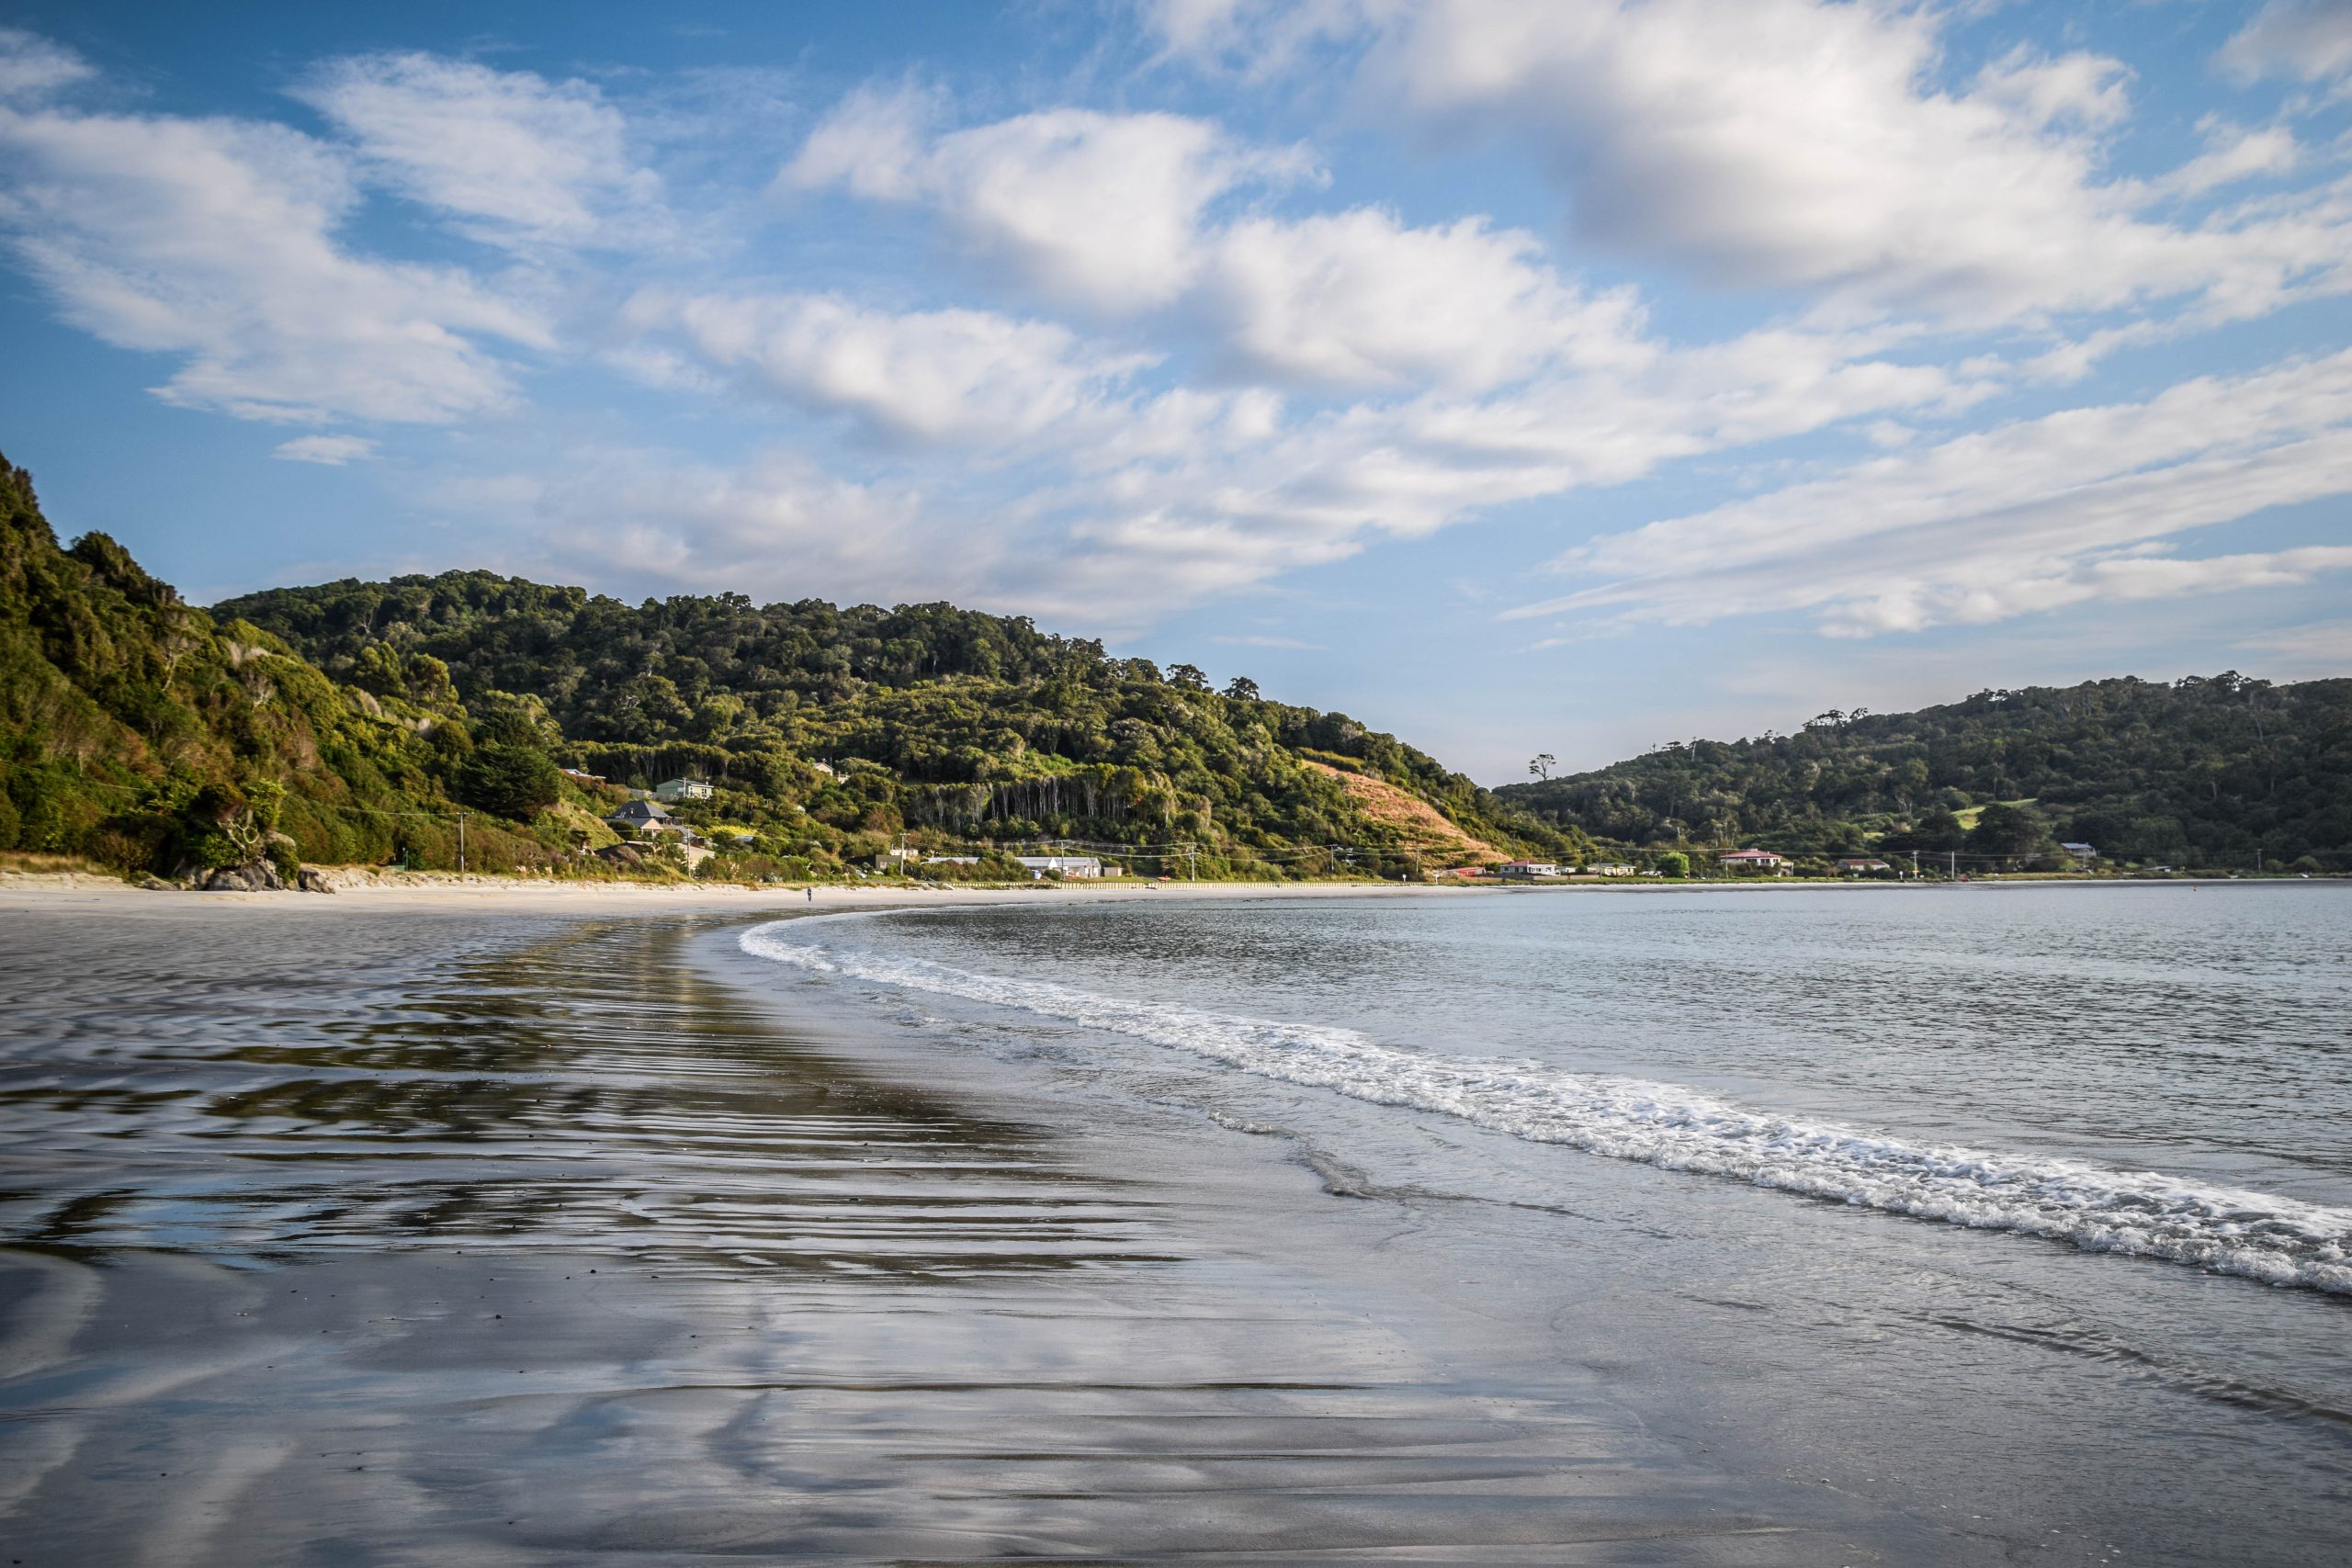
After 3 – 3.5 hours since departure from Ranu Pane, we arrived at Ranu Kumbolo Lake. There is a beautiful campsite there at the lakeside and obviously some warungs as well. Swimming in the lake isn’t allowed as the water is used for drinking and cooking. I regret a little bit that we didn’t stay there for an extra night. Next time!

Hiking Mount Semeru
Ranu Kumbolo Lake and campsite

Stage 2: Ranu Kumbolo Lake to Kalimati campsite (2-2.5h)

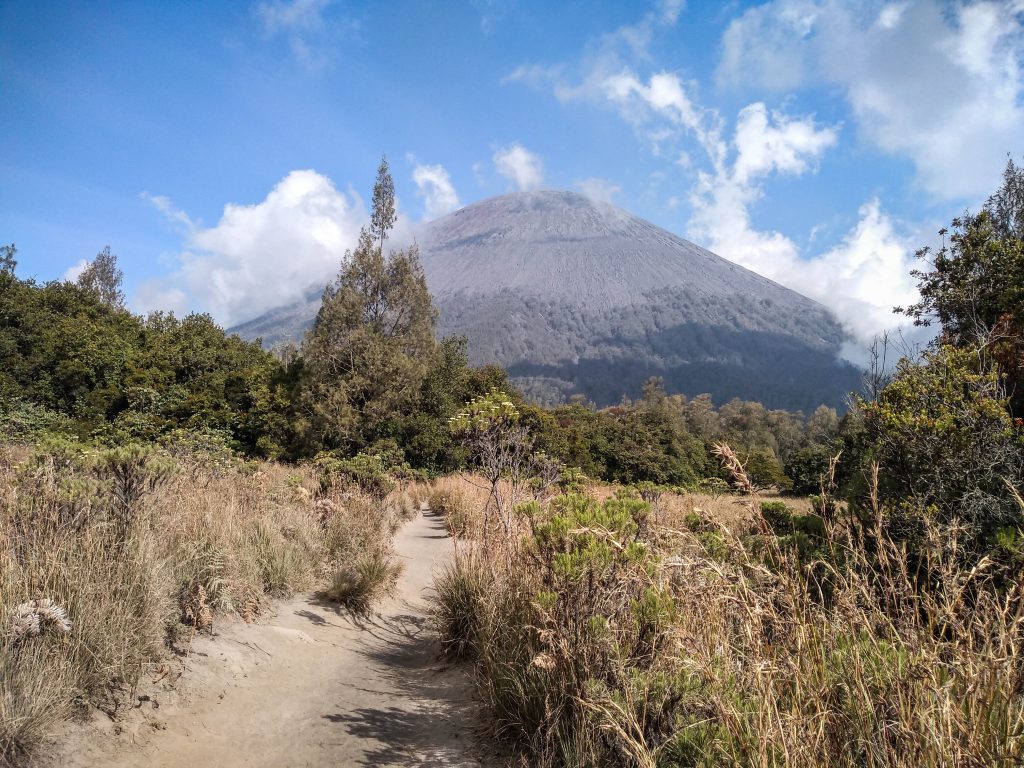
After a lunch break for cooking instant noodles and relaxation at the lake, we continued along much more steep part of the trail leading through forest and grasslands to Kalimati campsite. Here the backpack started to be really heavy and I was glad to have my trekking poles for extra support. Before, we could see Mount Semeru only occasionally, but now it’s getting closer and closer.

Hiking Mount Semeru
View on the way to Kalimati campsite

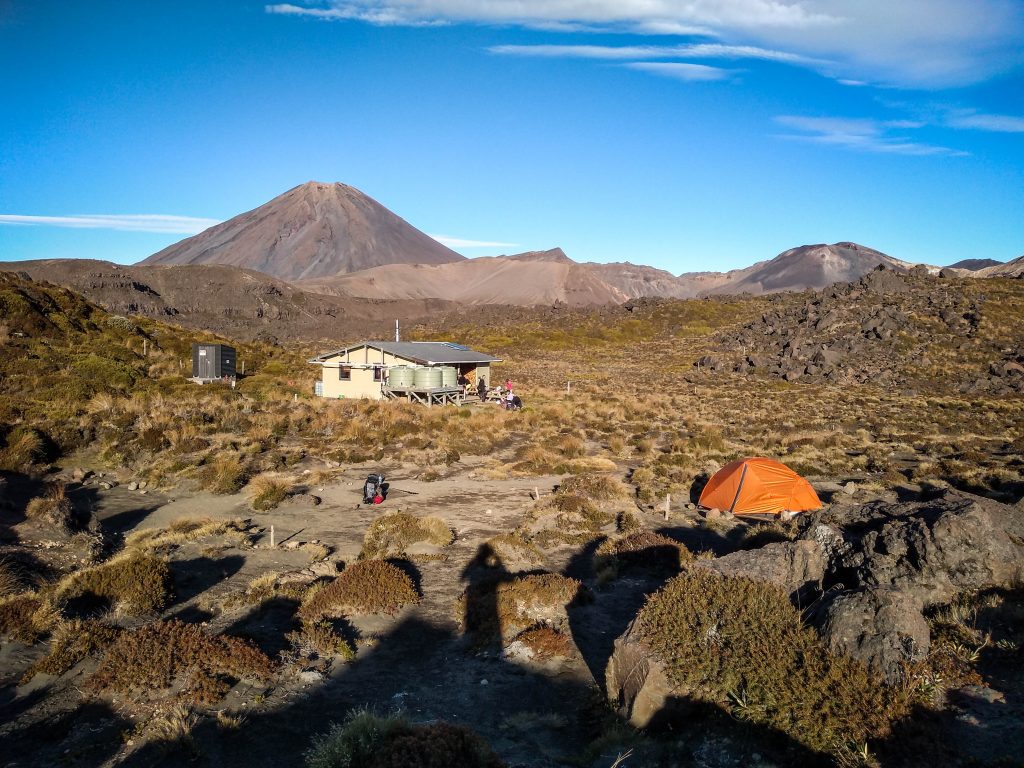
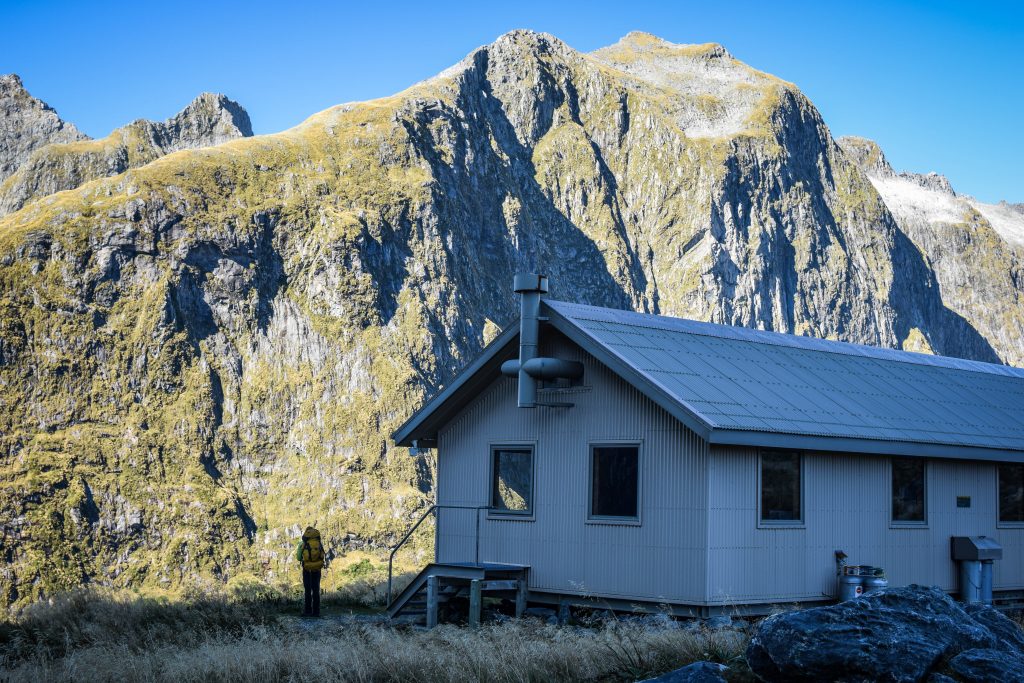
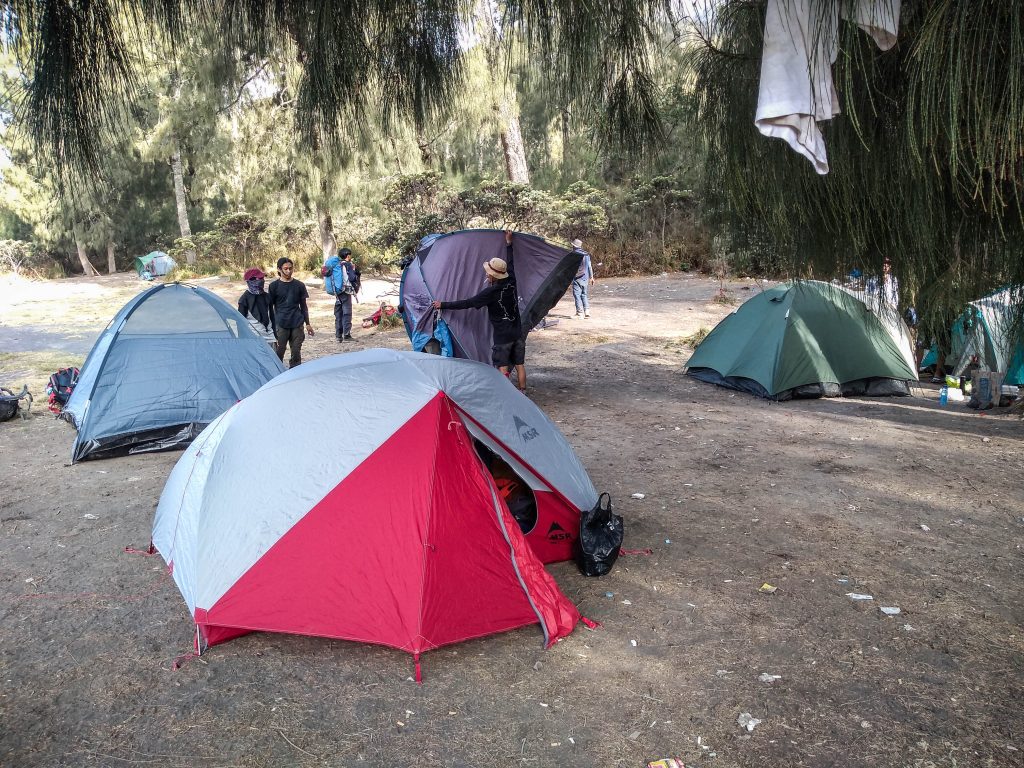
Around 2 – 2.5 hours later I was already setting the tent. The campsite was full of friendly hikers, everyone busy with cooking. If you are short on water, there is a source around 15 min walk from the campsite. Just ask locals for directions.

Having in mind that the night will be short, we tried to get some unstable sleep before the alarm woke us up at midnight.

Hiking Mount Semeru
Kalimati campsite

Day 2: Kalimati campsite – Semeru summit – Kalimati campsite – Ranu Kumbolo lake – Ranu Pane

Stage 1: Kalimati campsite to Semeru summit (4-5h)

The nights at Kalimati campsite can get really cold and the best is to have your own sleeping bag as the rented ones are rather thin. Good idea is to have a thermal layer as well.

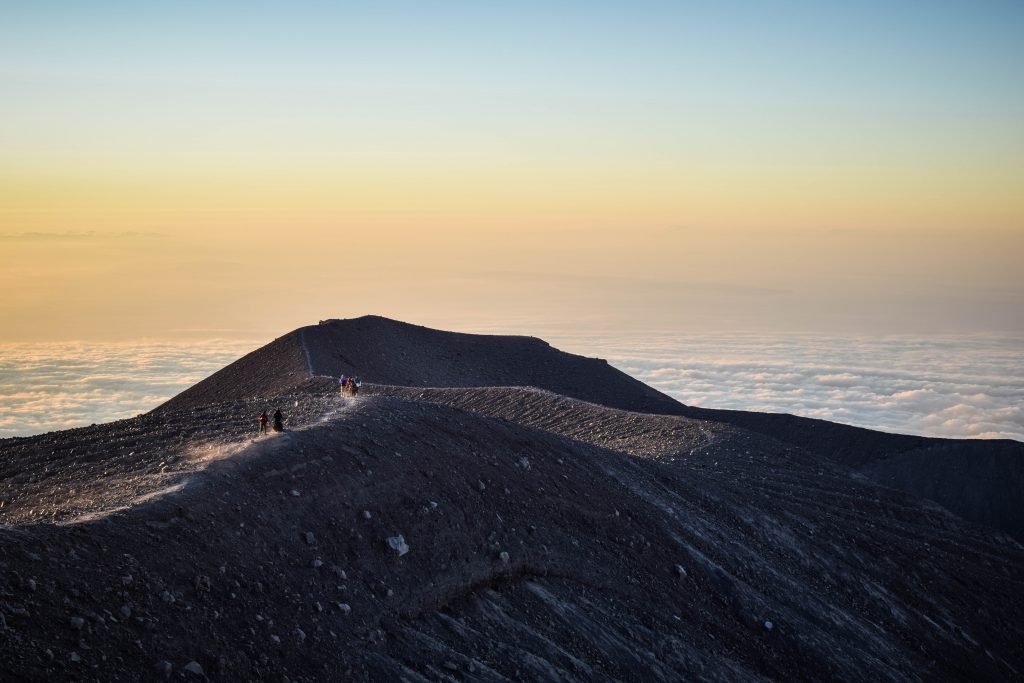
We started preparing our breakfast to warm up and feel some energy boost. Most of our things stayed inside the tent and we departed carrying a small backpack with water, snacks, a camera and an extra layer of clothes. Most of the people hit the trail between 00:00 – 01:00 am, so did we. There was a group saying that they want to depart as early as 10:00 pm but I think it’s way too early. Reaching the summit too early leaves you with nothing else to do than wait and get cold. Leave at midnight if you are slower and want to see the sunrise from the summit. If you are faster or it’s enough for you to see the sunrise on the way (which is awesome anyway), then 01:00 – 01:30 am would be enough.

Hiking Mount Semeru
Rocks are your enemies!

I could imagine that the trail is difficult to follow if you go solo, but there were plenty of other hikers getting ready at the same time so we simply followed them. With everyone equipped with head-light, it looked like a moving dotted line in the middle of dark night.

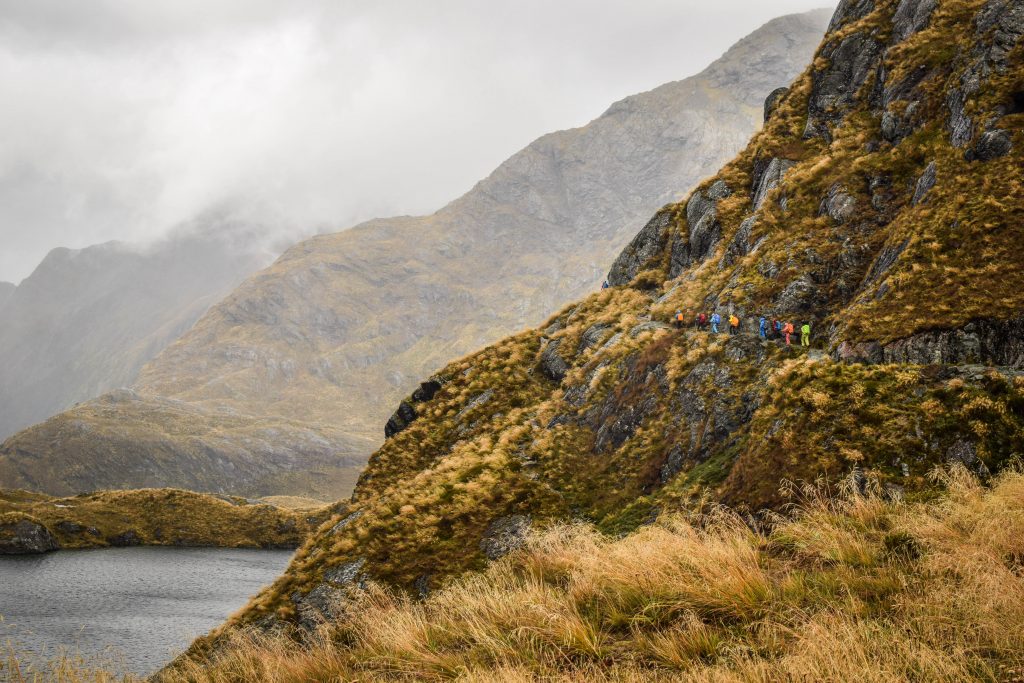
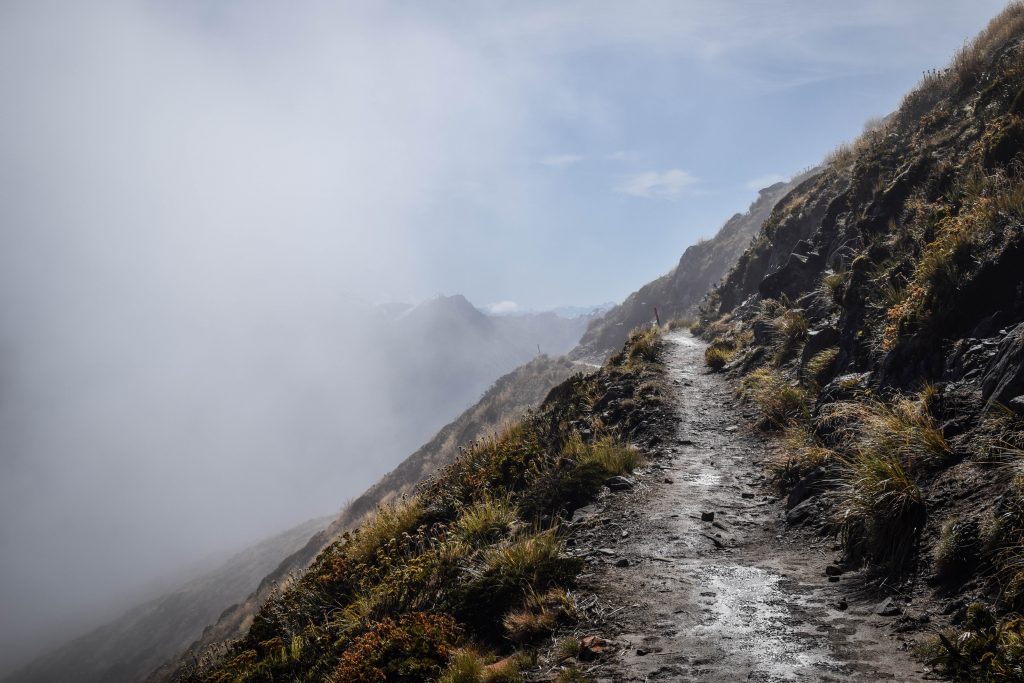
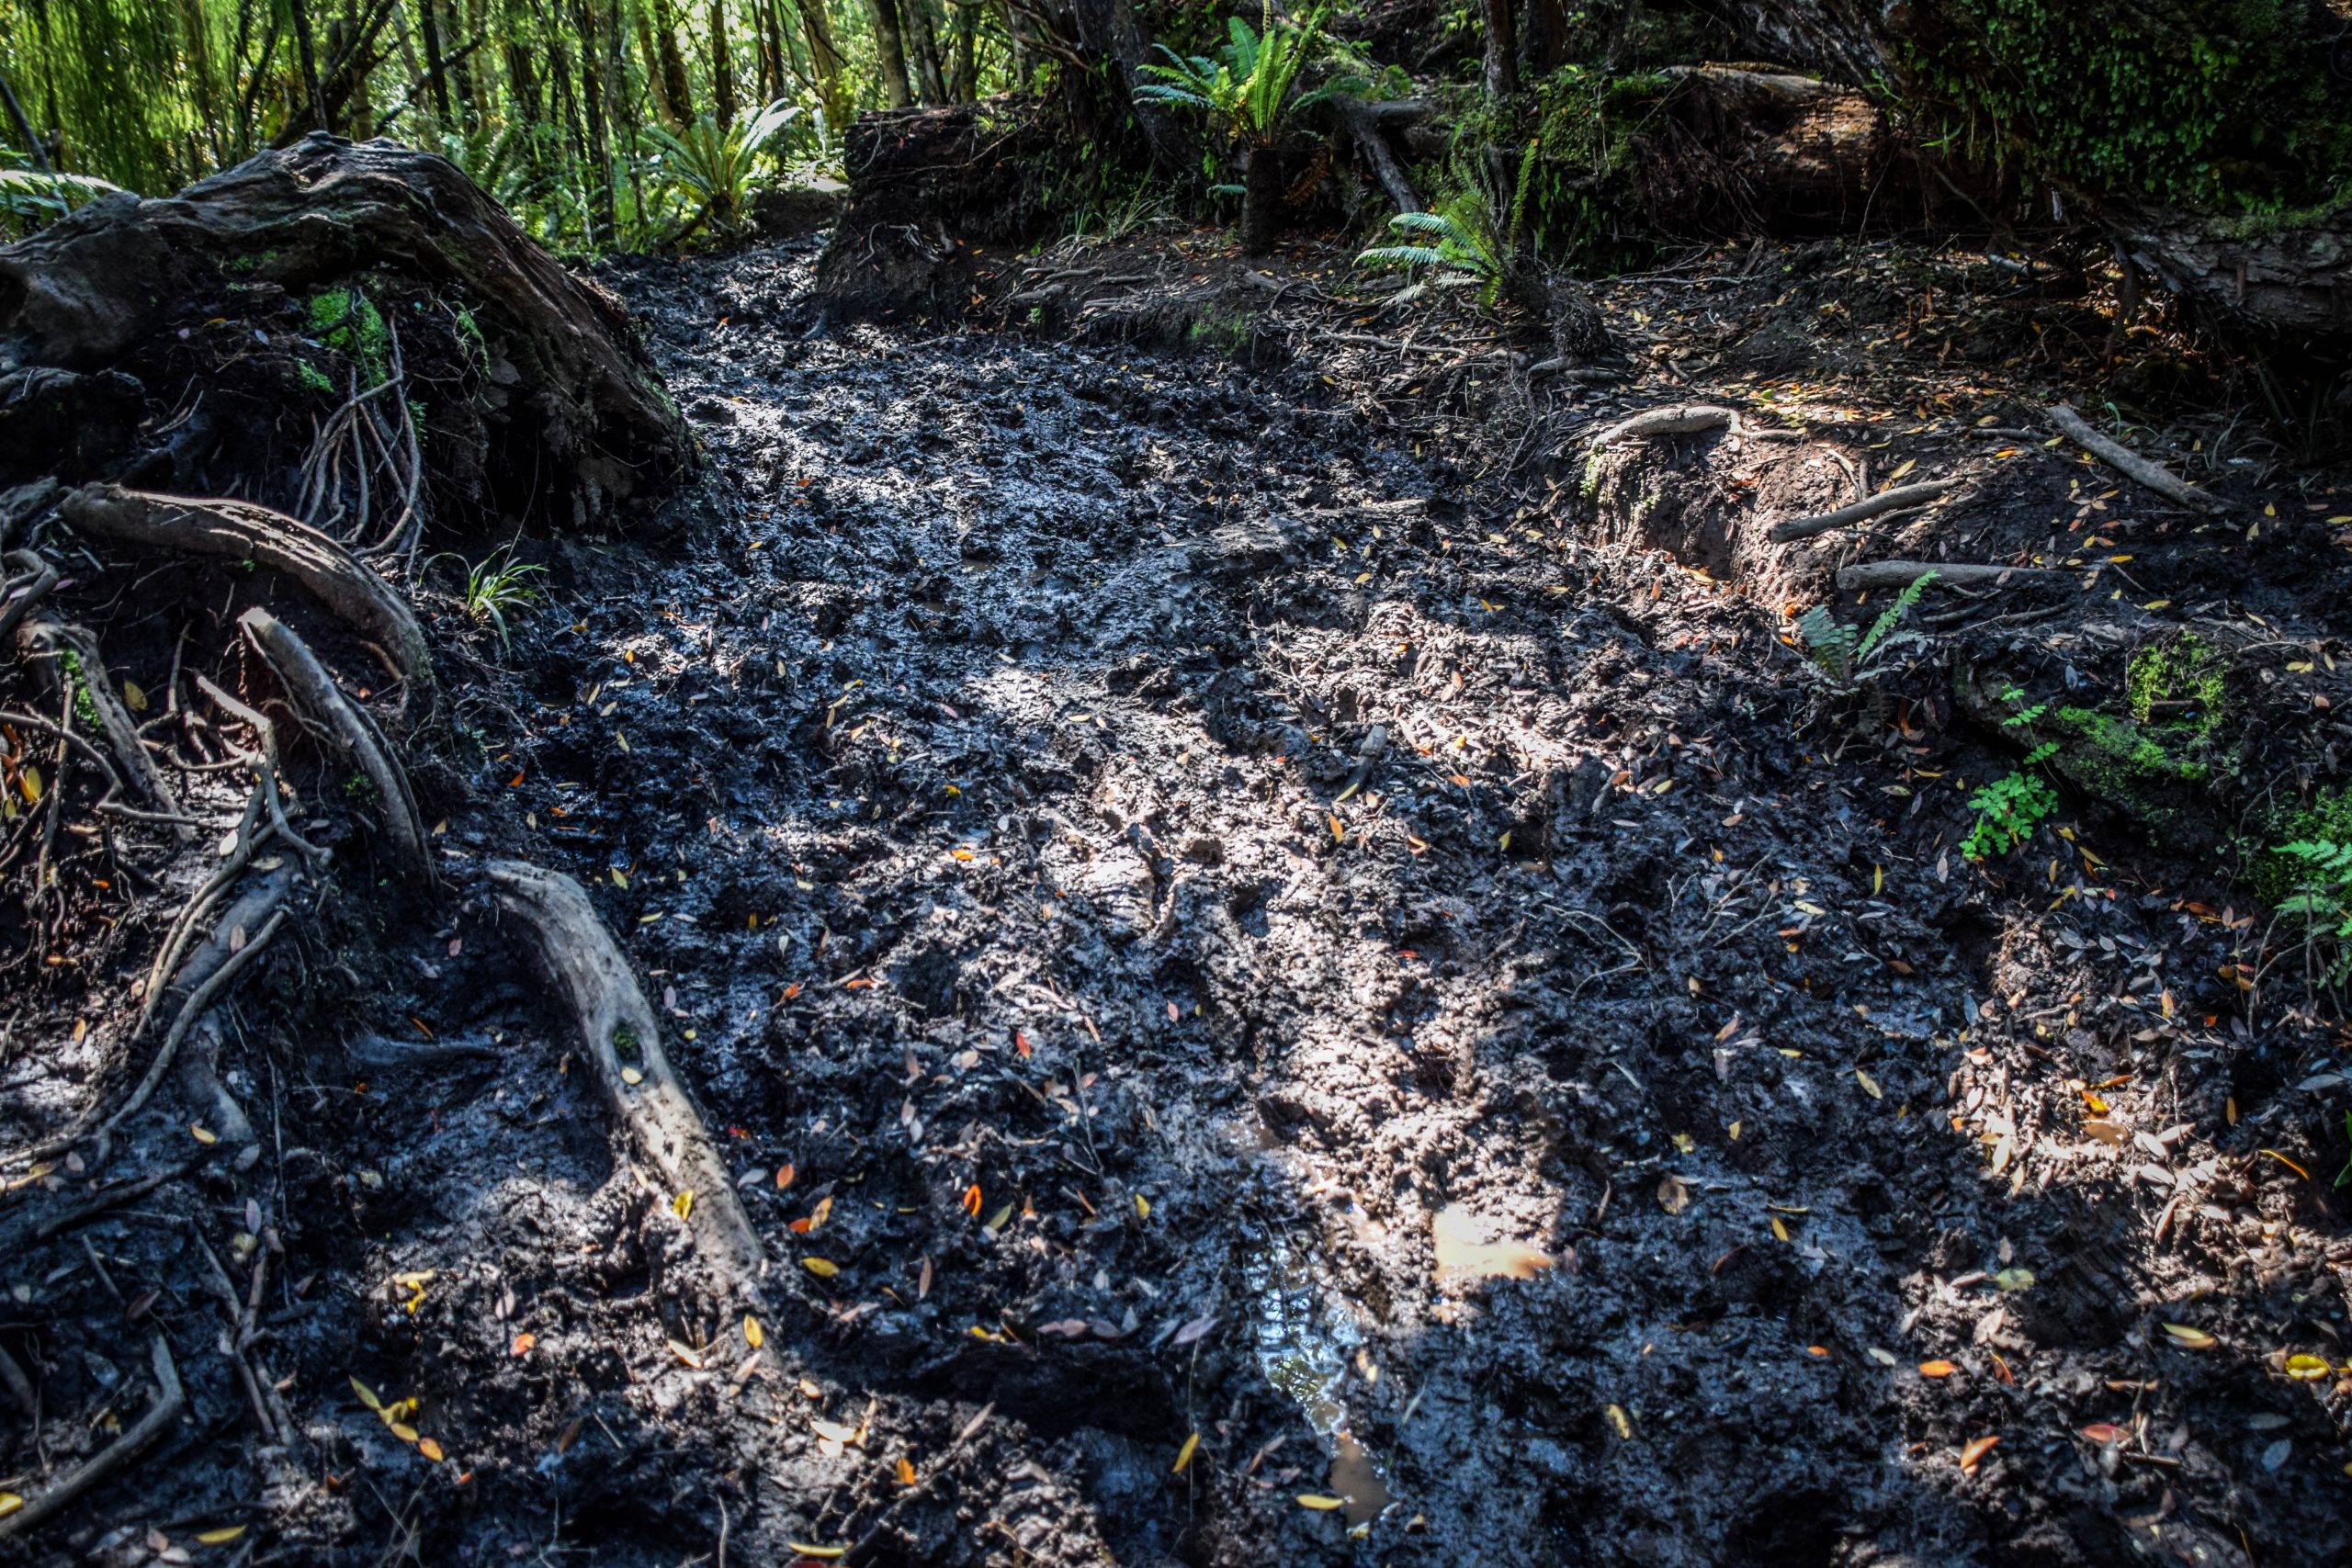
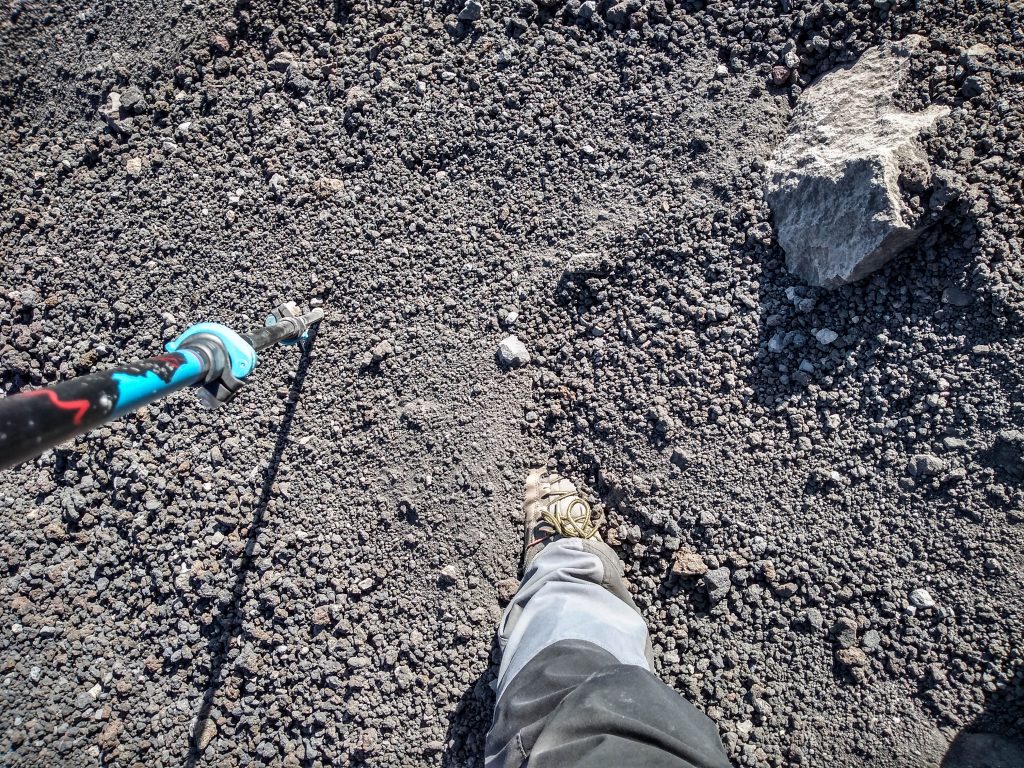
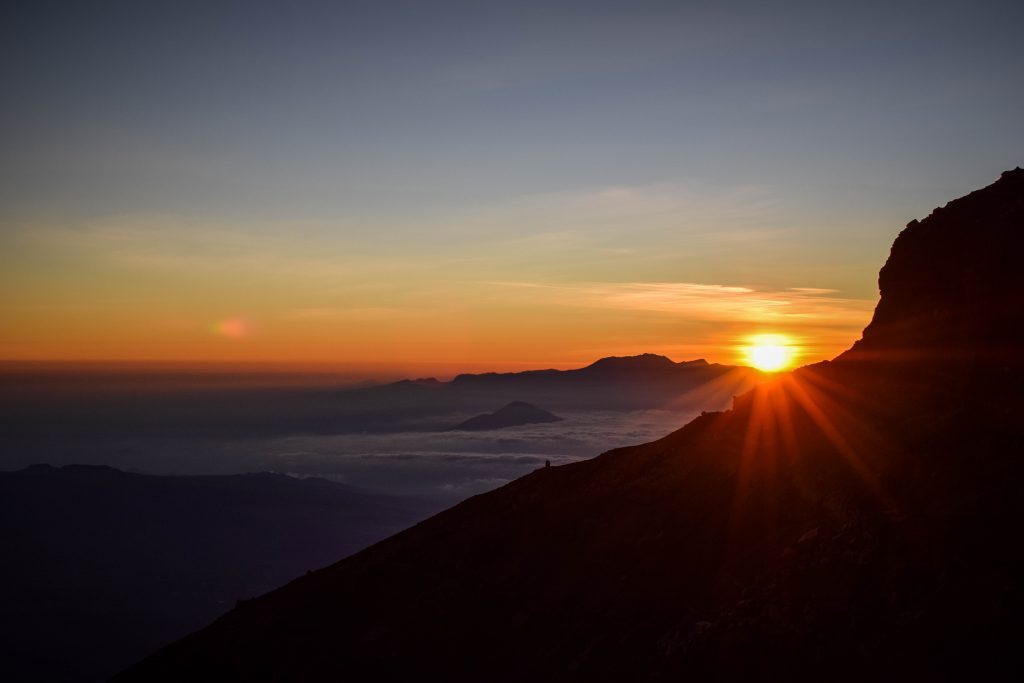
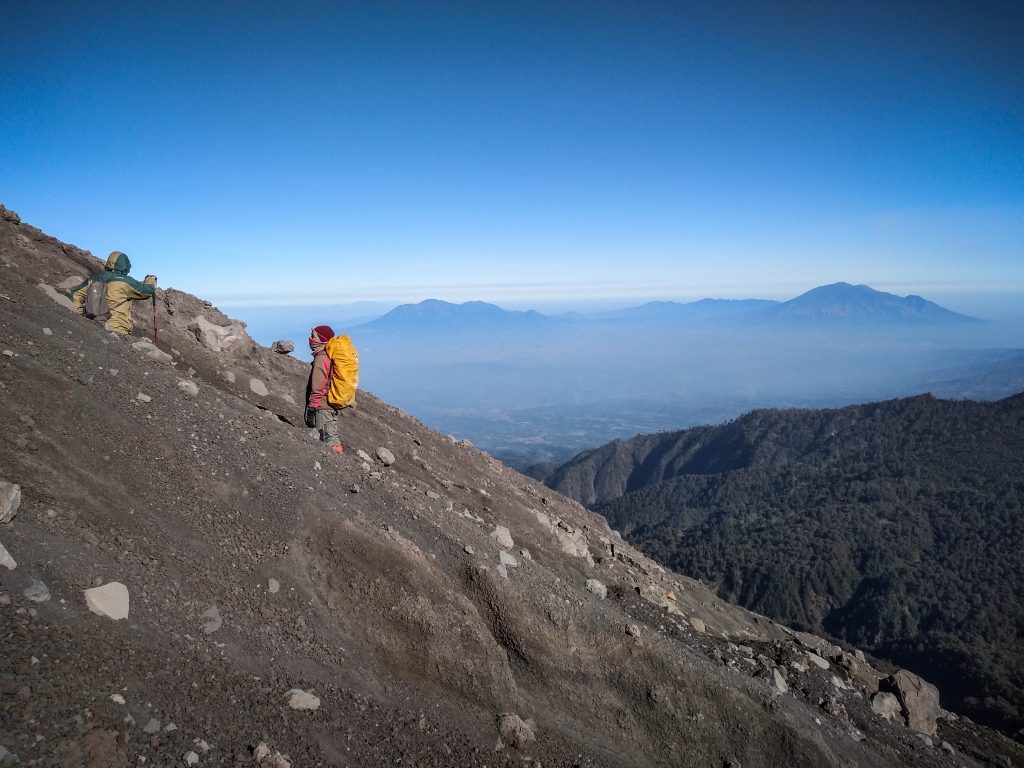
From the campsite, we went into the forest but it didn’t take long to reach infamous volcanic ash and start of the crazy long and slow ascent. So glad that I had my hiking poles! With every 2 steps up, you pretty much slide 1 step down. It’s steep, it’s tiring, it’s cold and it may be very windy due to exposed terrain. You also have to be careful of loose stones rolling down the slope as people walk in front of you. Maybe it’s better that we walked in the darkness? At least we pushed forward not knowing how far we are from the summit.

Hiking Mount Semeru
Sunrise on the way to Mount Semeru
Hiking Mount Semeru
Sunrise on the way to Mount Semeru
Hiking Mount Semeru
The shadow of the mountain at sunrise

Ok, I don’t want to scare you out! It’s definitely not easy but it’s doable. Just pace yourself properly and take breaks if you are running out of breath.

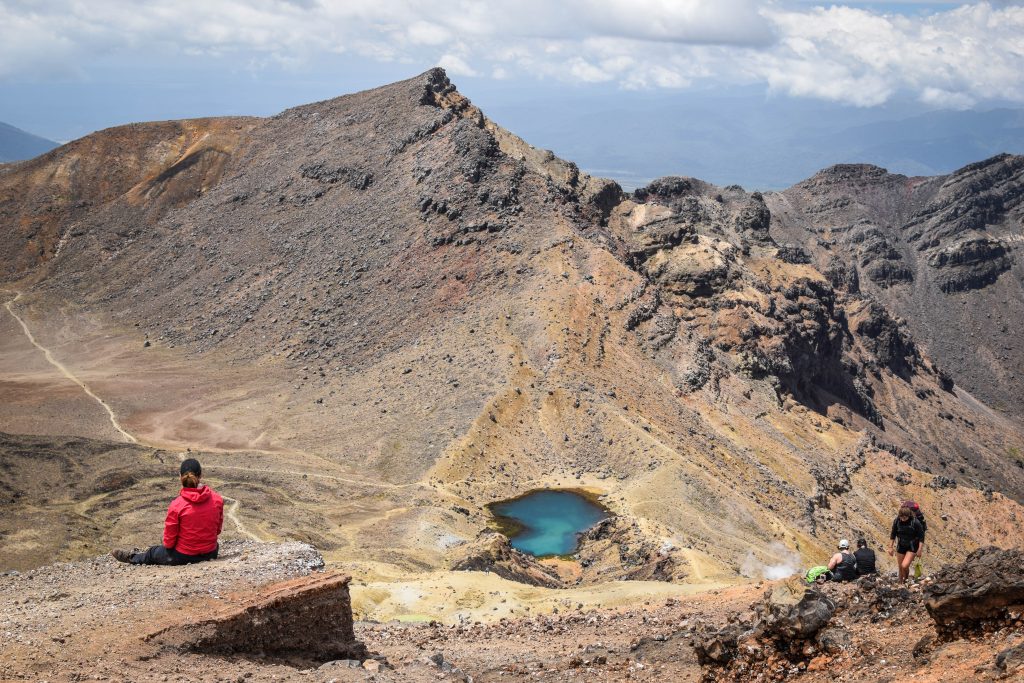
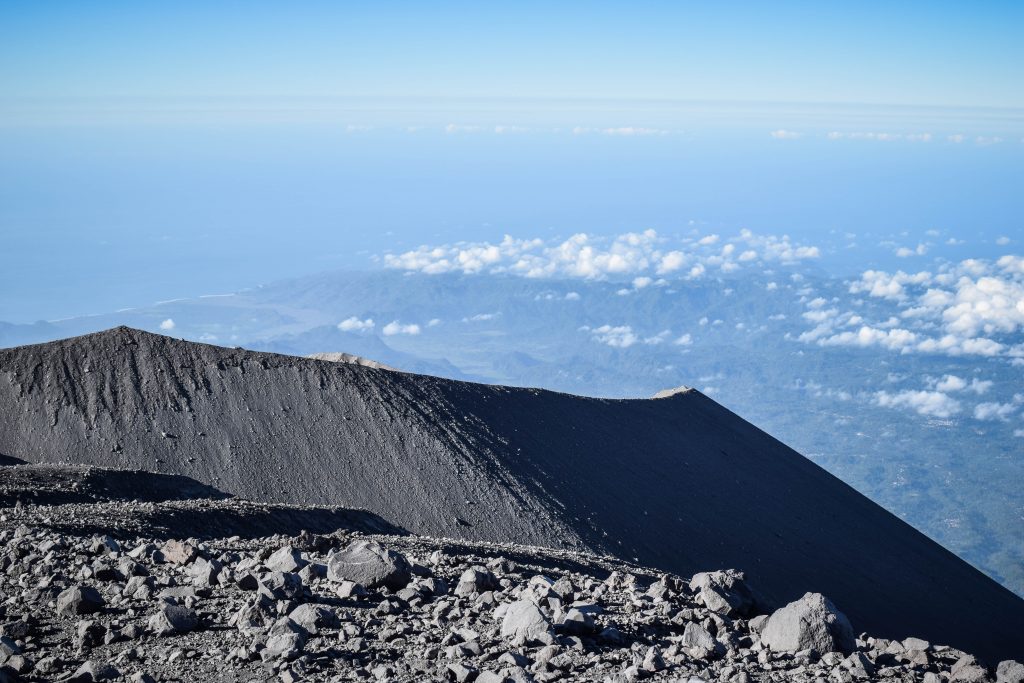
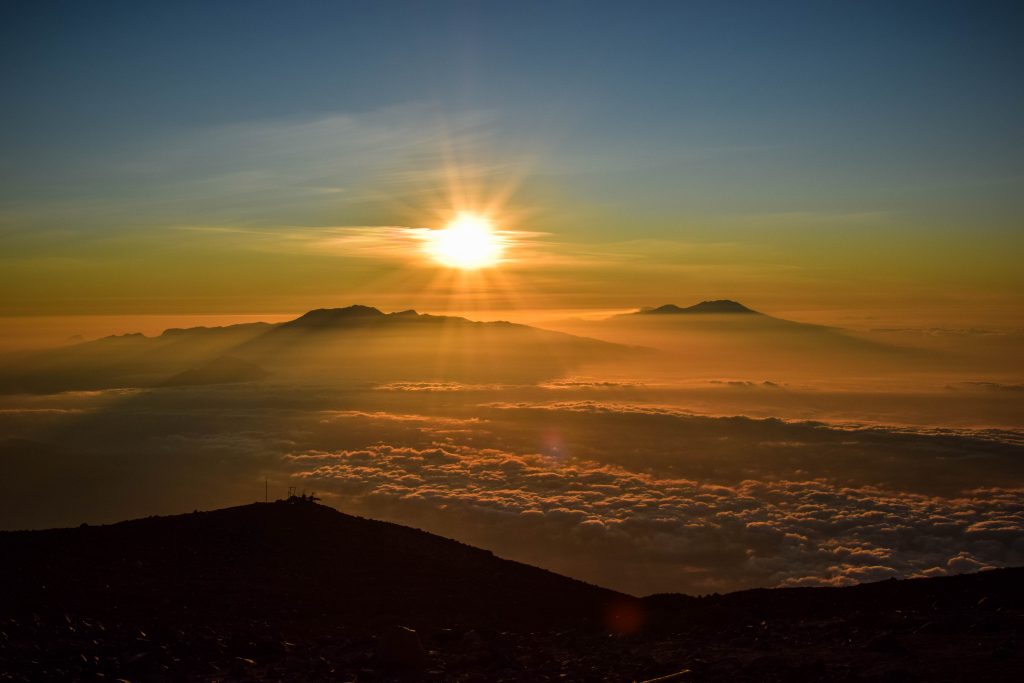
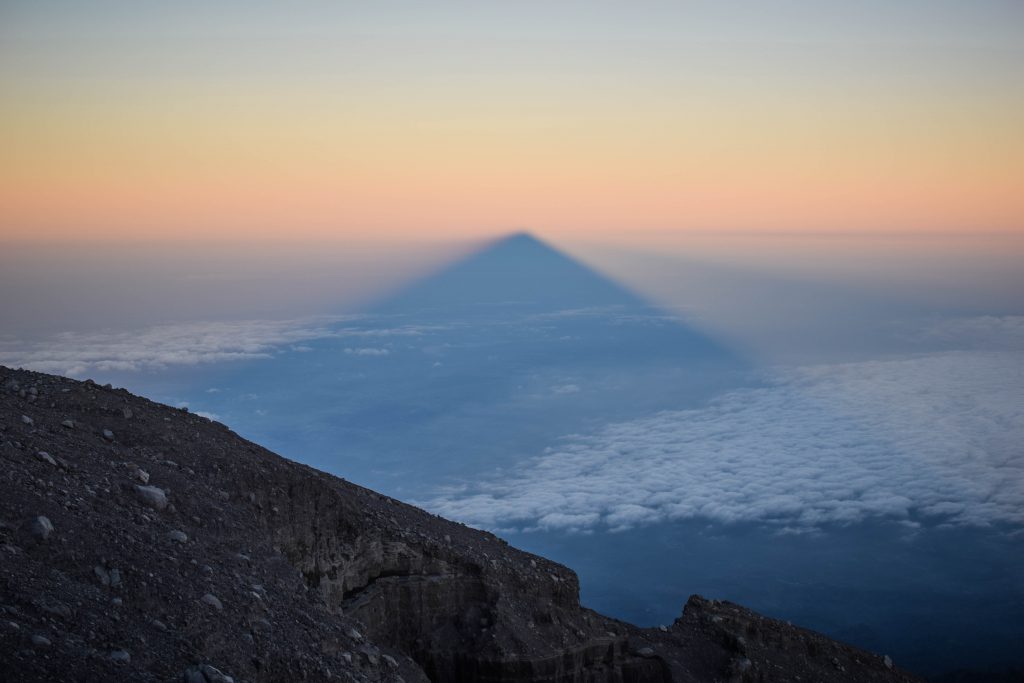
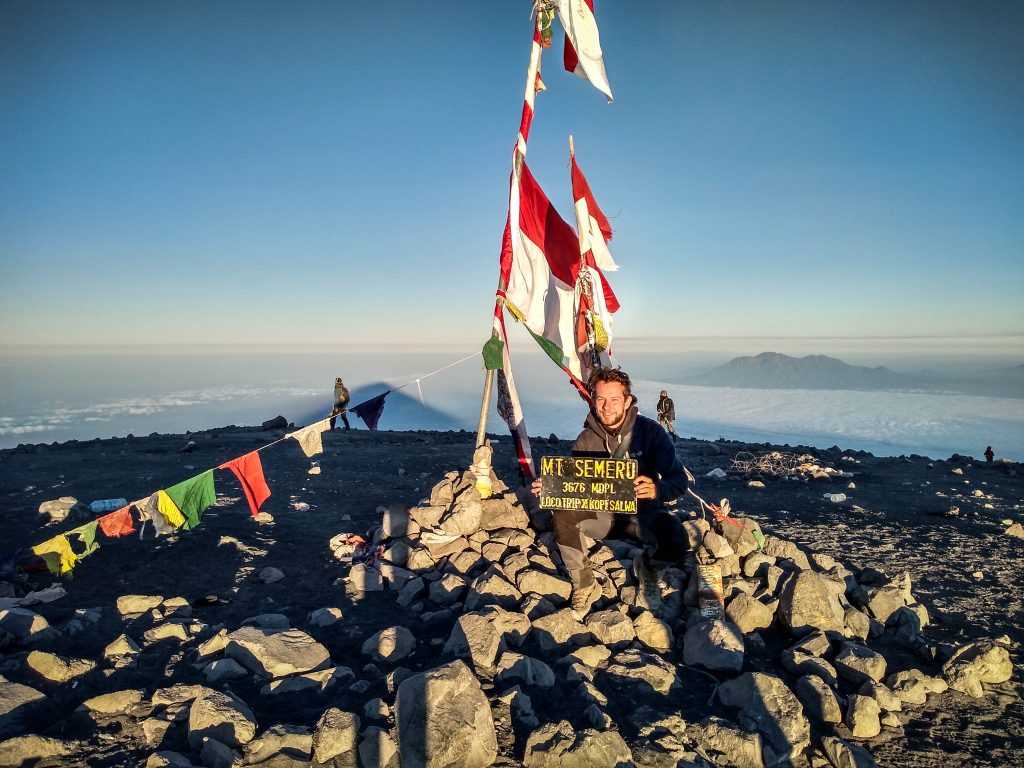
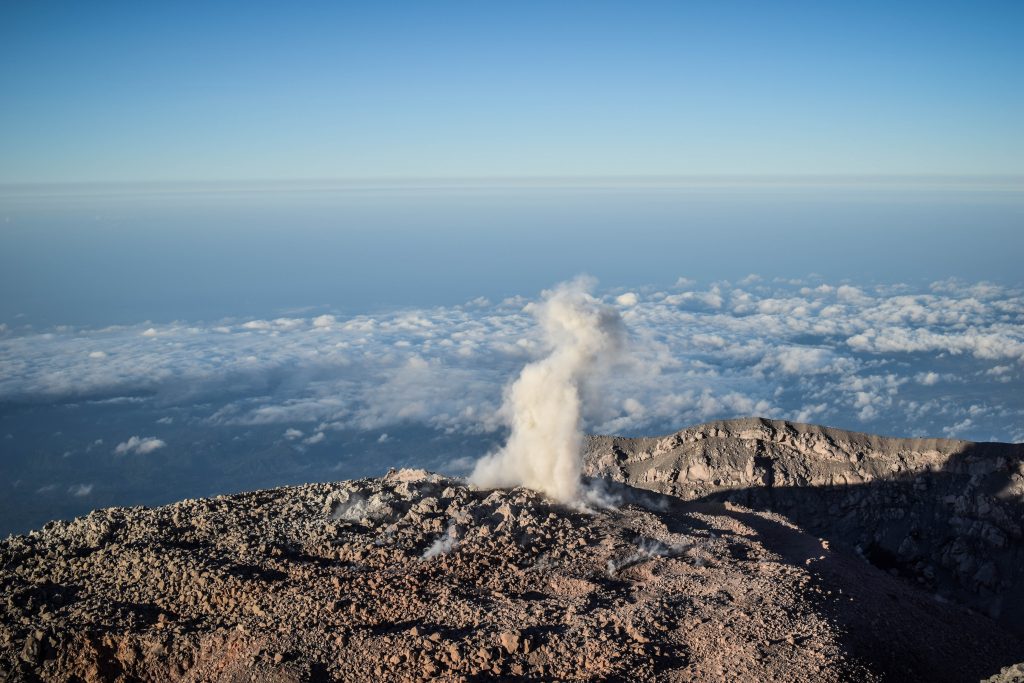
The summit is flat and there is a lot of space to take nice pictures and absorb the views. It’s worth following the trail along the ridge closer to the crater. Being the highest mountain on Java, panorama from Semeru’s top is simply spectacular. We also had a nice chat with a group of Indonesians that treated us with warm ginger drink and a soup! Having something warm in hands when resting on the summit after long and tiring ascent was exactly what we needed.

Hiking Mount Semeru
On the summit of Mount Semeru

But the best point was witnessing 2 small eruptions that happened just in front of us. Exactly the same style as we saw the day before but this time we were only a few meters away. The cloud was growing and taking its shape, hanging in the air and slowly drifting away. The whole spectacle reminds of frequent volcanic activity and the power of nature in Indonesia. In the case of Semeru, eruptions like that usually happen every 20-30 minutes so just hang around and wait for it. Be ready for one of a kind pictures opportunity!

Hiking Mount Semeru
Small eruptions can happen even every 20-30 min
Hiking Mount Semeru
It’s one of a kind spectacle!

Stage 2: Semeru summit to Ranu Pane village (6-8h)

After conquering the summit in 5 hours, the way down to the camp took us… less than 1.5 hours. Using heels and sliding all the way down is the most effective and fastest way to descent. When turning around, it was hard to imagine that we really went up this steep trail in the middle of the night.

Hiking Mount Semeru
The steep slope of Mount Semeru

We did an hour break to cook breakfast, pack all the things and then continued way back to Ranu Pane. After reaching Ranu Kumbolo Lake I started to feel really tired and made breaks more often to take off the backpack and let my shoulders rest for a while. We arrived at the village totally exhausted but extremely satisfied.

The last step was to organize jeep transportation back to Tumpang and from there taxi to the hotel in Malang. As always in Indonesia, negotiate your price and try to join a group of other hikers to split the costs. We couldn’t find anyone and after tough haggling, the driver took us for 200 IDR / person.

Introduction

There are endless hiking possibilities in New Zealand and if you nature enthusiast, that’s the perfect country for you. I prefer camping, however, with the network of more than 950 backcountry huts operated by the Department of Conservation (DOC), carrying your own tent all the way is not always needed.

10 tracks with the status of the Great Walk are multiday adventures located in the most scenic landscapes in the country and providing hikers with good facilities. My story with them is rather simple. I went for one (Tongariro Northern Circuit) and I knew that I want to complete all of them.

North Island

Tongariro Northern Circuit

Distance: 41 km

Time: 2-4 days

Definitely my favorite walk on the North Island. It was also my first Great Walk after arrival to New Zealand so I’m still sentimental about it. Being a loop, there is no hassle with extra transportation so it’s also budget-friendly.

I was extremely lucky with the weather and even though I initially planned the hike for 3 days, I finished it in 2 days which is perfectly doable but tiring. Do it in 3 days or 4 days if you like a more relaxed pace.

The track meanders through the rugged volcanic landscape with cones of Mt Tongariro, Mt Ruapehu and Mt Ngauruhoe around you. It includes most of Tongariro Crossing which is a day hike done by most of the tourists coming to Tongariro National Park and this section can get crowded.

Don’t miss Blue Lake, Tama Lakes and Taranaki Falls as side trips. They are all worth it!

Read the full description of the track.

Lake Waikaremoana Track

Distance: 46 km

Time: 2-3 days

The track follows the shoreline of Lake Waikaremoana and if fairly easy except quite a steep uphill section between Onepoto and Panekire Hut (if walking from Onepoto) or Waiopaoa Hut and Panekire Hut (if walking from Hopuruahine Landing). Rainforest, waterfalls, beaches – you have it all here. Just don’t forget your swimwear!

I started the track at Onepoto and in this way covered the more difficult uphill section on the first day.

Whanganui Journey

Distance: 87 or 145 km

Time: 3-5 days

First of all, it’s not a walk. Unless you can walk on the water. If not, then grab a kayak or canoe, pack your things into waterproof containers and paddle your way down the Whanganui River.

The full version is 145 km long, starts at Taumarunui and finished in Pipiriki (5 days). If you are not such a big enthusiast of paddling, start at Whakahoro instead and cut the distance to 87 km (3 days).

It’s worth stopping at the Bridge to Nowhere, that was built in the times when soldiers coming back from World War I were granted land in the area. The land proved too difficult to cultivate and after building the bridge in the middle of the bush, the plans to continue with the road were abandoned. Therefore, today it’s quite a unique tourist attraction in the beautiful scenery.

South Island

Abel Tasman Coastal Track

Distance: 60 km

Time: 3-5 days

The trail goes along the coast and many hikers rate it as one of the easiest of Great Walks. There are several great campsites on the way where you can pitch your tent on the sand and even enjoy the shower. Jumping in the kayak and doing the whole route or only some fragments from the water perspective is a nice and popular alternative. It’s not a loop so at the end of the track, take a water taxi back to the starting point or if you have a couple of more days to spare, walk back via alternative inland track.

I did it over 3 days starting at Marahau and it seems to be an absolute minimum if you want to cover the whole distance. I camped at Onetahuti Bay and Totaranui. For more relaxed experience and longer breaks at the spectacular bays and beaches, plan 4 or 5 days.

There is one really critical tidal crossing at Aweroa that is passable 1.5 hours before and 2 hours after low tide under normal conditional. Therefore, plan your day accordingly and check tides hours online as there is no alternative way. For me, it was one of the most unique and breathtaking spots on the trail. Oystercatchers wandering around looking for food, a huge area with sand shaped by the water, hilly background and adventurous crossing on its own, sometimes with water above my knees.

Heaphy Track

Distance: 78.4 km

Time: 3-6 days

The longest and one of the most diverse of Great Walks. Being located in Kahurangi National Park, it takes not only good shape to tackle it, but you need extra cash to organize logistics. To come back from one trailhead to another, it’s a long bus trip that takes around 5 hours and costs over 100 NZD.

I hiked the track in 3 days. The first one was a mostly uphill walk in the mountainous area and forest. The second day was way flatter and the forest gave place to wide grasslands at the end arriving at the West Coast. On the last day, walking along the beach I got the chance to admire one of the most remote coasts that I have ever seen.

I spent the nights at Saxon and Heaphy campsites and both had superb location.

Outside of the Great Walks season (1 May – 30 November), it’s allowed to go on the track with a mountain bike.

Paparoa Track

Distance: 55 km

Time: 2-3 days

The only Great Walk that I didn’t experience but that’s because it’s a brand new one due to open in the second half of 2020. When I see its location on the West Coast, I have no doubts it’s on my bucket list for the second visit in New Zealand.

The track crosses the rainforest and the Paparoa Range. According to the Department of Conversation (DOC), mountain bikers are allowed as well.

Routeburn Track

Distance: 32 km

Time: 2-3 days

My favorite of 3 Great Walks in Fiordland National Park. It’s short but breathtaking and there are no boring sections. The weather on my first day was simply horrible with pouring rain and strong winds all the way. But if everything is booked…. gotta go 🙂 Luckily, it had a positive side too, as the passing dark clouds were extremely photogenic.

I spent the night at Lake MacKenzie campsite trying to dry my completely wet clothes at least a little bit. Of course, I failed.

The second day was much better and the sun welcomed me as soon as I opened the tent. After a full day of rain, the Earland Falls were so huge that I had to take a detour built for such situations.

It’s a great track for mountain enthusiasts. I recommend making a side trip to Key Summit which takes around 1.5-hour return. Leave your heavy backpack at the crossroad, there is no need to carry the things all the way up.

[update from DOC website as of 15.03.2020 – check regularly for further news]

The Routeburn Track partially reopens from 12 March 2020 as a new walking experience, named Routeburn Return. It’s a 4-day, 3-night hike beginning and ending at the Routeburn Shelter. This return journey starts and finishes near Glenorchy.

Routeburn Return replaces the Routeburn Great Walk, which is closed for the rest of the season due to storm damage.

The Routeburn Return route may be more challenging than the usual route because of changes in elevation and one of the days is longer than a usual Great Walks experience.

Kepler Track

Distance: 60 km

Time: 2-4 days

Being a circuit makes it easily accessible and budget-friendly. I did it over 2 days in a clockwise direction with overnight at Iris Burn but I must say it was pretty challenging and I finished completely exhausted.

The weather conditions in Fiordland National Park are pretty unpredictable which I experienced on the second day. The thin layer of snow was covering the ground and people coming from the other direction said that yesterday they were walking in a snowstorm. I was really lucky that DOC advised me to follow the clockwise direction!

There are limestone caves near the Luxmore Hut that make for a nice side trip. Take a torch!

Milford Track

Distance: 53.5 km

Time: 4 days

Only 40 independent hikers can start the track each day which makes it extremely difficult to book. I did it 4 months in advance, refreshing the page several days hoping for someone to cancel. I got lucky, but it’s also easier for solo travelers.

This time I left the tent in the car as camping on Milford Track is not allowed. Even though it’s only 53.5 km long, you need to stay in all 3 huts on the way. It has pros and cons. I could easily walk such a distance in 3 or even in 2 days. On the other hand, I was ‘forced’ to take it slowly having more time to appreciate nature. Which was just fine. However, the popularity of the track, lack of campsites and additional transport from one end to another, demand quite a big budget as for the hike in the mountains.

And even though it’s my least favorite of Great Walks in Fiordland National Park, there is still a lot to appreciate. Spectacular views from MacKinnon Pass, the highest waterfall in New Zealand – Sutherland Falls (580m) and of course plenty of wildlife.

Rakiura / Stewart Island

Rakiura Track

Rakiura National Park covers around 80% of the island and is home to the least crowded of Great Walks. I booked my camping tickets only 2 days before departure which would rather not be possible on other tracks in the middle of the season.

You will hike along sandy beaches and through the forest but the most interesting part is the chance to see the kiwi. It’s the best place in the whole of New Zealand to see its symbolic bird. Apparently it’s possible even in the daylight! I suggest waking up around midnight, taking headlight (best with the red light mode that doesn’t scare kiwi off) and walking quietly around the camp.

Read the full description of the track.

Introduction

Hiking 1 of 10 New Zealand’s Great walks will bring you close to the best thing this country has to offer. Its nature. But be warned! It’s addictive and most likely the first of your Great Walks won’t be the last. Many people get pulled in by the idea and complete them all. So did I.

It’s a perfect opportunity for beginners in multi-day hiking to test their limits. You will be away for 2-4 days having a glimpse on backcountry experience but you don’t need any hardcore survival skills. Breath-taking scenery will reward even the worst weather. And when you can be alone on a track for quite some, you will certainly meet great people on campsites and in huts.

Before you go, make sure you are well prepared and packed all the essentials!

The art of packing

Packing for long-distance hikes can be a pain, especially for beginners. In the end, we consider many items as essentials that may be useful on the way. But once it’s all packed, we quickly realize the backpack is way too heavy. Believe me, the weight of each extra item on your back will matter when you ascend another hill.

It’s hard to avoid first-timer mistakes and I did learn some lessons on my own skin as well. To be honest, with every next hike, I’m taking less and fewer things. Consider my packing list for New Zealand’s Great Walks but also observe and learn from your own experience.

The list describes the suggested equipment for Great Walks in the summer season. Needless to say, equipment is necessary for harsh winter conditions.

Routeburn Track, New Zealand
Routeburn Track

Food

There is nothing that you can buy on the track, therefore whatever you take you with, it needs to last for the entire duration of the hike. To be on the safe side, it’s even recommended to take a supply for an extra day, in case of an unexpected injury or difficult weather conditions.

After a long day of the walk, you want to set up your tent and eat something warm as soon as possible. Prepare high-energy value meal that you can easily heat up. Freeze-dried food is a good idea as it just requires boiling the water, but it’s expensive.

For the first hikes, I used the food produced by Backcountry Cousine. The selection is really big and the meals are tasty but to be honest, I had to buy the bigger pack with a portion for 2 people to be really full. A meal costs around 10-15 NZD.

Whatever you take, the rule is simple. Eat the heaviest stuff first and keep the lightweight meals for last days.

Abel Tasman Track, New Zealand

Breakfast:

  • Bread
    with jam, honey or peanut butter
  • Instant
    cereal with fruits or porridge
  • Biscuits
    with jam
  • Powdered
    milk
  • Banana
  • Tea
    or coffee

Lunch:

  • Bread
  • Cheese
  • Salami
  • Humous
  • Ready to eat sausages
  • Instant soup
  • Nuts and dried fruits
  • Tea or coffee

Dinner:

  • Instant rice or pasta
  • Tinned tuna or chicken
  • Instant soup
  • Freeze-dried meal
  • Tea or coffee

Snacks:

  • Chocolate
  • Muesli bars
  • Biscuits
  • Nuts
  • Frooze Balls

Equipment

Only if you camp:

For campsites and huts:

  • Backpack with a waterproof cover
    40-60L should be enough for a multiday hike.
  • Waterproof bag
    Used as extra protection inside your backpack to put electronics and spare clothes inside.
  • Sleeping bag
    It can get cold no matter what time of the year so 3-4 seasons sleeping bag would be perfect. In mid of February, the temperature on Kepler Track dropped to 2C in the night so I was happy my sleeping bag comfort rating was 0C. It’s much warmer if you sleep in a hut, though you still need a sleeping bag as there are only bunk beds with mattresses.
  • Drinking bottle 1-1.5 L
    Water is always available next to the huts and campsites. It’s rainwater, fine for drinking without treatment. If you have doubts, boil it first or use the Sawyer water filter.
  • Cooking pot
    I’m using MSR PocketRocket 2 Mini Stove Kit which proved to be great size and quality.
  • Gas stove
    Sometimes provided in huts, check in advance.
  • Fuel
    Sometimes provided in huts, check in advance.
  • Plastic cutlery
  • Cup
  • Sharp survival knife
  • Cleaning set
  • Matches / lighter
  • Light camera or phone with a camera
  • Power bank / spare camera battery
  • Bin bags
    Whatever you bring in to the national park, you have to bring it out and throw away when you reach civilization.
  • Hut/campsite tickets
    These have to be picked up at DOC visitor centre before you depart.
  • Map
    Can be found at DOC visitor centre as well.
  • Earplugs
    Useful especially in bunkrooms in huts.
Kepler Track, New Zealand
Kepler Track

Clothing

It rains quite often in New Zealand, therefore you need to be prepared for changing weather conditions. Not to mention the fact that in February I experienced snow on Kepler Track. Warms and waterproof clothes are essential to increase your comfort on the trail.

  • Boots that are comfortable and well broken in
    Shoes are the most important element of your clothing, especially when hiking in the mountains with a heavy backpack. Your comfort and safety depend on them. Make sure that they are top-class shoes that you trust. For all Great Walks, I used La Sportiva TX5. Even though it took quite a while to break them in, they are extremely light, comfortable and provide great stabilization for my feet.
  • Raincoat with hood
  • Trousers
  • Waterproof over trousers
  • Jumper or sweater
    For cold mornings and evening or even for sleeping in case your sleeping bag is not warm enough.
  • T-shirt (at least 2)
  • Long sleeve shirt
  • Pair of thermals
  • Shorts
  • Buff
    It’s light and can be worn on the head, neck or wrist.
  • Flip flops / lightweight shoes for a campsite
    You will want to let your feet rest from heavy boots and feel more comfortable while hanging around campsite or hut.
  • Hiking socks
    I recommend taking an extra pair. Nothing is worse than wet feet.
  • Underwear
  • Hat
  • Gloves
    Rather for mountain tracks only.
  • Swimwear
    May be useful especially on Abel Tasman Track or Rakiura Track.
  • Extra clothes for sleeping
  • Sunglasses

Toiletries

  • Toothpaste
  • Toothbrush
  • Wet tissues
  • Toilet paper
  • Hand sanitizer
  • Soap
    There are usually sinks with rainwater next to the huts so you can use them for basic needs.
  • Small quick-dry towel
    May be useful especially on Abel Tasman Track or Rakiura Track.

Safety

  • Flashlight (headlight is the best)
  • Spare batteries
  • First aid incl. antiseptic, pain killers, bandages, blisters kit, personal meds
  • Insect repellent
  • Sunscreen
  • Spare matches / lighter in a waterproof container
  • Spare set of warm clothes
  • Whistle
  • Personal documents (ID, passport) in a waterproof bag

I wouldn’t say that personal locator beacon is really needed on Great Walks. The trail is well marked and it would be difficult to get lost. Before you go, just tell someone about your plans and how long you plan to be on a trail.

Milford Track, New Zealand

Do you have your favourite items that you take with you on multiday hikes? Let me know in the comments!

Introduction

Due to limited time, most travellers focus only on visiting New Zealand’s North and South Islands, excluding the third biggest Stewart Island/Rakiura from their itineraries. At first, I didn’t plan to visit the island and hike Rakiura Track either. However, after my first Great Walk – Tongariro Northern Circuit, I totally fell in love with long-distance treks. I instantly thought I want to have them all in my collection of memories from New Zealand.

Rakiura Track is the shortest and certainly the easiest of all Great Walks. It’s a 32 km loop in the Eastern part of the island. Department of Conservation (DOC) suggests 3 days itinerary but the track can be done by an average hiker in 2 days without a problem. Some do it in 1 day, even though I don’t recommend that option as it will be extremely rushed.

The big benefit (especially when heading from Fiordland) is that Rakiura Track is the cheapest Great Walk to do and the easiest to organize. I booked the campsite just 1 day in advance which would be highly unlikely on any other Great Walk.

Stewart Island/Rakiura

Rakiura National Park

The park was established in 2002 and is made of over 80% of the island’s territory. On the track, you will encounter information boards about early Maori settlements especially around Maori Beach and Port William as well as relicts of sawmilling industry which lasted until 1931. Some parts cross the Maori land which has been shared for the public use by the courtesy of its owners.

How to get to Stewart Island?

There are 2 options to get to Stewart Island: ferry or plane.

Ferry service is operated by Stewart Island Experience. Depending on the season, it goes 2, 3 or 4 times a day. The crossing takes 1 hour and regular ticket costs 89 NZD one way or 159 NZD return. Always make a booking in advance. I didn’t and the ferry that I planned to take the next morning was fully booked. There is free parking just in front of the terminal in Bluff. The crossing can be quite bumpy, so better get your meal not before but after the arrival to Oban.

Flights are operated by Stewart Island Flights and leave Invercargill 3 times per day. It’s definitely faster (20 minutes) and more scenic way to arrive in Oban. As usually in New Zealand, it comes with the price and will hit the budget significantly with 130 NZD for a one-way ticket or 220 NZD return.

Overnight in Oban

If arriving in the afternoon, it’s worth to spend the night in Oban and start the track the next morning. Bunkers Backpackers Hostel is an excellent choice.

Clockwise or anticlockwise?

There is not much difference in which direction you start the hike. Deciding for 2 days itinerary, it’s up to you if longer and harder part should be done on the first or the second day of the hike.

If starting in the anticlockwise direction, make your way from Oban towards starting point at Lee Bay (5km). Otherwise, your starting point will be at the Fern Gully Road end (2km from Oban).

Weather

Due to its location, Stewart Island/Rakiura is exposed to even more changeable weather than the rest of New Zealand. It’s best to monitor the conditions on MetService. Strong winds and heavy rains are known on this track and can occur at any time of the year. After rains, be prepared to walk in deep mud. It’s worth dropping by to DOC office to reconfirm the weather conditions and ask for recommendations.

1,2 or 3 days?

Technically it is possible to do the track in one day, however, it would be a very long and very tough day. Start at sunrise is essential and you will finish around dusk, with not too much time for breaks along the way.

More popular versions are the ones over 2 or 3 days.

I did the track in 2 days and it was optimal time, giving the chance to have a break, take in all the sights and camp in the middle of the forest with the best chance in New Zealand to spot a kiwi in natural habitat.

3 days would be a bit too much for me, nevertheless, if you prefer to take your time, do sunbathing and picnicking on the way, then it’s a great opportunity.

Huts and campsites

The Great Walk season on Stewart Island/Rakiura begins usually at the beginning of October and lasts until the end of April. Bookings for huts and campsites are required year-round.

Booking can be done at the Department of Conservation website. Once on the island, don’t forget to drop by to DOC office in Oban to pick up the tickets and re-check weather conditions.

Both huts and campsites have pros and cos. Doing all of Great Walks, I used huts only on Milford Track and that’s because camping there is forbidden. I like to feel that I am totally independent and rely only on own supplies and equipment. Moreover, camping gives more flexibility to re-schedule the hike when the weather turns bad. Huts are rather booked out weeks in advance, especially on the most popular tracks. Camping on Rakiura Track gives you also better chance to spot the kiwi and hear all the sounds of the forest in the night.

Great Walks huts have bunk beds, mattresses, heating, toilets and cold water. Campings comes with water supply, cooking shelter, sinks and toilets.

List of huts and campsites

There are 2 huts and 3 campsites along the track. As for all Great Walks, overnight stays must be booked in advance and tickets should be picked up at DOC office in Oban before departure. As the track is the least popular of all Great Walks, there is usually no need of booking months in advance, however, do monitor the situation to avoid disappointment.

Maori Beach Campsite – besides being a grassy campsite close to the beach, it’s also the historic site where you can learn about remains of sawmill industry present on the island until 1931. It’s only a few kilometres from Oban so not many hikers stay here. There are 16 camping spots.

Port William Hut and Campsite – popular overnight stop located 8.1 kilometres from the trailhead at Lee Bay. If offers 24 bunk beds and 16 camping spots.

North Arm Hut and Campsite – from my point of view, the best place for the night on a track located only a stone’s throw away from Paterson Inlet. It offers 24 bunk beds and 16 camping spots.

Pricing

In the Great Walk season (1 October – 30 April) the prices are as follows:

Huts: 24 NZD per adult per night, 17 years old and under free (booking still required)

Campsites: 6 NZD per adult per night, 17 years old and under free (booking still required)

Outside of the season ( 1 May – 30 September), the price for a hut drops to 22 NZD. Price for campsite doesn’t change.

Track details and profile

Distance: 32 km (loop)

Time: 1-3 days

Rakiura Track elevation
www.doc.govt.nz

The track profile and other useful details can be found inside the Department of Conservation (DOC) brochure.

The following itinerary assumes 2 nights on a track which will give you plenty of time to relax, take a swim and enjoy nature. I did the track with only one overnight stay at North Arm Campsite (departing from Oban towards Lee Bay).

Stage 1 – From Lee Bay to Port William Hut and Campsite (3-4h, 8.1km)

The day at Oban started with perfect weather and I dropped by to DOC office to pick up the map and tickets for the campsite. Then I followed the road towards Lee Bay (5 kilometres). Alternatively, it’s possible to take a taxi and save the legs, but it’s a pleasant walk through the village. The chain-link sculpture at Lee Bay is the official beginning of the track and symbolizes one of the Maori legends. It’s the story of Maui, who used South Island as his canoe and Stewart Island/Rakiura as the anchor to fish the North Island.

Stewart Island/Rakiura

From here, the track continues along the coast to Maori Beach. It’s a perfect place for a snack and swim. The campsite is just right next to the beach and it’s much less crowded than the one at Port William, so if you like peace and silence, consider staying here overnight.

Stewart Island/Rakiura

For me, it wasn’t the time to rest yet and I continued further across the swing bridge and then to the turn off to Port William Hut and Campsite. Even though it wasn’t my overnight stopover, I dropped my backpack in the bushes, took my lunch and went there to eat and relax. It’s 40 minutes off the main track and as it was still early hour, not too many hikers were there. Two women were chilling on the grass in front of the hut and one of them happened to be half Polish so we had a nice chat in my native language.

Stewart Island/Rakiura

Stage 2 – From Port William Hut and Campsite to North Arm Hut and Campsite (4-6h, 13km)

The second stage became harder but not because of its steepness but rather constant need to jump over the mud. In parts, it’s necessary to get off the main track and take a detour through the bush. Honestly, it was quite a boring couple of kilometres. It’s just the path through the forest like any other in New Zealand, where the only highlights were passing by the old log hauler once used to drag trees to the gullies seeing… a stick insect.

Stewart Island/Rakiura

Upon arrival to North Arm Campsite, I was greeted by a Kiwi couple. We cooked our freeze-dried food made by Backcountry Cousine and had a nice chat. The guy was a real badass as in his late 50’s he finished Te Araroa Track which is 3.000 kilometres long hike from the very top of North Island to the very bottom of South Island. I really hope to follow his example when I am at his age.

I still had over an hour before the sunset and there is a nice place to relax behind the hut. Just follow the path down towards Paterson Inlet. Have a swim or just put your feet to the water and wait for the low tide to come.

Stage 3 – From North Arm Hut and Campsite to Oban (13 km)

In the morning of the next day, the weather changed significantly. It started to get windy and kiwi guy said that according to forecast, it’s gonna rain at 1 pm. I left the campsite at 7:30 am to be able to arrive in Oban before it gets wet. The easy path through the forest led me to the junction, where I took Ryan’s Creek Track for a more scenic detour to Fern Gully Carpark. It adds only around 1.5 hours to already quite an easy day.

Stewart Island/Rakiura

From Fern Gully Carpark, which is the end of the track, it’s another 2 kilometres to Oban. I checked in again to Bunkers Backpackers Hostel and enjoyed one of the most amazing sunsets in New Zealand.

Stewart Island/Rakiura

Don’t miss!

Dark Sky Sanctuary & Aurora Australis

Rakiura in the Maori language means ‘the land of glowing skies’. You will understand why. Stewart Island/Rakiura is one of the International Dark Night Sanctuaries and with clear skies, it’s a spectacle on the sky. Moreover, around winter you have good chances to see Southern Lights also known as Aurora Australis.

Kiwi spotting

There are less than 40 human inhabitants of Stewart Island/Rakiura. How about kiwis? Well, the estimated population is 20.000. It makes the island the best place to see kiwis in their natural environment. To be precise, the species is the southern brown kiwi. While in other parts of New Zealand kiwis are nocturnal, on Stewart Island/Rakiura they can be also spotted in daylight!

I got lucky as well. I set an alarm for midnight, took my flashlight and went for a short walk on a track, from where I came the previous day. I was walking very slowly, focusing on all the little noises in the bushes. Suddenly, I heard something and stopped moving for at least 15 minutes. I could clearly hear the movement closer and closer. The kiwi was walking perfectly towards me, probably curious about my flashlight. I had the one with white light but the best would be using the red light mode, so it doesn’t scare the kiwis off.

Kiwi on Stewart Island/Rakiura

It was quite a brave kiwi. At some point it was just at my feet, touching my shoelaces with his beak. Realizing that it’s not eatable, he continued his night journey through the forest. So did I, coming back to the tent to fell asleep completely satisfied with the night encounter.

Is it worth hiking Rakiura Track?

It’s definitely not that scenic as other Great Walks. However, there are things making up for it. Night walks in the forest in search for kiwis, spectacular sunrises and even more spectacular sunsets, dark skies and the chance to see Southern Lights. Due to the distance and advancement level, Rakiura Track is probably the best Great Walk for newbie hiker. And if you are experienced and want to go through muddy tracks even further, it’s possible to hike North West Circuit (125 km, 9-11 days) or Southern Circuit (71.5 km, 4-6 days).

Enjoy!

For questions, contact me on pinyourfootsteps@gmail.com